Exit
  • Global community
    • Language:
      • Deutsch
      • English
      • Español
      • Français
      • Português
  • 日本語コミュニティ
  • 한국 커뮤니티
2

Batch process one image into multiple sized frames

Explorer ,
Feb 12, 2024 Feb 12, 2024

Please help with advice on the quickest way to do the following:
I have 1000 .jpg portrtaits, all the same size. I want to take one portrait at a time and place it in say four different sized frames on one file, and save this as a new file/.jpg. Essentially, allowing me to print an A4 sized print which will have an A5, A6, A7 and A8 sized portrait on it. NB the A6 and A8 frames are rotated to horizontal to be able to fit in the layout:

IMG_9887.jpgexpand image
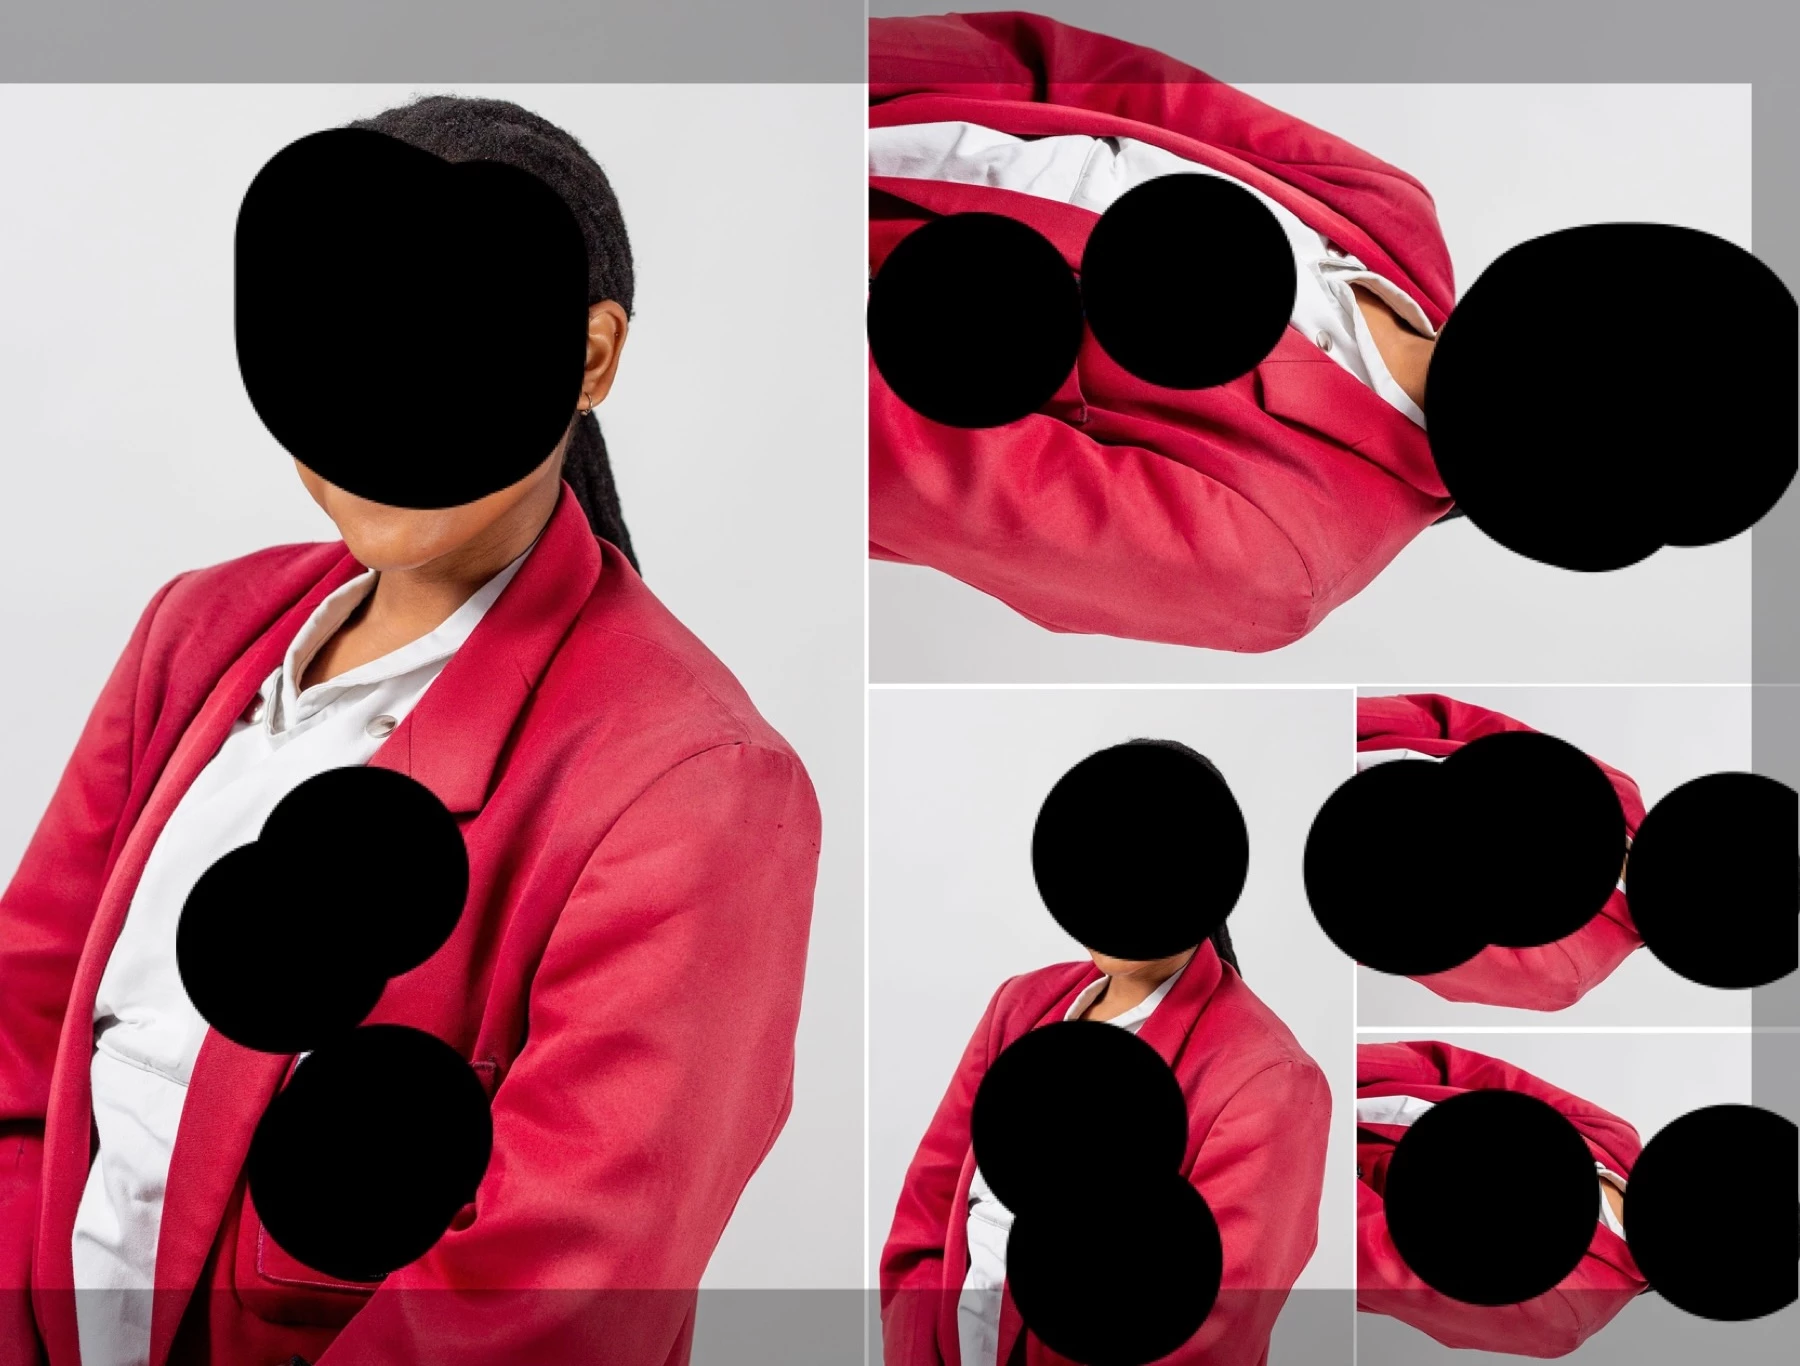
I have created a template with the different sized frames as holders. 

TOPICS
Actions and scripting
1.4K
Translate
Report
Community guidelines
Be kind and respectful, give credit to the original source of content, and search for duplicates before posting. Learn more
community guidelines

correct answers 2 Correct answers

Community Expert , Feb 12, 2024 Feb 12, 2024

This updated 1.2 version adds overall sharpening (this will increase the processing time):


/*
Picture Package from Linked Smart Object Template PSD.jsx
v1.2 - 14th February 2024, Stephen Marsh
https://community.adobe.com/t5/photoshop-ecosystem-discussions/batch-process-one-image-into-multiple-sized-frames/td-p/14417350
Notes:
* The template file must be called 'Picture Package Template.psd'
* There must be existing linked smart object images in each frame
* All files must be the same pixel wid
...
Translate
Community Expert , Feb 14, 2024 Feb 14, 2024

I didn't spot this before in your screenshot, see the notes of the various conditions that need to be in place:


* There must be existing linked smart object images in each frame


and


* All files must be the same pixel width and height - and the same PPI resolution
* There must be a layer named 'Frame 1' containing a linked smart object
* Remaining frame layers must use the same linked smart object as found in 'Frame 1'


The frames can't be empty, there needs to be an existing placeholder ima

...
Translate
Adobe
Community Expert ,
Feb 12, 2024 Feb 12, 2024

Please provide a copy of the template PSD, or at least a screenshot of the layers.


It's a shame that Adobe never returned the Picture Package feature.

Translate
Report
Community guidelines
Be kind and respectful, give credit to the original source of content, and search for duplicates before posting. Learn more
community guidelines
Explorer ,
Feb 12, 2024 Feb 12, 2024

Thank you for your reply. Herewith a screenshot of the layers and blank template:

StephenCPhotography_0-1707740915863.pngexpand image


Translate
Report
Community guidelines
Be kind and respectful, give credit to the original source of content, and search for duplicates before posting. Learn more
community guidelines
Community Expert ,
Feb 12, 2024 Feb 12, 2024

There is no PSD, it would help if you could upload it, thanks.


P.S. Will all future images have the same pixel width, height and PPI value? In other words, is the input to the frames consistent, or will it be inconsistent? If the image input is consistent, what is the pixel width, height and PPI value?

Translate
Report
Community guidelines
Be kind and respectful, give credit to the original source of content, and search for duplicates before posting. Learn more
community guidelines
Explorer ,
Feb 12, 2024 Feb 12, 2024

Hi, here's the .psd – it my setup template, happy to have it adjusted as needed.
The images are of the same aspet ratio and will be exported with all the same settings – not done yet so open to suggestions which would be best suited to this project. Must just be of photo print quality.

Translate
Report
Community guidelines
Be kind and respectful, give credit to the original source of content, and search for duplicates before posting. Learn more
community guidelines
Explorer ,
Feb 12, 2024 Feb 12, 2024

Yes! Picture Package is exactly what I need 😞 

Translate
Report
Community guidelines
Be kind and respectful, give credit to the original source of content, and search for duplicates before posting. Learn more
community guidelines
Community Expert ,
Feb 12, 2024 Feb 12, 2024

I can think of ways to do this with Smart Objects (each image size is a copy of the same linked Smart Object so replacing the linked file in one updates all of the sizes on the layout), but that would be inefficient to do by hand with 1000 images, so would this be a good way to use Photoshop variables? (Photoshop data-driven graphics)


I haven’t actually tried this, but because each image on the sheet is a layer, could each layer in one layout be associated with a spreadsheet field with the same JPEG filename in the spreadsheet, then you just hand Photoshop the folder of images and the spreadsheet and Photoshop auto-generates all the layouts?

Translate
Report
Community guidelines
Be kind and respectful, give credit to the original source of content, and search for duplicates before posting. Learn more
community guidelines
Community Expert ,
Feb 12, 2024 Feb 12, 2024
quote

I can think of ways to do this with Smart Objects (each image size is a copy of the same linked Smart Object so replacing the linked file in one updates all of the sizes on the layout), but that would be inefficient to do by hand with 1000 image...


By Conrad_C


Conrad, this is exactly the method that I was going to explore via scripting!  :]

Translate
Report
Community guidelines
Be kind and respectful, give credit to the original source of content, and search for duplicates before posting. Learn more
community guidelines
Community Expert ,
Feb 12, 2024 Feb 12, 2024

This is a great idea, but I see a minor issue based on the original screenshot with images. The data sets do not allow us to control the orientation.

Translate
Report
Community guidelines
Be kind and respectful, give credit to the original source of content, and search for duplicates before posting. Learn more
community guidelines
Community Expert ,
Feb 12, 2024 Feb 12, 2024

@StephenC Photography 


Notes (original code updated to a 1.1 version):
* The template file must be called 'Picture Package Template.psd'
* There must be existing linked smart object images in each frame
* All files must be the same pixel width and height - and the same PPI resolution
* There must be a layer named 'Frame 1' containing a linked smart object
* Remaining frame layers must use the same linked smart object as found in 'Frame 1'
* A sub-directory in the input directory will be created titled 'Picture Packages'
* JPEG picture packages saved to the 'Picture Packages' directory will silently overwrite existing files of the same name


/*
Picture Package from Linked Smart Object Template PSD.jsx
v1.1 - 14th February 2024, Stephen Marsh
https://community.adobe.com/t5/photoshop-ecosystem-discussions/batch-process-one-image-into-multiple-sized-frames/td-p/14417350
Notes:
* The template file must be called 'Picture Package Template.psd'
* There must be existing linked smart object images in each frame
* All files must be the same pixel width and height - and the same PPI resolution
* There must be a layer named 'Frame 1' containing a linked smart object
* Remaining frame layers must use the same linked smart object as found in 'Frame 1'
* A sub-directory in the input directory will be created titled 'Picture Packages'
* JPEG picture packages saved to the 'Picture Packages' directory will silently overwrite existing files of the same name
*/

#target photoshop

if (app.documents.length) {

    if (app.activeDocument.name == "Picture Package Template.psd") {

        var origDialogs = app.displayDialogs;
        app.displayDialogs = DialogModes.NO;

        // Hide the Photoshop panels
        app.togglePalettes();

        // Script Execution Timer - Function    
        var timeDiff = {
            setStartTime: function () {
                d = new Date();
                time = d.getTime();
            },
            getDiff: function () {
                d = new Date();
                t = d.getTime() - time;
                time = d.getTime();
                return t;
            }
        };

        // Script Execution Timer - Start    
        timeDiff.setStartTime();

        // Set the file processing counter
        var fileCounter = 0;

        // Select the input folder
        var inputFolder = Folder.selectDialog("Please select the input folder:");

        // Limit the input files to JPG/JPEG extensions
        var fileList = inputFolder.getFiles(/\.(jpg|jpeg)$/i);

        // Alphabetical sort
        fileList.sort();

        // Input folder sub-folder
        var destinationDir = new Folder(inputFolder + "/" + "Picture Packages")
        if (!destinationDir.exists) {
            destinationDir.create();
        }

        // Loop over the input folder files
        for (var i = 0; i < fileList.length; i++) {

            try {
                // Select Frame 1
                app.activeDocument.activeLayer = app.activeDocument.layers["Frame 1"];

                // Relink
                var idplacedLayerRelinkToFile = stringIDToTypeID( "placedLayerRelinkToFile" );
                var desc384 = new ActionDescriptor();
                var idnull = stringIDToTypeID( "null" );
                desc384.putPath( idnull, new File(fileList[i].fsName) );
                var idlayerID = stringIDToTypeID( "layerID" );
                desc384.putInteger( idlayerID, 39 );
                executeAction( idplacedLayerRelinkToFile, desc384, DialogModes.NO );

            } catch (e) {
                alert("Error!" + "\r" + e + ' ' + e.line);
            }

            // JPEG Save
            var fileName = fileList[i].fsName.replace(/(^.+\/)(.+)(\.[^\.]+$)/, '$2')
            var jpgSave = new File(destinationDir + "/" + fileName + "_Picture_Package.jpg");
            var jpgOptns = new JPEGSaveOptions();
            jpgOptns.formatOptions = FormatOptions.STANDARDBASELINE;
            jpgOptns.embedColorProfile = true;
            jpgOptns.matte = MatteType.NONE;
            jpgOptns.quality = 10;
            app.activeDocument.saveAs(jpgSave, jpgOptns, true, Extension.LOWERCASE);

            fileCounter++;
        }

        // End of script
        app.displayDialogs = origDialogs;
        app.togglePalettes();
        app.beep();
        alert('Script completed!' + '\r' + fileCounter + ' files processed' + '\r' + '(' + timeDiff.getDiff() / 1000 + ' seconds)');

    } else {
        alert("The active document isn't named 'Contact Sheet Template.psd'...");
    }

} else {
    alert("The 'Contact Sheet Template.psd' document must be open!");
}


https://prepression.blogspot.com/2017/11/downloading-and-installing-adobe-scripts.html


Translate
Report
Community guidelines
Be kind and respectful, give credit to the original source of content, and search for duplicates before posting. Learn more
community guidelines
Community Expert ,
Feb 12, 2024 Feb 12, 2024

This updated 1.2 version adds overall sharpening (this will increase the processing time):


/*
Picture Package from Linked Smart Object Template PSD.jsx
v1.2 - 14th February 2024, Stephen Marsh
https://community.adobe.com/t5/photoshop-ecosystem-discussions/batch-process-one-image-into-multiple-sized-frames/td-p/14417350
Notes:
* The template file must be called 'Picture Package Template.psd'
* There must be existing linked smart object images in each frame
* All files must be the same pixel width and height - and the same PPI resolution
* There must be a layer named 'Frame 1' containing a linked smart object
* Remaining frame layers must use the same linked smart object as found in 'Frame 1'
* A sub-directory in the input directory will be created titled 'Picture Packages'
* JPEG picture packages saved to the 'Picture Packages' directory will silently overwrite existing files of the same name
* A temporary sharpening layer was added, however this will increase the processing time
*/

#target photoshop

if (app.documents.length) {

    if (app.activeDocument.name == "Picture Package Template.psd") {

        var origDialogs = app.displayDialogs;
        app.displayDialogs = DialogModes.NO;

        // Hide the Photoshop panels
        app.togglePalettes();

        // Script Execution Timer - Function    
        var timeDiff = {
            setStartTime: function () {
                d = new Date();
                time = d.getTime();
            },
            getDiff: function () {
                d = new Date();
                t = d.getTime() - time;
                time = d.getTime();
                return t;
            }
        };

        // Script Execution Timer - Start    
        timeDiff.setStartTime();

        // Set the file processing counter
        var fileCounter = 0;

        // Select the input folder
        var inputFolder = Folder.selectDialog("Please select the input folder:");

        // Limit the input files to JPG/JPEG extensions
        var fileList = inputFolder.getFiles(/\.(jpg|jpeg)$/i);

        // Alphabetical sort
        fileList.sort();

        // Input folder sub-folder
        var destinationDir = new Folder(inputFolder + "/" + "Picture Packages")
        if (!destinationDir.exists) {
            destinationDir.create();
        }

        // Loop over the input folder files
        for (var i = 0; i < fileList.length; i++) {

            try {
                // Select Frame 1
                app.activeDocument.activeLayer = app.activeDocument.layers["Frame 1"];

                // Relink
                var idplacedLayerRelinkToFile = stringIDToTypeID( "placedLayerRelinkToFile" );
                var desc384 = new ActionDescriptor();
                var idnull = stringIDToTypeID( "null" );
                desc384.putPath( idnull, new File(fileList[i].fsName) );
                var idlayerID = stringIDToTypeID( "layerID" );
                desc384.putInteger( idlayerID, 39 );
                executeAction( idplacedLayerRelinkToFile, desc384, DialogModes.NO );

            } catch (e) {
                alert("Error!" + "\r" + e + ' ' + e.line);
            }

            // Temp sharpen layer
            app.activeDocument.activeLayer = app.activeDocument.layers[0];
            var idmergeVisible = stringIDToTypeID( "mergeVisible" );
            var desc1416 = new ActionDescriptor();
            var idduplicate = stringIDToTypeID( "duplicate" );
            desc1416.putBoolean( idduplicate, true );
            executeAction(idmergeVisible, desc1416, DialogModes.NO);
            //
            app.activeDocument.activeLayer.blendMode = BlendMode.LUMINOSITY;
            //
            var idset = stringIDToTypeID("set");
            var desc1429 = new ActionDescriptor();
            var idnull = stringIDToTypeID("null");
            var ref151 = new ActionReference();
            var idlayer = stringIDToTypeID("layer");
            var idordinal = stringIDToTypeID("ordinal");
            var idtargetEnum = stringIDToTypeID("targetEnum");
            ref151.putEnumerated(idlayer, idordinal, idtargetEnum);
            desc1429.putReference(idnull, ref151);
            var idto = stringIDToTypeID("to");
            var desc1430 = new ActionDescriptor();
            var idblendRange = stringIDToTypeID("blendRange");
            var list124 = new ActionList();
            var desc1431 = new ActionDescriptor();
            var idchannel = stringIDToTypeID("channel");
            var ref152 = new ActionReference();
            var idchannel = stringIDToTypeID("channel");
            var idchannel = stringIDToTypeID("channel");
            var idgray = stringIDToTypeID("gray");
            ref152.putEnumerated(idchannel, idchannel, idgray);
            desc1431.putReference(idchannel, ref152);
            var idsrcBlackMin = stringIDToTypeID("srcBlackMin");
            desc1431.putInteger(idsrcBlackMin, 0);
            var idsrcBlackMax = stringIDToTypeID("srcBlackMax");
            desc1431.putInteger(idsrcBlackMax, 0);
            var idsrcWhiteMin = stringIDToTypeID("srcWhiteMin");
            desc1431.putInteger(idsrcWhiteMin, 255);
            var idsrcWhiteMax = stringIDToTypeID("srcWhiteMax");
            desc1431.putInteger(idsrcWhiteMax, 255);
            var iddestBlackMin = stringIDToTypeID("destBlackMin");
            desc1431.putInteger(iddestBlackMin, 0);
            var iddestBlackMax = stringIDToTypeID("destBlackMax");
            desc1431.putInteger(iddestBlackMax, 0);
            var iddestWhiteMin = stringIDToTypeID("destWhiteMin");
            desc1431.putInteger(iddestWhiteMin, 0);
            var iddesaturate = stringIDToTypeID("desaturate");
            desc1431.putInteger(iddesaturate, 255);
            var idblendRange = stringIDToTypeID("blendRange");
            list124.putObject(idblendRange, desc1431);
            desc1430.putList(idblendRange, list124);
            var idlayer = stringIDToTypeID("layer");
            desc1429.putObject(idto, idlayer, desc1430);
            executeAction(idset, desc1429, DialogModes.NO);
            //
            var idunsharpMask = stringIDToTypeID( "unsharpMask" );
            var desc1433 = new ActionDescriptor();
            var idamount = stringIDToTypeID( "amount" );
            var idpercentUnit = stringIDToTypeID( "percentUnit" );
            desc1433.putUnitDouble( idamount, idpercentUnit, 150.000000 ); // Amount
            var idradius = stringIDToTypeID( "radius" );
            var idpixelsUnit = stringIDToTypeID( "pixelsUnit" );
            desc1433.putUnitDouble( idradius, idpixelsUnit, 1.000000 ); // Radius
            var idthreshold = stringIDToTypeID( "threshold" );
            desc1433.putInteger( idthreshold, 4 ); // Threshold
            executeAction( idunsharpMask, desc1433, DialogModes.NO );

            // JPEG Save
            var fileName = fileList[i].fsName.replace(/(^.+\/)(.+)(\.[^\.]+$)/, '$2')
            var jpgSave = new File(destinationDir + "/" + fileName + "_Picture_Package.jpg");
            var jpgOptns = new JPEGSaveOptions();
            jpgOptns.formatOptions = FormatOptions.STANDARDBASELINE;
            jpgOptns.embedColorProfile = true;
            jpgOptns.matte = MatteType.NONE;
            jpgOptns.quality = 10;
            app.activeDocument.saveAs(jpgSave, jpgOptns, true, Extension.LOWERCASE);

            // Remove the temp sharpen layer
            app.activeDocument.activeLayer.remove();

            fileCounter++;
        }

        // End of script
        app.displayDialogs = origDialogs;
        app.togglePalettes();
        app.beep();
        alert('Script completed!' + '\r' + fileCounter + ' files processed' + '\r' + '(' + timeDiff.getDiff() / 1000 + ' seconds)');

    } else {
        alert("The active document isn't named 'Contact Sheet Template.psd'...");
    }

} else {
    alert("The 'Contact Sheet Template.psd' document must be open!");
}


Translate
Report
Community guidelines
Be kind and respectful, give credit to the original source of content, and search for duplicates before posting. Learn more
community guidelines
Explorer ,
Feb 13, 2024 Feb 13, 2024

Many thanks for this! From what I understand, the above needs to be copied into Apple Script Editor and then compiled. Trying that I get a syntax error, "Expected expression, property or key form, etc. but found unknown token.". Adobe tell me I can record my key strokes to a script when setting up my layout, and the run that script within the batch process. I am trying to do this - just hitting a few snags 😛 trial and error.

Translate
Report
Community guidelines
Be kind and respectful, give credit to the original source of content, and search for duplicates before posting. Learn more
community guidelines
Community Expert ,
Feb 13, 2024 Feb 13, 2024
quote

Many thanks for this! From what I understand, the above needs to be copied into Apple Script Editor and then compiled. Trying that I get a syntax error, "Expected expression, property or key form, etc. but found unknown token."


By StephenC Photography


No, that isn't correct, the code is ExtendScript/JavaScript, not AppleScript.


  1. Copy the code text to the clipboard
  2. Open a new blank file in a plain-text editor (not in a word processor)
  3. Paste the code in
  4. Save as a plain text format file – .txt
  5. Rename the saved file extension from .txt to .jsx
  6. Install or browse to the .jsx file to run


https://prepression.blogspot.com/2017/11/downloading-and-installing-adobe-scripts.html


Translate
Report
Community guidelines
Be kind and respectful, give credit to the original source of content, and search for duplicates before posting. Learn more
community guidelines
Explorer ,
Feb 13, 2024 Feb 13, 2024

Right! thanks, got that sorted. This is amazing!!
I am now getting the following error after selecting to run the script under File, Scripts, and the input folder name. I have Adobe PS 2024 25.4.0

StephenCPhotography_0-1707835113865.pngexpand image


Translate
Report
Community guidelines
Be kind and respectful, give credit to the original source of content, and search for duplicates before posting. Learn more
community guidelines
Community Expert ,
Feb 13, 2024 Feb 13, 2024

@StephenC Photography 


I usually develop in Ps 2021.


I have updated the original 1.0 code to a 1.1 version and the second sharpening version from 1.1 to 1.2, both dated 14th February 2024.


I have tested in Ps 2021 (22.5.9) and 2024 (25.3.1) without issue.


Translate
Report
Community guidelines
Be kind and respectful, give credit to the original source of content, and search for duplicates before posting. Learn more
community guidelines
Community Expert ,
Feb 14, 2024 Feb 14, 2024

I didn't spot this before in your screenshot, see the notes of the various conditions that need to be in place:


* There must be existing linked smart object images in each frame


and


* All files must be the same pixel width and height - and the same PPI resolution
* There must be a layer named 'Frame 1' containing a linked smart object
* Remaining frame layers must use the same linked smart object as found in 'Frame 1'


The frames can't be empty, there needs to be an existing placeholder image in all frames for the replacement to work.


P.S. The script could have the required template name changed from 'Picture Package Template.psd' to 'A5_Jumbo_A7_A8 template.psd'.


I'm guessing that the previous code was fine, it's just that there wasn't an image to swap!

Translate
Report
Community guidelines
Be kind and respectful, give credit to the original source of content, and search for duplicates before posting. Learn more
community guidelines
Community Expert ,
Feb 15, 2024 Feb 15, 2024

@StephenC Photography 


So how did things go?

Translate
Report
Community guidelines
Be kind and respectful, give credit to the original source of content, and search for duplicates before posting. Learn more
community guidelines
Explorer ,
Feb 16, 2024 Feb 16, 2024

Yes!! I got it working!! Thank you soo so much 😄 But...I can only with portrait oriented photos. I need these horizontally positioned photos (x3 in the below image) too and I can't get the 'Place linked' image to rotate 90 degrees inside the frame. Any ideas?

StephenCPhotography_0-1708083254242.pngexpand image


Many many thanks!

Lucinda 


Translate
Report
Community guidelines
Be kind and respectful, give credit to the original source of content, and search for duplicates before posting. Learn more
community guidelines
Explorer ,
Feb 16, 2024 Feb 16, 2024

Fixed! I got it working (my lack of skills delaying me!) perfectly. You're a super star. Thanks for your patience xx

Translate
Report
Community guidelines
Be kind and respectful, give credit to the original source of content, and search for duplicates before posting. Learn more
community guidelines
Community Expert ,
Feb 16, 2024 Feb 16, 2024

Glad you got there! Yes, the images need to be rotated via the Properties panel either 90° or -90° in the frame before being swapped out by the script.

Translate
Report
Community guidelines
Be kind and respectful, give credit to the original source of content, and search for duplicates before posting. Learn more
community guidelines
Explorer ,
Feb 16, 2024 Feb 16, 2024
LATEST

Thank you! I'm so stoked 😄 

Translate
Report
Community guidelines
Be kind and respectful, give credit to the original source of content, and search for duplicates before posting. Learn more
community guidelines