- Home
- Photoshop ecosystem
- Discussions
- Re: Best way to remove the red tint/noise in shado...
- Re: Best way to remove the red tint/noise in shado...
Copy link to clipboard
Copied
Recently I took a picture of the milky way from inside a cave.
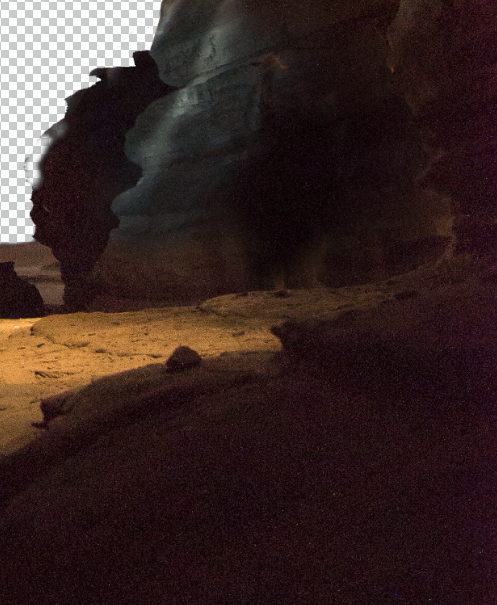
I've processed everything how I wanted and it looks great on the web but now I need to print a large version of it (700mm on shortest edge). After going back into the file I noticed a ton of redish colour in the shadows of the image around the edge of the cave (as seen below)
I understand this is due to the high ISO and the camera, however, is there any way of limiting this in post processing especially for printing?
I thought of going over it with a black brush at a low opacity but I'm afraid that at that size it'll look too obvious when blown up


 1 Correct answer
Hi
I think we've seen this image before from you. Very nice ![]()
You could try this.
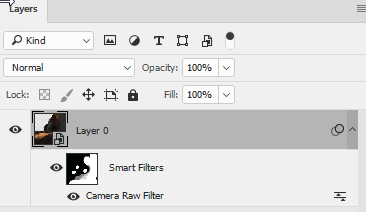
Put the image in a smart object
Open it in the camera raw filter.
Use the noise reduction in camera raw and also pull down the red and purple saturation


Now fill the smart filter mask with black and then paint with a soft white brush at around 30% opacity onto the mask where you want the red noise to reduce building up the reduction with successive strokes.

I would keep it subtle.
From
To

Dave
Explore related tutorials & articles
Copy link to clipboard
Copied
Hi
I think we've seen this image before from you. Very nice ![]()
You could try this.
Put the image in a smart object
Open it in the camera raw filter.
Use the noise reduction in camera raw and also pull down the red and purple saturation


Now fill the smart filter mask with black and then paint with a soft white brush at around 30% opacity onto the mask where you want the red noise to reduce building up the reduction with successive strokes.

I would keep it subtle.
From
To

Dave
Copy link to clipboard
Copied
Hi Dave,
YES! haha you helped me align the stars in this one ![]()
I'll give that idea a shot, I knew there would be something but wasn't 100% sure what it was but needed something because printing at a large size will make the issue even worse
Copy link to clipboard
Copied
Whatever you do - do it in a smart object that way you can alter the settings again if it doesn't look right. No pixels destroyed.
In case anyone is wondering - the "dark slide" method from the camera is not going to work here as the image is stitched with a lot of puppet warping to overcome star movement combined with multiple complex lens distortion. I remember it well ![]()
Dave
Copy link to clipboard
Copied
I wonder if you could get anywhere attacking it on a per channel basis? A quick look shows that the green channel has the best contrast, and red and blue are more or less equally noisy. I'm a bit lazy when it comes to noise reduction, and tend to go with the presets (with Topaz DeNoise) but you do have per channel control.
Another, not strictly related, thought is that when sharpening this sort of high ISO image for print, use High Pass, and run noise reduction on the high pass layer. You can also boost contrast on the high pass layer with curves or levels. This still leaves you with the edge sharpening, but without exaggerating noise in the smoother areas.
There's a lot of specialist information out there for astro of course. We used to have a regular poster who makes software for it. Noel Carboni of ProDigital Software
Astronomy Tools Actions Set by ProDigital Software
Hmmm, I have just had a wee read through and there is some interesting info on that page.
Copy link to clipboard
Copied
Thanks Trevor I'll have a shot at each channel ![]()
Also check out the highpass filter, I was going to use unsharpen mask but from the looks highpass has more customization
Cheers! I just shot him a message about his astrophotography presets and if they'll work
Find more inspiration, events, and resources on the new Adobe Community
Explore Now