• Global community
    • Language:
      • Deutsch
      • English
      • Español
      • Français
      • Português
  • 日本語コミュニティ
    Dedicated community for Japanese speakers
  • 한국 커뮤니티
    Dedicated community for Korean speakers
Exit
0

Bevel and emboss radius corner shading issues

New Here ,
Jul 04, 2017 Jul 04, 2017

Copy link to clipboard

Copied

Hi,

I'm experiencing an issue with the radius corners of an embossed shape where the shading becomes stepped around the inner radius as shown in the screenshot below.

Bevel and emboss issues.jpg

The shape is an eps linked to illustrator to make it easier to alter the colours although I get the same effect if I draw a random shape using the path tool in Photoshop. The file is set up as 300dpi and CMYK.

Is there a way to get smooth shading around these curves?

Thanks

Andy

Views

2.2K

Translate

Translate

Report

Report
Community guidelines
Be kind and respectful, give credit to the original source of content, and search for duplicates before posting. Learn more
community guidelines

correct answers 1 Correct answer

Community Expert , Jul 05, 2017 Jul 05, 2017

A work-around solution is to convert the layer to a smart object. Next, open the smart object, and increase the image resolution by 200% up to 500% (depends on the amount of artefacting - test). Play with the Soften setting to reduce the banding.

Save the smart object, and close. Finally, reduce the scale of the layer in the master file by the same percentage.

When one increases the Smart Object’s resolution it should not be necessary to scale it in the containing document to achieve the original

...

Votes

Translate

Translate
Adobe
Community Expert ,
Jul 05, 2017 Jul 05, 2017

Copy link to clipboard

Copied

Why do you work in CMYK?

Those artefacts are no uncommon for the effect.

Have you tried using 3D instead?

Votes

Translate

Translate

Report

Report
Community guidelines
Be kind and respectful, give credit to the original source of content, and search for duplicates before posting. Learn more
community guidelines
New Here ,
Jul 05, 2017 Jul 05, 2017

Copy link to clipboard

Copied

Hi,

thank you for getting back to me.

I've set this up in CMYK because that is how it will be printed, although I could convert it to CMYK after applying the effect.

If this is a common problem with the bevel and emboss tool I'll have a look at using the 3D tool or I might just try blurring the corners to reduce the effect.

Votes

Translate

Translate

Report

Report
Community guidelines
Be kind and respectful, give credit to the original source of content, and search for duplicates before posting. Learn more
community guidelines
Community Expert ,
Jul 05, 2017 Jul 05, 2017

Copy link to clipboard

Copied

I've set this up in CMYK because that is how it will be printed, although I could convert it to CMYK after applying the effect.

This does not touch on the principal problem, but when working in CMYK and multiplying a black shadow one might exceed the Color Space’s Total Area Coverage.

Votes

Translate

Translate

Report

Report
Community guidelines
Be kind and respectful, give credit to the original source of content, and search for duplicates before posting. Learn more
community guidelines
Mentor ,
Jul 05, 2017 Jul 05, 2017

Copy link to clipboard

Copied

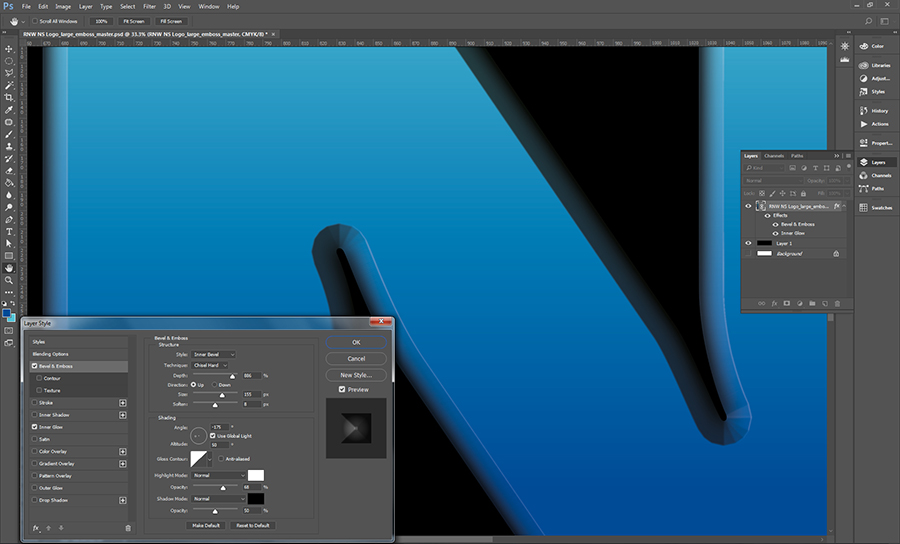
No, unfortunately these artefacts are a known limit inherent to Photoshop's emboss effects. In certain other image editors these effects are of much higher quality, so it is possible technically to fix this, but the developers haven't really responded to calls for improvement.

Increasing the Soften setting blends the banding steps, at the expense of sharpness.

A work-around solution is to convert the layer to a smart object. Next, open the smart object, and increase the image resolution by 200% up to 500% (depends on the amount of artefacting - test). Play with the Soften setting to reduce the banding.

Save the smart object, and close. Finally, reduce the scale of the layer in the master file by the same percentage.

This will re-sample the smart object, and the artefacting ought to be gone or almost invisible. It requires a bit of trial and error to get the best quality, but it does work.

Votes

Translate

Translate

Report

Report
Community guidelines
Be kind and respectful, give credit to the original source of content, and search for duplicates before posting. Learn more
community guidelines
Community Expert ,
Jul 05, 2017 Jul 05, 2017

Copy link to clipboard

Copied

A work-around solution is to convert the layer to a smart object. Next, open the smart object, and increase the image resolution by 200% up to 500% (depends on the amount of artefacting - test). Play with the Soften setting to reduce the banding.

Save the smart object, and close. Finally, reduce the scale of the layer in the master file by the same percentage.

When one increases the Smart Object’s resolution it should not be necessary to scale it in the containing document to achieve the original size, only when one changes the Width/Height.

Votes

Translate

Translate

Report

Report
Community guidelines
Be kind and respectful, give credit to the original source of content, and search for duplicates before posting. Learn more
community guidelines
Mentor ,
Jul 05, 2017 Jul 05, 2017

Copy link to clipboard

Copied

LATEST

Ah, stupid me, you are correct. Just change the ppi instead of the smart object's height/width, and no need for that last step.

Unfortunately, I have tested it again, and depending on the shape even this trick may not improve the quality to a point it can be used in production (for the nitpicky, at least).

Extruding and/or beveling in 3d is probably your best bet.

I wish the embossing layer effect would get an update already. I don't think the devs have ever bothered improving the embossing effect since they first implemented it. I suppose they consider it "good enough" - but it really isn't anymore.

Votes

Translate

Translate

Report

Report
Community guidelines
Be kind and respectful, give credit to the original source of content, and search for duplicates before posting. Learn more
community guidelines
New Here ,
Jul 05, 2017 Jul 05, 2017

Copy link to clipboard

Copied

Thanks, I'll try this and let you know how I get on.

Votes

Translate

Translate

Report

Report
Community guidelines
Be kind and respectful, give credit to the original source of content, and search for duplicates before posting. Learn more
community guidelines