 Adobe Community
- Home
- Photoshop ecosystem
- Discussions
- Re: Can Photoshop knock out white (or any other co...
- Re: Can Photoshop knock out white (or any other co...

Copy link to clipboard
Copied
Is there a simple way to knock out white (or any other color) in Photoshop CS5?
It's hard for me to imagine that in this day and age, doesn't have an easy method of doing what this plug-in allowed us to do over a decade ago.
Surely, by now, I can stop installing this plug-in (originally created for PS on Win95).


 1 Correct answer
I don't follow links as a rule.
What do you mean by "knock out"? Are you trying to make an image partially transparent?
You can select parts of an image in Photoshop via a large variety of different methods in Photoshop, from color ranges to manual lassoing, then either delete through a layer or add a layer mask to make those regions transparent.
I've used Photoshop for 16+ years now and haven't found a need for a 3rd party plug-in to help me make selections yet.
-Noel
Explore related tutorials & articles
 66
Replies
66
66
Replies
66

Copy link to clipboard
Copied
Using your method, if I were to load a color as a selection, it would be the same as using the magic wand.
No.

Copy link to clipboard
Copied
Photoshop already has several ways of accomplishing what you're describing - just none with a one button simplicity, because real world matting/color keying isn't that simple.
Do a web search on tutorials on chromakeying or matting using Photoshop.
Copy link to clipboard
Copied
Chris Cox wrote:
Photoshop already has several ways of accomplishing what you're describing - just none with a one button simplicity, because real world matting/color keying isn't that simple.
Do a web search on tutorials on chromakeying or matting using Photoshop.
Considering the number of useless artistic filters Photoshop ships with (which are for beginners who want all-in-one, single-click solutions to add rudementary effects to their images -- I mean seriously, how many serious graphic designers use the Poster Edges or Watercolor filters?) perhaps it wouldn't be a bad idea to include a one-click solution for knocking out colors in Photoshop, like GIMP has... for those who want a quick fix before they're ready to move on to more complex manual chromakeying techniques.
Clearly, there is a demand for it. Just an idea for the suggestion box.
It could work like a filter. It would prompt you to select the color you want knocked out via the eyedropper tool. Once selected, it could ask you for what kind of radius level you want. 0 = this precise shade to transparent only, 100 = even if there's only 1% of this color found in a pixel, knock out that 1% and leave the pixel 99% opaque.
Know what I mean? Again, just an idea for the suggestion box, because year after year, people keep asking for this feature.
In fact, it's never a good thing when people are telling you "I'm still using GIMP side by side with Photoshop only because of this one feature Photoshop doesn't have."
Just throw the damn thing in there! 
Copy link to clipboard
Copied
Just an idea for the suggestion box.
Feature Requests can be posted over at
http://feedback.photoshop.com/photoshop_family/products/photoshop_family_photoshop

Copy link to clipboard
Copied
In the almost 2 years since you posted this question, haven't you taken the advice from others responding to your question?
If you just did some searching on the internet, you'd find at least 10 different ways to do what you want in photoshop without any plugins.
And you never even posted an example so that some kind soul would heap upon you the so asked for knowledge.
Copy link to clipboard
Copied
Chris Cox wrote:
Photoshop already has several ways of accomplishing what you're describing - just none with a one button simplicity, because real world matting/color keying isn't that simple.
That's not entirely accurate.
There IS one button that gets you a lot of the way there...
-Noel
Copy link to clipboard
Copied
Noel Carboni wrote:
That's not entirely accurate.There IS one button that gets you a lot of the way there...


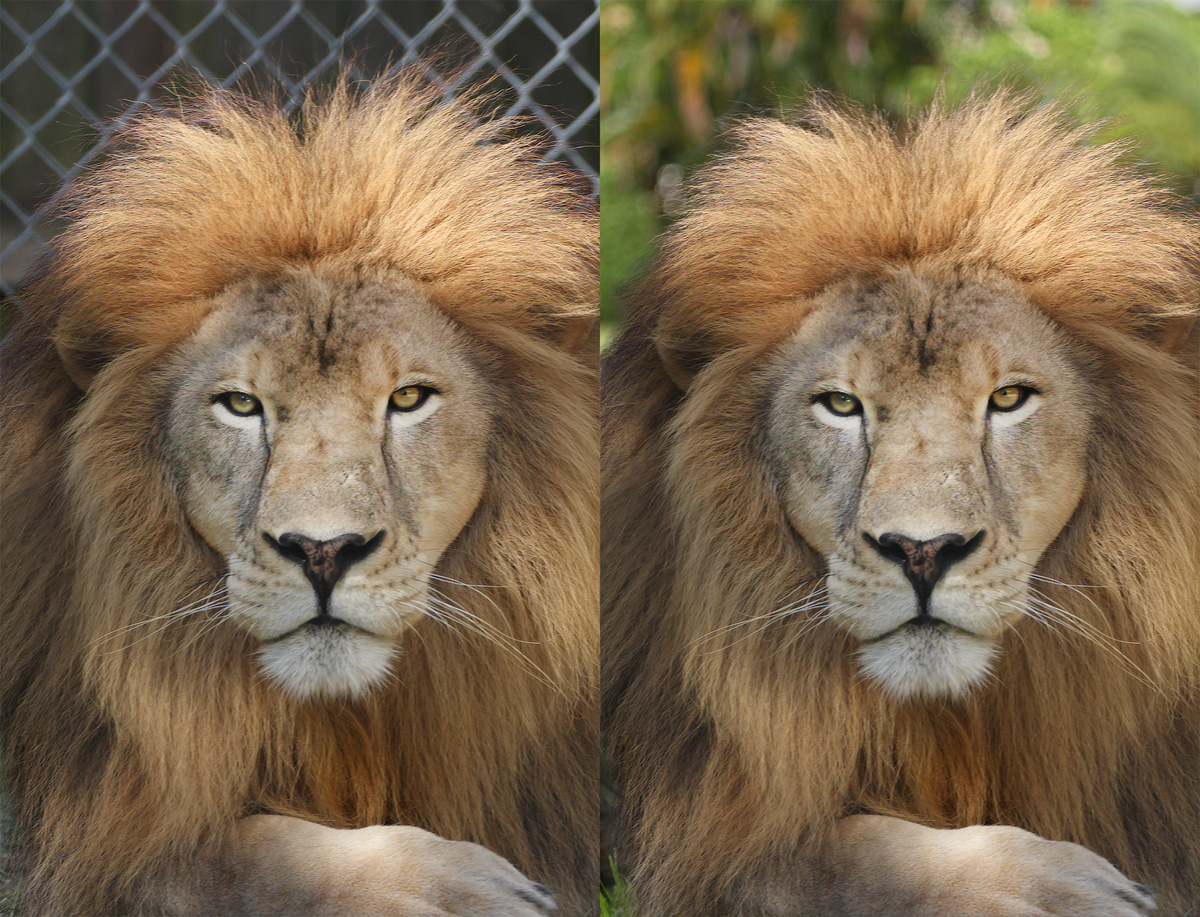
You're arguing in bad faith, Noel. You kept 95% of the charcoal information located between the individual strands of hair. Try putting that same lion on a white background and you'll see you didn't really knock out anything.
Again, hair is only part of the equation. There's glass. Drapes. Infinite semi-transparent objects that "refine edge" cannot help you with.
GIMP is a pretty popular tool. Nowhere near the powerhouse that Photoshop is, but still a tool that is very highly regarded in the industry because there are some things it does better and/or more easily than Photoshop. For instance, I use it for saving JPGs to a specific file size. Whereas Photoshop has 10 levels of JPG image quality, GIMP has 100, so you can literally save your JPG to 49.7K if your file size limit is 50k -- very useful for designing online banners with weight limits, for instance. The algorythm for retaining image quality vs file weight is also more advanced than Photoshop -- if I take a 200k JPG and reduce it to 50k with Photoshop, and do the same with GIMP, the GIMP version will look better.
Now, I didn't even know until this thread that GIMP has a one-click color-knockout tool... but I know I've been asking for one for years.
Implementing one will make many of us happy, while not hurting the rest of you in any way. Why do people continue to oppose ideas like this, or look down on other people's wish lists simply because they don't share it?
If you don't want a feature like this in Photoshop, why oppose those who do?

Copy link to clipboard
Copied
I'm not saying your suggestion is a bad one, but if you posted an example i'm sure someone would give you some pointers. People here may have never used Gimp before and not have any first hand
experience with gimp's alpha to transparency command.
Photoshop does have 100 levels of jpeg compression: File>Save For Web and also in save for web check out Optimize to File Size from the flyout menu.
There is also an action in the adobe exchange that does the same exact thing that Eliminate White does (from your first post) and can do it manually by loading the selections from the each of the rgb channels.
Copy link to clipboard
Copied
Good lord, who's arguing against you? I'm not opposing anything.
I am just suggesting the use of features already in existence, as they might actually be usable.
This is a bit like going to get breakfast at a pancake place and complaining that you didn't get a good bagel. Sure, you can suggest that the management add bagels to the menu, but to suggest to someone nearby who says "if you're really hungry, try the pancakes - they're pretty good here" that they're arguing against you is just ludicrous.
I'll try to find a high key image of hair in front of a light background. Please, by all means, post a good example if you have one.
-Noel
Copy link to clipboard
Copied
I don't think anyone has suggested that there wasn't a more complex way to knock stuff out. In fact, if someone had the time, one could spend days selecting individual strands of hair, applying a specific feathering to the selection, and then using various brushes on a mask to eliminate whatever background might exist. This approach will work on all scenarios.
Instead, we are asking for a simple "select this color and knock it out" option, preferably with a color radius value so we can choose how far away from the selected tone Photoshop should begin knocking out.
This doesn't exist. We'd like it to exist. It's been requested for years.
Those of you who are set in your current ways may even find it a useful time-saver once it's in there. But it'll never get in there as long as people who don't understand what we're asking for or why we're asking for it give Adobe the impression that it's not needed.
Technically, feathering a selection AFTER having made the selection isn't needed. You could specify your feathering value BEFORE you make your selection. And yet a lot of people still appreciate the ability to change the feathering value after the fact.
I bet if someone would have suggested that here, people would have told the person "why do you need that? just specify the value before making your selection".
Instead, Adobe just put it in and we use it.
So it's not so much that we don't appreciate the fact that there are longer, more complex ways of doing things... it's that people are missing the point of the original suggestion. And may be inadvertantly giving Adobe the idea that the suggestion isn't needed.
Copy link to clipboard
Copied
Noel Carboni wrote:
I'll try to find a high key image of hair in front of a light background.
Okay, I found a high-key image on the web.
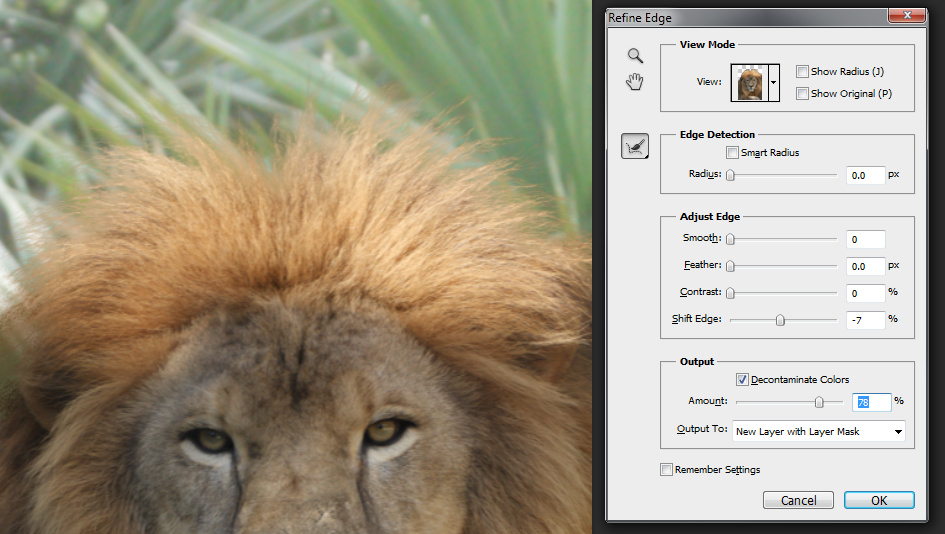
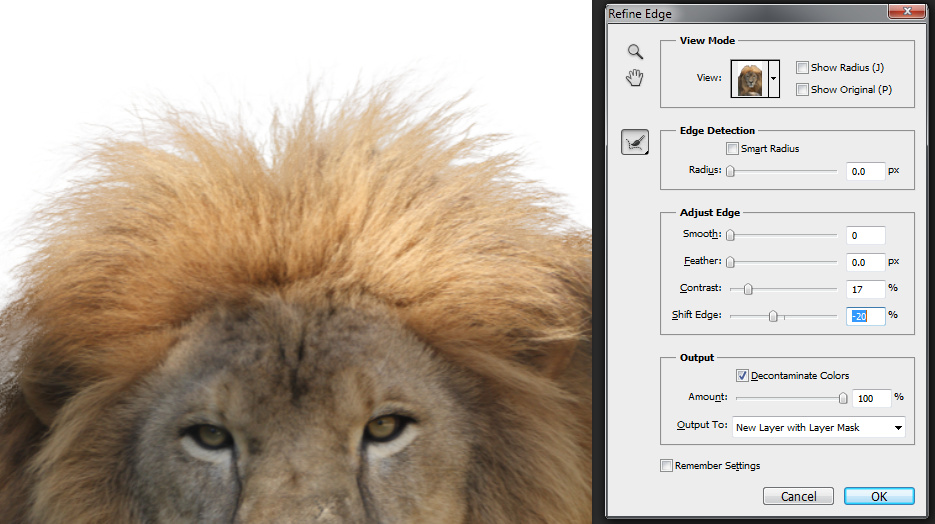
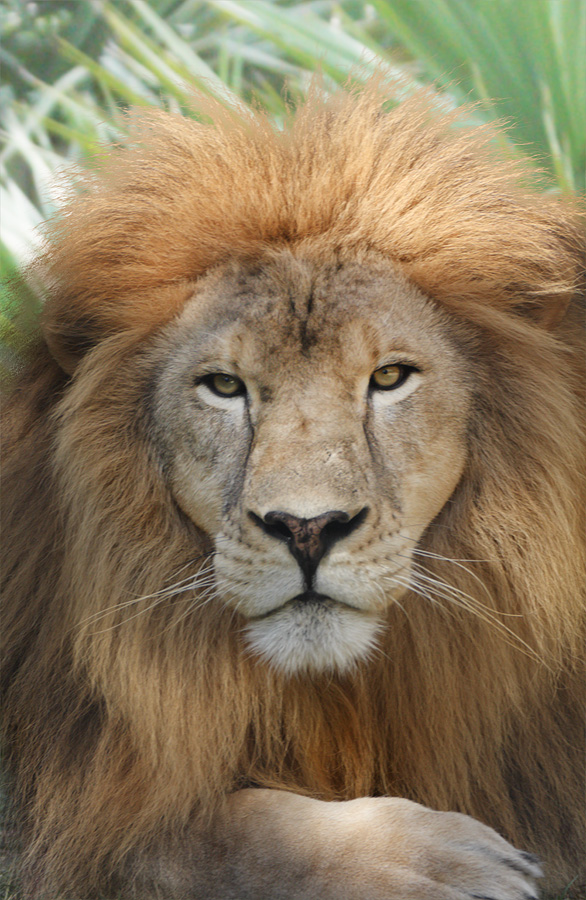
Why am I just not seeing the problem using the [Refine Edge] feature here? Have you experimented with this at all? It seems to me the BEST case is when the background is white - this was trivial.
-Noel
Copy link to clipboard
Copied
Because no one asked you to find a picture with a white background. Re-read again. What you were asked was to take your lion and put it up against a white background. Not a background of roughly identical values as the original picture, like you did.
And yes, while taking a picture on a white background and applying it to a complex background is easy as pie, yours somehow still managed to look fake. Look at your example again. You can see the white in certain portions of her hair when there ought to be green hues due to the green background.
Noel, just stop, ok? This isn't getting us anywhere. If you don't want the simple color-knockout option some of us would like to see, just move along and find something you DO support.
That's how we keep things positive.
Copy link to clipboard
Copied
Noel, just stop, ok? This isn't getting us anywhere.
I guess not, since you're closed off to using the tools you have.
I've always followed a two-pronged philosophy:
1. Use what's provided as adeptly as possible.
2. Request new features so that what's provided will be even better in the future.
-Noel
Copy link to clipboard
Copied
jyeager11 wrote:
Because no one asked you to find a picture with a white background. Re-read again. What you were asked was to take your lion and put it up against a white background. Not a background of roughly identical values as the original picture, like you did.
I believe you're just not giving the Decontaminate Colors feature a good enough workout, along with the other sliders. As you can see from all the images I've posted a relatively natural looking result can be achieved without much work, and the background doesn't need to be simple.
-Noel
Copy link to clipboard
Copied
jyeager,
You have been saying how easy it is to use a one click method in Gimp to knock out white.
So far we have seen no example. How about a one click knockout of a person as an example?
Copy link to clipboard
Copied
Curt Y wrote:
jyeager,
You have been saying how easy it is to use a one click method in Gimp to knock out white.
So far we have seen no example. How about a one click knockout of a person as an example?
No, that was Jou Pa. I actually had no idea GIMP had this tool until he mentioned it in this thread, earlier.
This thread has become too frustrating to read, with everyone talking but no one really listening. I'm unsubscribing. Sorry, guys.
Copy link to clipboard
Copied
Actually that was Marion Driscoll that pointed that out along with several other useful suggestions that i bet you haven't even bothered to check out.
She also gave you the link to request a feature. Did you ever do that?
Copy link to clipboard
Copied
Dang it, I just can't figure out what I'm doing wrong that I simply can't come up with a problem like what jyeager11 is describing. 

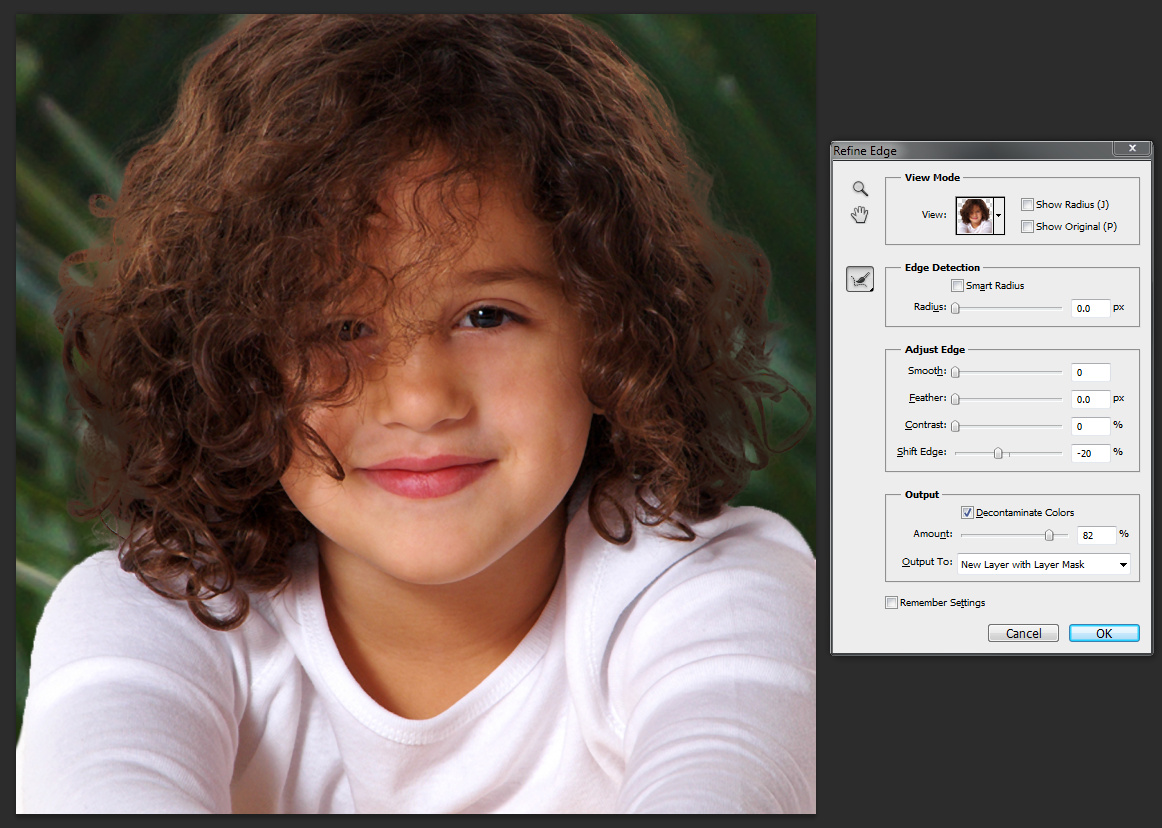
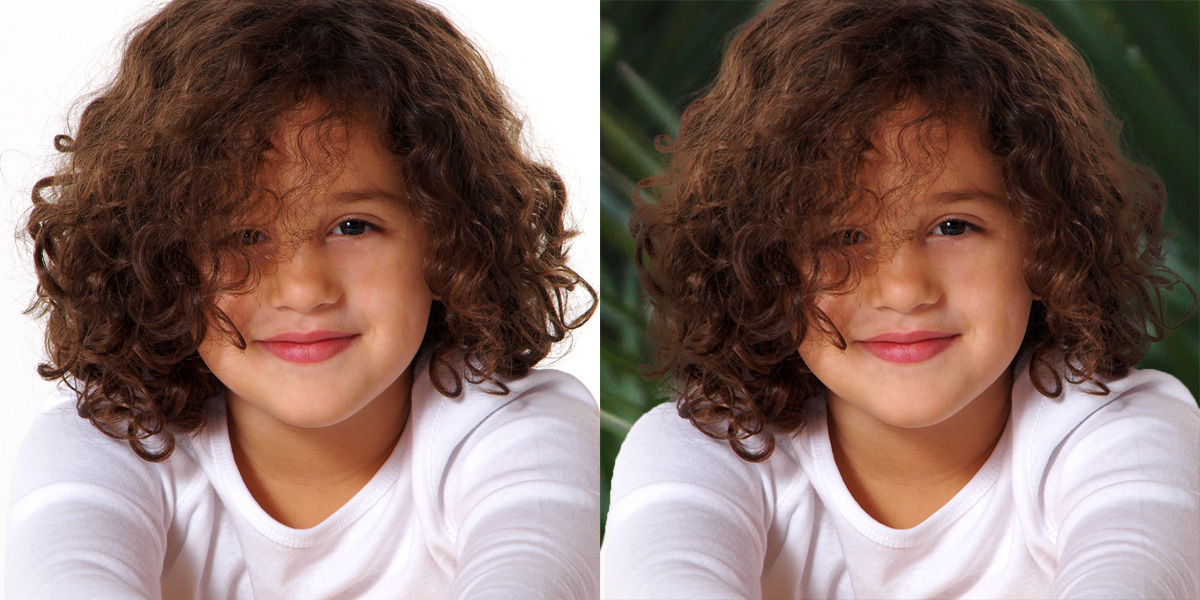
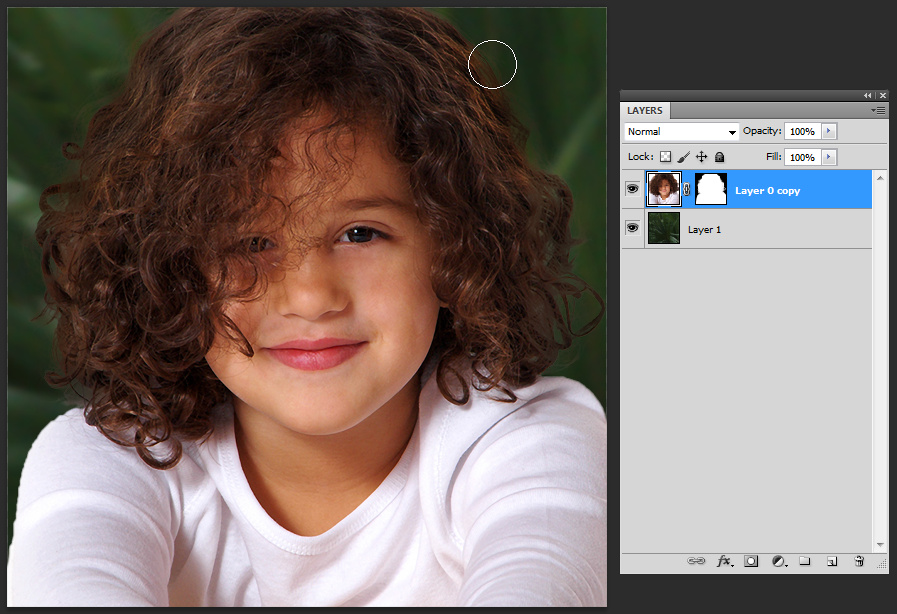
How fast do you need this to work? I did the above in about 2 minutes. Most of the time was painting the transition areas around the edge of her hair inside the Refine Edge tool.
Here's the Photoshop Edit log:
2012-01-01 15:57:34 File BlueBackgroundRemovalSample.psd opened
Open
C:\TEMP\BlueBackgroundRemovalSample.psd
As: Photoshop
With Maximize Compatibility
Select layer “Layer 1 copy 2”
Without Make Visible
Quick Selection
Refine Edge
Refine Edge
Radius: 0 pixels
Contrast: 0%
Smooth: 0
Feather: 0 pixels
Shift Edge: 0%
Without Smart Radius
With Decontaminate Colors
Decontaminate Amount: 86%
Output: New Layer with Layer Mask
Select blue channel
Select green channel
With Extend
Show red channel
Select burn
Burn Tool
Burn Tool
2012-01-01 15:59:41 File C:\TEMP\BlueBackgroundRemoved.jpg saved
Save
As: JPEG
Quality: 10
With Optimized
Matte: none
In: C:\TEMP\BlueBackgroundRemoved.jpg
With Copy
Here's the file I started with if you'd like to practice:
http://Noel.ProDigitalSoftware.com/ForumPosts/BlueBackgroundRemovalSample.psd
-Noel

Copy link to clipboard
Copied
Thank you, Noel. You have answered a lot of my questions. I am now able to mask/key/knock out my backgrounds too.
Copy link to clipboard
Copied
Taking things a step further, you can easily enough darken the hair beyond what the Decontaminate Colors feature did with a few strokes of the Burn tool on the edges of the hair in the masked layer, if the default result still looks unnaturally light to you.
This has nothing to do with the decontamination quality, but more to do with your eye/brain picking up on the hair reflections looking lighter around the back because she was photographed with a bright background.
-Noel
Copy link to clipboard
Copied
I only photograph bald, naked men so I cannot relate well to your situation. But this video might be helpful...
http://blogs.adobe.com/jnack/2010/04/video_selecting_hair_with_refine_edge_in_cs5.html
Copy link to clipboard
Copied
Marian Driscoll wrote:
I only photograph bald, naked men
Umm..

Copy link to clipboard
Copied
 I'm a new Photoshop CC user and new to forums... apologies for adding to this old discussion, but if it's still active, can someone suggest a simple way in Photoshop to convert all the white in the attached logo to transparent? Gimp was mentioned in this discussion and it worked quickly and well (Color-to-Alpha, white, OK, Export), for me to have for example a light yellow-to-grey gradient background - so can it be done easily in Photoshop? I loaded the Gimp result into Photoshop and tested it on a white background (it then looked identical to the original logo), and on other colors, and it's perfect for my needs. So can it done to this accuracy and so easily in Photoshop? I did try the suggestion in this discussion (an Adobe video for CS5) to use Quick Select, mask and Refine Edge, but that needed multiple steps and I couldn't get the drop shadow areas right. I'm hoping there's an easier and better way? Thanks in advance, Olly.
PS: If needed I can add the Gimp version, and my Photoshop PSD with the test layers.
Copy link to clipboard
Copied
Background Eraser Tool, Select -> Color Range, or any of the "white to transparency" actions found on the net.

Copy link to clipboard
Copied
Both the background eraser tool and the color range select option are unable to achieve the "color to alpha/transparency" result: the shadows remain grey, and contain the white component.
Alternatively, you can download this black unmultiply plugin/action:
http://www.ayatoweb.com/download/down04.html
To remove white, first invert the image <ctrl><i>, then apply the Ayato Unmultiply action, then invert the image once again. Result: the white component is removed.

 AdChoices