• Global community
    • Language:
      • Deutsch
      • English
      • Español
      • Français
      • Português
  • 日本語コミュニティ
    Dedicated community for Japanese speakers
  • 한국 커뮤니티
    Dedicated community for Korean speakers
Exit
0

Can't get rid of EMPTY area around image

New Here ,
Apr 10, 2019 Apr 10, 2019

Copy link to clipboard

Copied

Background Problem.png

I am on Windows, as you can see there is SOMETHING around my images and no it is NOT whitespace. They are all saved as PNG's and whatever whitespace they had was removed using inverse selection. Whenever I drop these images onto a black canvas, I see nothing, but for my specific purposes, there can not be ANYTHING but the actual image. The image's actual border is important.

Please help.

Views

8.2K

Translate

Translate

Report

Report
Community guidelines
Be kind and respectful, give credit to the original source of content, and search for duplicates before posting. Learn more
community guidelines
Adobe
LEGEND ,
Apr 10, 2019 Apr 10, 2019

Copy link to clipboard

Copied

Post the ACTUAL files so we can look at them.

Votes

Translate

Translate

Report

Report
Community guidelines
Be kind and respectful, give credit to the original source of content, and search for duplicates before posting. Learn more
community guidelines
Community Expert ,
Apr 10, 2019 Apr 10, 2019

Copy link to clipboard

Copied

The area around the gray bar displays the checkerboard pattern denoting total transparency. Any color surrounding the gray bar that you may see is the color and tone of the layer beneath it.

Votes

Translate

Translate

Report

Report
Community guidelines
Be kind and respectful, give credit to the original source of content, and search for duplicates before posting. Learn more
community guidelines
Community Expert ,
Apr 10, 2019 Apr 10, 2019

Copy link to clipboard

Copied

Hi

Your image is the gray area surrounded by transparency. As previously stated you can remove the excess transparency with Edit trim, but on non-rectangular shapes the transparency will remain.

Dave

Votes

Translate

Translate

Report

Report
Community guidelines
Be kind and respectful, give credit to the original source of content, and search for duplicates before posting. Learn more
community guidelines
Community Expert ,
Apr 10, 2019 Apr 10, 2019

Copy link to clipboard

Copied

LATEST

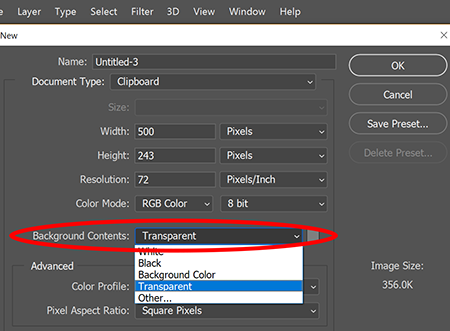
Start with a new document that has a transparent background, denoted by the checkerboard pattern.

Place or draw your shape  on a new layer.

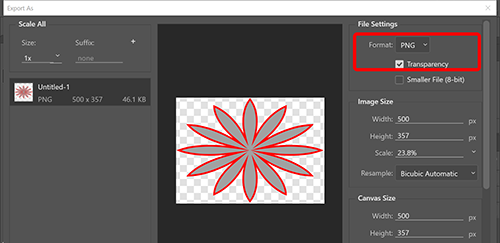
Click on File >  Export > Export As.  Select format:  PNG with transparency. 

Scroll down and select Color Space:  sRGB.  Then hit the Export button to save.

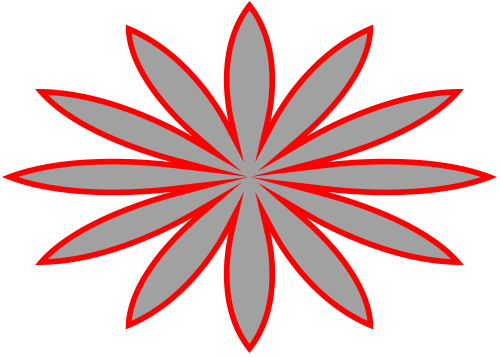
Below is my transparent PNG.

flowerrShape.png

Nancy O'Shea— Product User, Community Expert & Moderator
Alt-Web Design & Publishing ~ Web : Print : Graphics : Media

Votes

Translate

Translate

Report

Report
Community guidelines
Be kind and respectful, give credit to the original source of content, and search for duplicates before posting. Learn more
community guidelines
Community Expert ,
Apr 10, 2019 Apr 10, 2019

Copy link to clipboard

Copied

comp.png

A readout of the seven points indicated above are identical: Lightness of 100%, Neutral gray.

Is the difference you referred to actually an illusion?

Do the Lab Color values of your original art vary?

Votes

Translate

Translate

Report

Report
Community guidelines
Be kind and respectful, give credit to the original source of content, and search for duplicates before posting. Learn more
community guidelines
Community Expert ,
Apr 10, 2019 Apr 10, 2019

Copy link to clipboard

Copied

Photoshop always saves images as rectangles. So for irregular shapes, even with transparency, you will have a rectangular image shaped canvas.

You can minimise the size of the rectangle with Image>Trim

Dave

Votes

Translate

Translate

Report

Report
Community guidelines
Be kind and respectful, give credit to the original source of content, and search for duplicates before posting. Learn more
community guidelines