Changing skin tone...
Copy link to clipboard
Copied
I'm trying to change the skin tone of my animated puppet, and I'm having a lot of difficulty.
I can change some of the areas, but not all of the areas.
Could someone please help?
Thanks
Explore related tutorials & articles
Copy link to clipboard
Copied
Hi
Please add screenshots showing the issue and including your layers panel,
Dave
Copy link to clipboard
Copied
A few dozen people have viewed your inquiry and not responded, waiting to see your images because there is no single combination of RGB or CMYK values in Photoshop that produces the only “correct” flesh tone. It varies depending depending ethnicity, lighting and other variables.
We can, however, come up with some guidelines that may be applied when using Curves to correct what we recognize to be unnatural skin color in a digital image. Moreover, since whatever shifted the skin tone away from normal also affected the colors in the rest of the photograph, correcting skin tones with a Curve adjustment automatically contributes to correcting other colors in the scene.
Because for my background as a lithographer, I have found that (for me) skin tones are more easily and precisely adjusted in CMYK mode.
In that context, satisfactory Caucasian skin tone is rendered when:
> the yellow value of the skin is similar to the magenta – within ten points
> the cyan is one-third to one-fifth the value of the magenta.
More often than not, the yellow is a bit stronger than the magenta, but it is not a hard and fast rule.
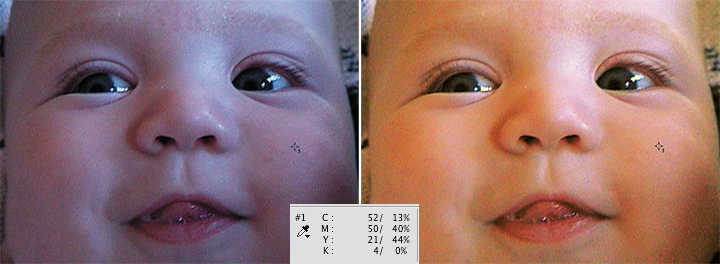
For example, c10 m40 y50 k0 is a common combination for light Caucasian skin. Fashion and cosmetic advertising typically reduces those numbers by about 25% -- but the proportion is similar. It is the relationship of the three colors to each other, rather than these exact values, that is the guide here. It provides a general direction for change when the color of a face tends toward lobster, cadaver or ghoul.
With the Caucasian color ratio as the starting reference, black skin tone composition is typically stronger in both cyan and magenta. Often the cyan increases to about half of the magenta value. In addition, any touch of black can be considered part of the cyan calculation. The result is an enormous array of tans and rich browns. Asian skin tones, and there are many, are a bit stronger in yellow and cyan than the Caucasian ratio I mentioned.
Shown below is the Before & After of a Caucasian sample and the CMYK of a few black faces.
If you would like step-by-step instructions for using Curves to adjust skin tones in CMYK mode, respond to the offer and I will post the method here.


Note the markers, indicating where the color reference point is located.
Copy link to clipboard
Copied
Hi Norman
Adjusting "by the numbers" is why I would love to see the video vector scope in Photoshop (as in Premiere Pro and After Effects). There is a skin tone line on the scope which , remarkably, works for all those skin types. One day maybe..... ![]()
Dave
Copy link to clipboard
Copied
One of the easiest method to select whole face, body ect. is Quick Mask - use soft brush and opacity about 50-60 and draft select areas you need to change - then use any of adjustment tools (Selective Color, Hue/Saturation, Curves ect.) to adjust colors
Copy link to clipboard
Copied
I wonder if it is a tonal range thing? If trying to add colour, for instance, it will work on mid greys, but have no effect on near white. As Dave says, paste a screen shot here, and tell us in more detail what you are trying to achieve, and what steps you have taken to try and make it happen.
Copy link to clipboard
Copied
Sorry for the delay, everyone....
Here is a screen shot. I'm trying to make my character a shade darker.
I've been able to adjust the skin tone for every area, except the hands and neck (via "Blending Options")
When I tried it for the hands, the stroke highlights the "outer part of the hands", and not the lines between the fingers. Plus, it adds an outline to the entire hand (see the puppet's left hand), which is what I don't want.
I used the "Curvature Pen Tool" to create the outline, but it made the hand look sloppy.
Copy link to clipboard
Copied
Can you show us a screen shot of your layers panel? We need to see all of the layers, so un-dock it and drag it out if you need to.
It is not clear what you mean by 'blending options'.
Copy link to clipboard
Copied
Hi Yusufuh,
It might be easier if you copy the Layers panel that Trevor.Dennis asked for using Ctrl+Shift+Cmd+4+drag and then paste it into forum window instead of using your camera.

If you use Grab, which you'll find in Utilities, you can use the Insert Image button at the top of the forum panel.


