Copy link to clipboard
Copied
When I use the gradient tool, it affects the layer, and if I am unhappy with its results, I just UNDO and then try again. It is basically a "one shot deal" ... love it or hate it.
However, in this YouTube tutorial (5:25 to 6 min.), the gradient tool in the mask seems to be ADDITIVE, like he keeps adding to what is being masked. https://youtu.be/oZr378NyOKM?list=PLHRSsMUaMQK3CeE_8Ayg36ix01Zgh9teI&t=325
When I try this, after one gradient tool stroke, it completely annihilates any prior masking and creates something from scratch. And the same for each successive gradient tool stroke. So how is he able to make it ADDITIVE? Please help! Thank you!!
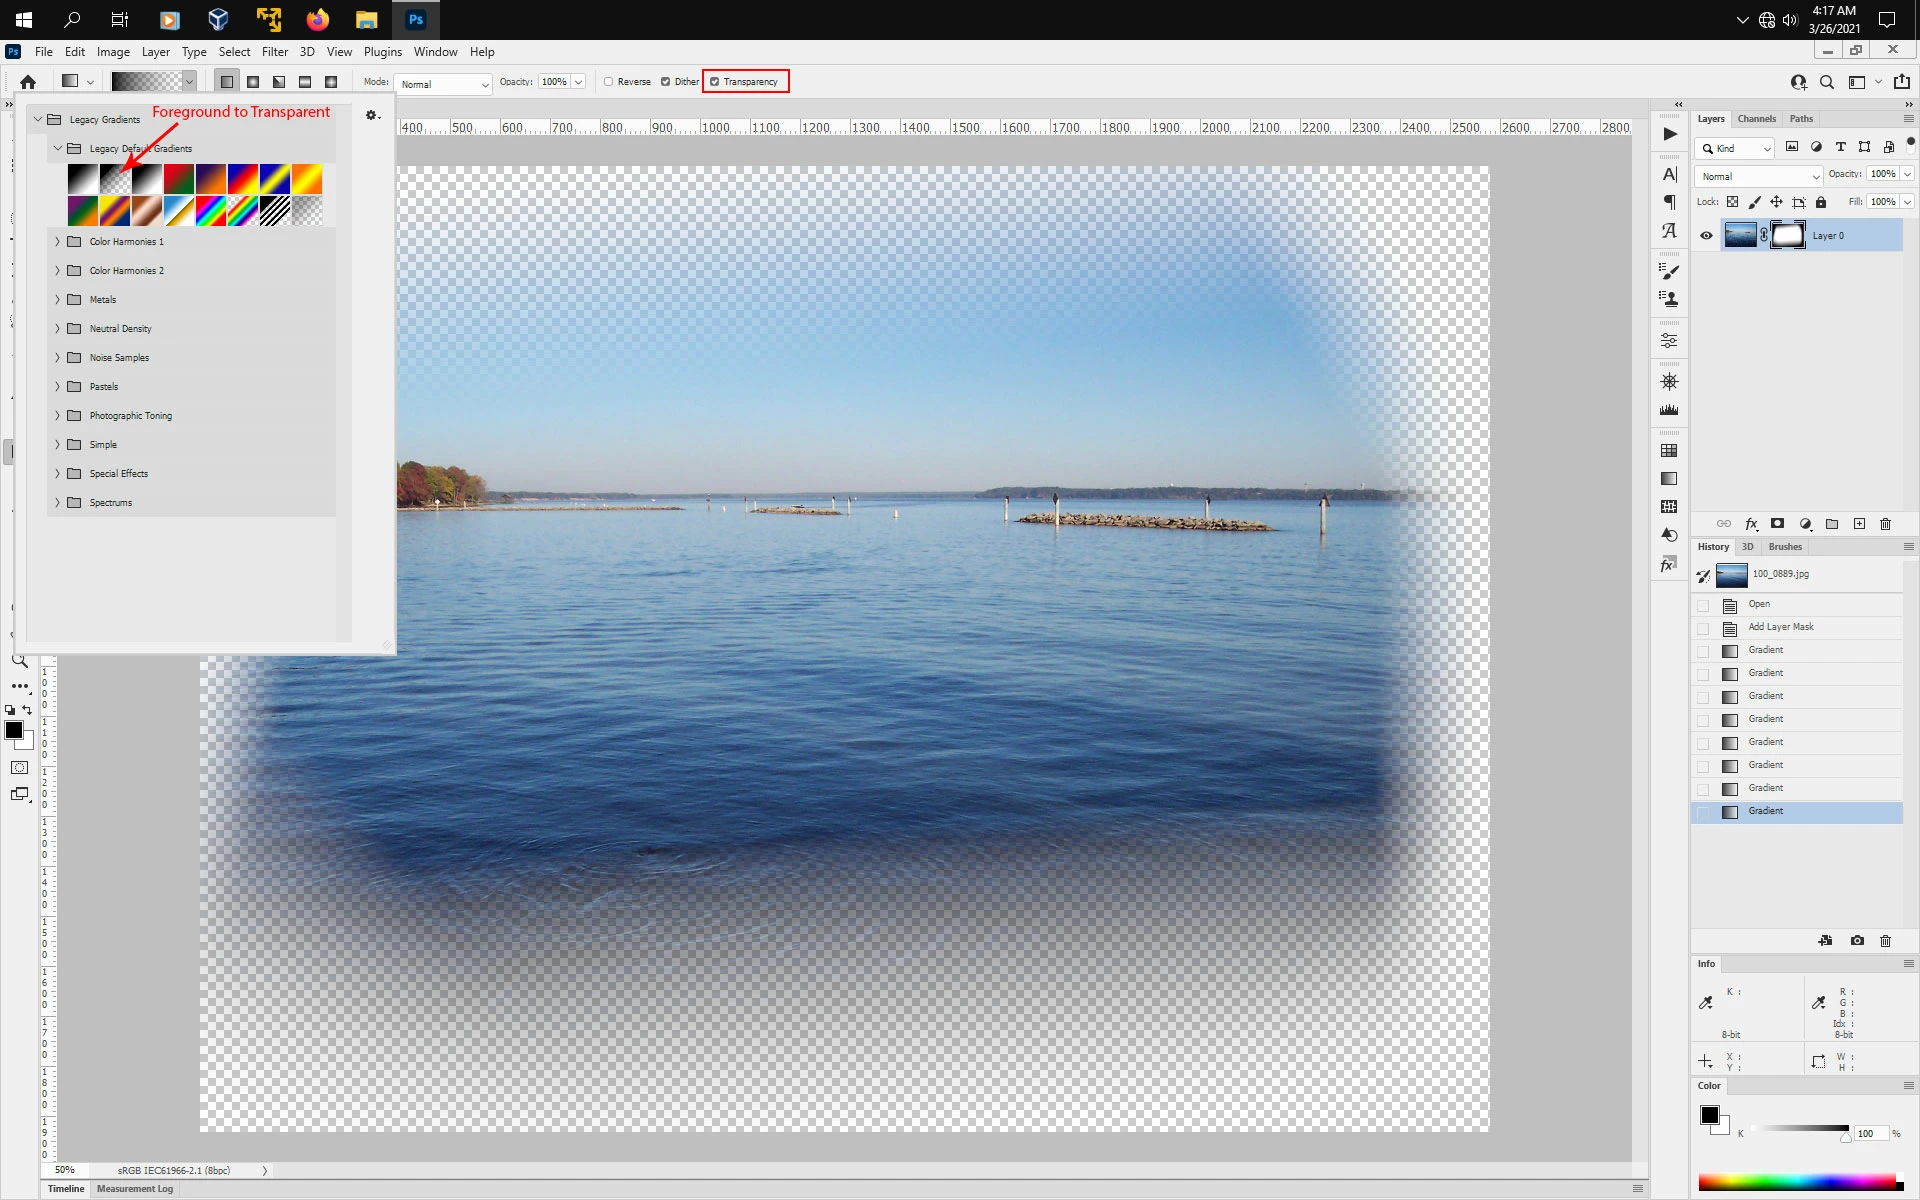
The problem as i see it is your settings.
First you need to select the Foreground to Transparent gradient and then you need to check Transparency in the Gradient tool options.
(you have your Edit>Preferences>Workspace set for Enable Narrow Options Bar, so you don't see
the word Transpaency in the Tool Options)
After that you should get the same results as in the video in your intial post.
The Narrow Options Bar
Copy link to clipboard
Copied
Could you please post screenshots with the pertinent Panels (Toolbar, Layers, Options Bar, …) visible?
Which Gradient have you chosen to use? »Black, white«, Foreground to transparent«, …?
You can also experiment with Blend Modes.
Copy link to clipboard
Copied
I've posted an example screenshot of the gradient to which I am referring. I have used blending modes as well exercise from the tutorial video but for other uses in the task.
I would like to know why the person in the tutorial video has a gradient tool that is behaving differently than mine. Thanks.
Copy link to clipboard
Copied
Did you notiice that I underligned Foreground to transparent in my previous post?
Copy link to clipboard
Copied
In the tutorial he set the gradient from black to transparent, not black to white.
Copy link to clipboard
Copied
Thank you. However, this is not the issue.
In the video, he is able to almost 'paint' like with a brush with the gradient tool, and it continues to add black to the mask. Conversely, for me, for every stroke of the gradient tool, it eliminates the prior gradient in the mask and starts fresh. There is nothing additive. Nothing builds upon the prior gradient tool stroke. It's all or nothing.
Copy link to clipboard
Copied
»Thank you. However, this is not the issue.«
You appear to be mistaken, have you actually tested using the Foreground to transparent-gradient?
Copy link to clipboard
Copied
I tried testing with both Black to White and Black to transparent and still have bad results, unfortunately.
Copy link to clipboard
Copied
Try holding Shift while dragging
Copy link to clipboard
Copied
I tried holding shift, but it only constrains the stroke to be straight. I also tried Alt/Option and Cmd/Cntrl. but no luck.
Copy link to clipboard
Copied
Hi, I just switched my gradient to Black to Transparent, targeted a layer mask, and am able to hide more and more parts of my layer.
In your image, we see a black to white gradient, and a regular layer (but it would work the same way on the pixel content of the layer.)
IF you selected a Black to transparent gradient, you might have an issue with your preferences, I'd try to reset the tool in the option bar: right-click the icon and select reset tool.
As an alternative, did you try switching the blending mode to Multiply?
Copy link to clipboard
Copied
Yes, I tried Normal and Multiply.
Copy link to clipboard
Copied
Could you also post screenshots that show what happens when you use Black-to-White with Multiply?
Copy link to clipboard
Copied
I tried testing with both Black to White and Black to transparent and still have bad results, unfortunately.
Copy link to clipboard
Copied
Hi, did you 1) try to restart photoshop
2) try resetting the tool, as explained earlier?
3) Or reset Photoshop's preferences by holding down Ctrl+Alt+Shift (Pc) Cmd+Opt+Shift (Mac) as you click on Photoshop's icon to start it up.
See: https://helpx.adobe.com/photoshop/using/preferences.html
If you do have access to the menu Edit>Preferences (Pc) or Photoshop>Preferences (Mac), it is possible to reset them from the General submenu.
Copy link to clipboard
Copied
Thank you. I have tried resetting the tool and resetting Photoshop preferences. Honestly, I've been using Photoshop for about 15 years, and the gradient tool always behaved this way, so I thought that was standard behavior for the gradient tool until I saw the tutorial video.
Copy link to clipboard
Copied
Copy link to clipboard
Copied
Interesting. Mine doesn't seem to behave in this way. Whatever is laid down in the prior gradient tool stroke disappears and only the new gradient tool stroke results seem to present themselves.
Copy link to clipboard
Copied
Just to be clear, I tried testing with both Black to White and Black to transparent and still have bad results, unfortunately.
Copy link to clipboard
Copied
»I tried testing with both Black to White and Black to transparent«
Screenshots or screen recordings please.
Edit: Please don’t forget including all pertinent Panels and Bars in the images.
Copy link to clipboard
Copied
An alternative to the transparent gradient is changing a Black to White gradient's blend mode to multiply or darken.
Copy link to clipboard
Copied
Thank you. yes, I had also tried multiply And even blending options for this.
Copy link to clipboard
Copied
Please don’t just tell us stuff, show us the screenshots to illustrate your claim.
If you should have lost the default gradients then nothing is keeping you from either
• loading them again or
• creating a new Gradient that goes from a Color to transparent
Copy link to clipboard
Copied
Ok, I'll have to record a video and upload it.
I don't think I lost any default gradients. I believe the gradient tool is either acting funny or I am doing something wrong.
Copy link to clipboard
Copied
If a tool acts funny, reset it: right-click on its icon in the option bar: