Participating Frequently
February 14, 2018
Answered

Could I use two magic wand selections to straighten an image?

  • February 14, 2018
  • 2 replies
  • 2669 views

This is an odd query, but it relates to one I posted yesterday about trying to recognize the sprockets in a movie film frame.

If I have a vertical strip of sixteen movie film frames, which isn't perfectly straight-- what if I selected the top sprocket hole with the magic wand, and the bottom sprocket hole, and had a script which would take the coordinates of the two to straighten the image?

Thanks to anyone for whom this makes sense. I'm finding the crop-and-straighten command doesn't work.

This topic has been closed for replies.
Correct answer JJMack

Ah-- I've just seen your previous post, JJ. Thank you. I will see if I can understand that and learn from it.


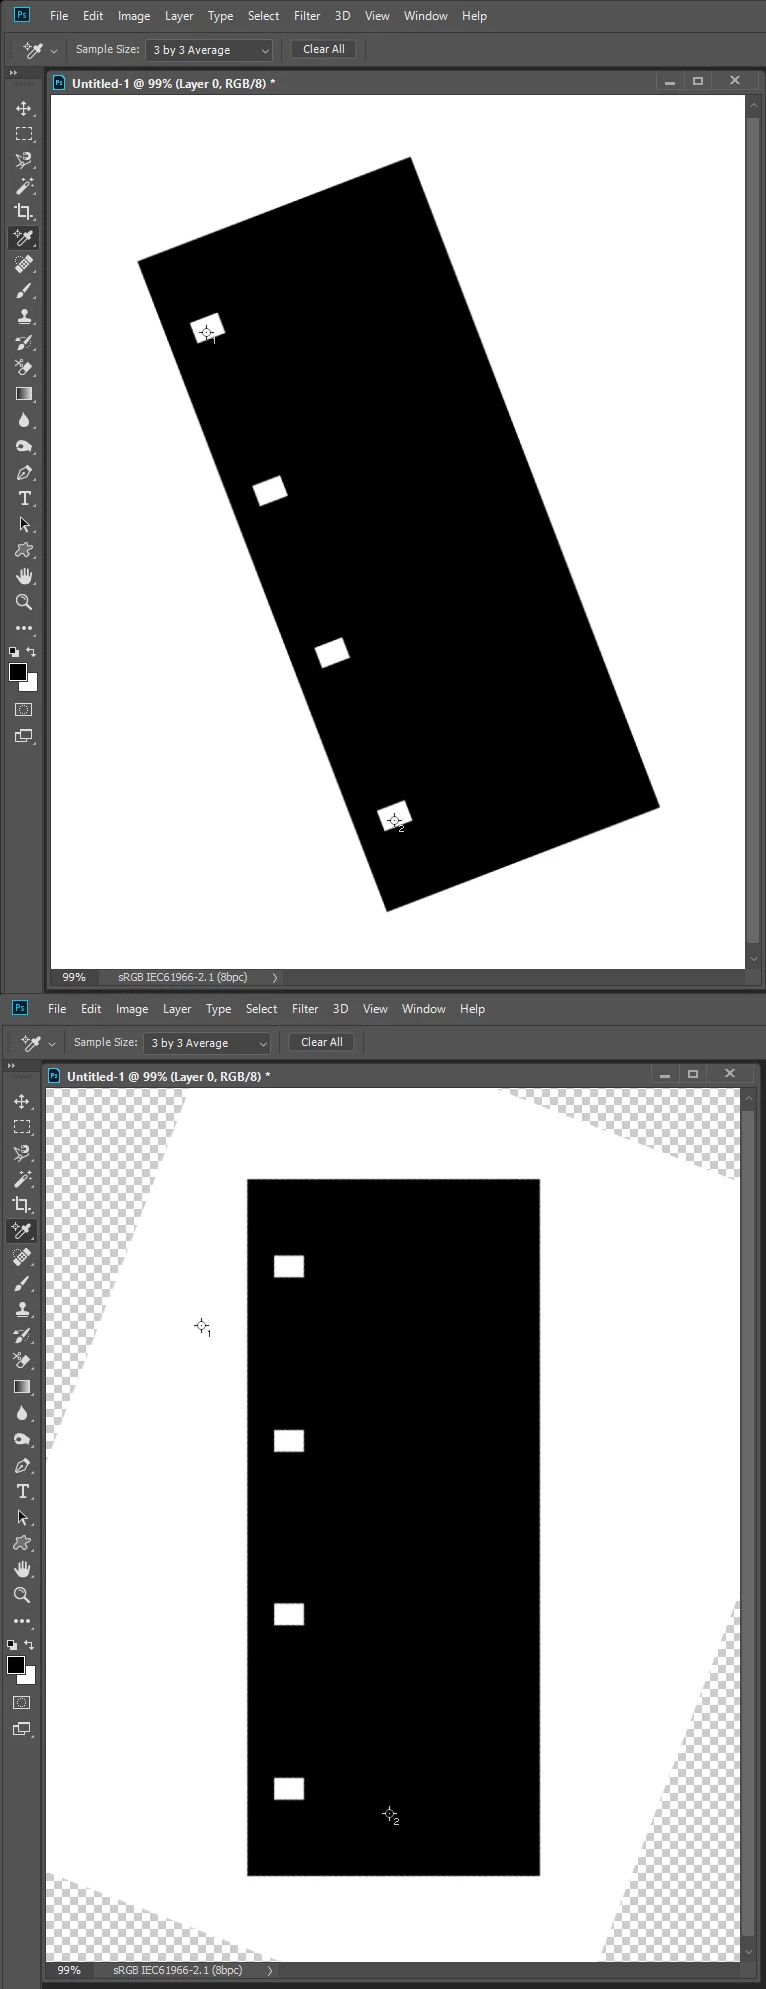
The script you want may work like this one.

// Save the current preferences

var startRulerUnits = app.preferences.rulerUnits;

// Set Photoshop to use pixels

app.preferences.rulerUnits = Units.PIXELS;

Main();

// Return the app preferences

app.preferences.rulerUnits = startRulerUnits;

function Main() {

if (app.activeDocument.colorSamplers.length!=2) {

alert('two color sampler points are required');

return;

}

else {

point1 = [];

point2 = [];

for (var s=0,len=app.activeDocument.colorSamplers.length;s<len;s++) {

var colorSamplerRef = app.activeDocument.colorSamplers;

MagicWand( colorSamplerRef.position[0].value ,colorSamplerRef.position[1].value);

if (s==0) point1=TopLeft();

else point2=TopLeft();

app.activeDocument.selection.deselect();

   }

   Rwidth = point2[0]-point1[0];

   Rheight = point2[1]-point1[1];

   degrees = Math.atan(Rwidth/Rheight) * 180 / Math.PI;

   app.activeDocument.activeLayer.rotate(degrees);

}

}

function TopLeft() {

try{

TL=[];

var SB = app.activeDocument.selection.bounds;

TL[0]=SB[0].value;

TL[1]=SB[1].value;

return TL;

}

catch(e){}

}

function MagicWand(Xpoint,Ypoint) { 

// =======================================================

var idsetd = charIDToTypeID( "setd" );

    var desc121 = new ActionDescriptor();

    var idnull = charIDToTypeID( "null" );

        var ref33 = new ActionReference();

        var idChnl = charIDToTypeID( "Chnl" );

        var idfsel = charIDToTypeID( "fsel" );

        ref33.putProperty( idChnl, idfsel );

    desc121.putReference( idnull, ref33 );

    var idT = charIDToTypeID( "T   " );

        var desc122 = new ActionDescriptor();

        var idHrzn = charIDToTypeID( "Hrzn" );

        var idPxl = charIDToTypeID( "#Pxl" );

        desc122.putUnitDouble( idHrzn, idPxl, Xpoint );

        var idVrtc = charIDToTypeID( "Vrtc" );

        var idPxl = charIDToTypeID( "#Pxl" );

        desc122.putUnitDouble( idVrtc, idPxl, Ypoint );

    var idPnt = charIDToTypeID( "Pnt " );

    desc121.putObject( idT, idPnt, desc122 );

    var idTlrn = charIDToTypeID( "Tlrn" );

    desc121.putInteger( idTlrn, 20 );

    var idAntA = charIDToTypeID( "AntA" );

    desc121.putBoolean( idAntA, true );

executeAction( idsetd, desc121, DialogModes.NO );

}

2 replies

JJMack
Community Expert
Community Expert
February 14, 2018

Please do not keep opening addition threads for the same subject. Sprocket holes may damaged.  But as chuck wrote if you do one sprocket at a time you can get the bounds of each.  Using the top left corner point of each you may be able to set a Photoshop ruler then use straighten. If that is possible I do not think it would matter what the distance between sprocket holes is any two holes could be used and Photoshop would calculate the rotation angle. Its a simple right triangle calculation. Your script could of course also do the math instead of Photoshop. However after the rotation the holes would move in an arc and now have different bounds

JJMack
Participating Frequently
February 15, 2018

OK, this is what I've got so far. With each image file I execute an action where I select the top sprocket hole with the magic wand and then the bottom sixteenth sprocket hole with the same. The script first subtracts the width of the sprocket (178 pixels) and then takes the difference in width to calculate the angle of rotation. Because the images are consistently the same length I don't really need a y coordinate to get good enough numbers to rotate. As well, using the action I can get close enough to the sprocket so that the magic wand takes care of the inexactness. So far this seems to work not badly.

#target photoshop

if (documents.length == 0) {

    alert("nothing opened");

} else {

    // start

    //setup

    var file = app.activeDocument;

    var selec =  file.selection;

    //run

    var bnds = selec.bounds; // get the bounds of current selection

    var // save the particular pixel values

       xLeft = bnds[0],

       yTop = bnds[1],

       xRight = bnds[2],

       yBottom = bnds[3];


    var newAngle1 = [ [xRight - 178 ] - xLeft ]; // remove sprocket width

    var newAngle2 = [ [newAngle1 /  200 ] ]; // set amount of rotate

    var Angle = parseFloat(newAngle2);

    //Angle = -1 * Angle;  

    //alert(Angle);  

}

Rotate();

function Rotate() {

var orig_ruler_units = app.preferences.rulerUnits;

app.preferences.rulerUnits = Units.PIXELS;

// Rotate portrait to landscape orientation

if (activeDocument.height > activeDocument.width) activeDocument.rotateCanvas(Angle);

// Reset units to original settings

app.preferences.rulerUnits = orig_ruler_units;

}

Participating Frequently
February 16, 2018

Background layer can not be rotated you can add this before the rotate to convert a background layer to a normak layer

activeDocument.activeLayer.isBackgroundLayer=0; // Make it a normal Layer


This works beautifully, John. Thank you so much.

Step 1: load image and select color samples inside top and bottom sprocket.

Step 2: using action, run your script:

// Save the current preferences 

var startRulerUnits = app.preferences.rulerUnits; 

// Set Photoshop to use pixels  

app.preferences.rulerUnits = Units.PIXELS; 

Main(); 

// Return the app preferences 

app.preferences.rulerUnits = startRulerUnits; 


function Main() { 

if (app.activeDocument.colorSamplers.length!=2) { 

alert('two color sampler points are required'); 

return; 

else { 

point1 = [];

point2 = [];

var mySampler = app.activeDocument.colorSamplers[0];  //find out where x y coordinates of first sampler are

var samptx =mySampler.position[0];

var sampty =mySampler.position[1];

var sampx = parseInt(samptx);

var sampy = parseInt(sampty);

for (var s=0,len=app.activeDocument.colorSamplers.length;s<len;s++) { 

var colorSamplerRef = app.activeDocument.colorSamplers

MagicWand( colorSamplerRef.position[0].value ,colorSamplerRef.position[1].value); 

if (s==0) point1=TopLeft(); 

else point2=TopLeft(); 

app.activeDocument.selection.deselect(); 

   }  

   Rwidth = point2[0]-point1[0]; 

   Rheight = point2[1]-point1[1]; 

   degrees = Math.atan(Rwidth/Rheight) * 180 / Math.PI; 

   activeDocument.activeLayer.isBackgroundLayer=0; // Make it a normal Layer

   app.activeDocument.activeLayer.rotate(degrees); 

}

   activeDocument.selection.selectAll();

    var file = app.activeDocument;

    var selec =  file.selection;

    var newRect = [ [sampx-300, sampy -500], [sampx-300 , sampy+12520], [sampx + 1400, sampy + 12520], [sampx + 1400, sampy - 500] ]; // get selection for cropping so that all images are same size

    selec.deselect;

    selec.select(newRect);


function TopLeft() { 

try{ 

TL=[]; 

var SB = app.activeDocument.selection.bounds; 

TL[0]=SB[0].value; 

TL[1]=SB[1].value; 

return TL;  

catch(e){} 

function MagicWand(Xpoint,Ypoint) {   

// ======================================================= 

var idsetd = charIDToTypeID( "setd" ); 

    var desc121 = new ActionDescriptor(); 

    var idnull = charIDToTypeID( "null" ); 

        var ref33 = new ActionReference(); 

        var idChnl = charIDToTypeID( "Chnl" ); 

        var idfsel = charIDToTypeID( "fsel" ); 

        ref33.putProperty( idChnl, idfsel ); 

    desc121.putReference( idnull, ref33 ); 

    var idT = charIDToTypeID( "T   " ); 

        var desc122 = new ActionDescriptor(); 

        var idHrzn = charIDToTypeID( "Hrzn" ); 

        var idPxl = charIDToTypeID( "#Pxl" ); 

        desc122.putUnitDouble( idHrzn, idPxl, Xpoint ); 

        var idVrtc = charIDToTypeID( "Vrtc" ); 

        var idPxl = charIDToTypeID( "#Pxl" ); 

        desc122.putUnitDouble( idVrtc, idPxl, Ypoint ); 

    var idPnt = charIDToTypeID( "Pnt " ); 

    desc121.putObject( idT, idPnt, desc122 ); 

    var idTlrn = charIDToTypeID( "Tlrn" ); 

    desc121.putInteger( idTlrn, 20 ); 

    var idAntA = charIDToTypeID( "AntA" ); 

    desc121.putBoolean( idAntA, true ); 

executeAction( idsetd, desc121, DialogModes.NO ); 

The little bit I have added gets the x y coordinates from the first color sample and makes a selection box for cropping. That way, the image is not only vertical, but the sprockets will be roughly in the same y position in each file.

3. Using the same action, finish cropping.

4. Using the same action, magic wand is programmatically clicked on first frame sprocket. Script 2 is run:

#target photoshop

if (documents.length == 0) {

    alert("nothing opened");

} else {

    // start

    //setup

    var file = app.activeDocument;

    var selec =  file.selection;

    //run

    var bnds = selec.bounds; // get the bounds of current selection

    var // save the particular pixel values

       xLeft = bnds[0],

       yTop = bnds[1],

       xRight = bnds[2],

       yBottom = bnds[3];

    var newRect = [ [xLeft-100,yTop -305], [xLeft-100,yTop+555], [xLeft + 1400,yTop + 555], [xLeft + 1400,yTop - 305] ]; // set coords for selection, counter-clockwise

    selec.deselect;

    selec.select(newRect);

    // end

}

5. The action crops to this selection; saves it; then un-crops; then the cursor programmatically takes the next sprocket down and executes script 2 again, up to frame 16.

Resulting in 168,000 perfectly cropped frames of animation which I can later use other actions or routines to clean, sharpen, and adjust. The hardest part of movie film scanning is the registration, making sure each frame is straight and has the sprocket in the same place.

Again, thank you, John, and to others who made suggestions. :> This was good exercise for my liberal-arts brain.

Chuck Uebele
Community Expert
Community Expert
February 14, 2018

I suppose you could. You would need to select one sprocket hole, get the bounds of the selection, then deselect it and select the second hole to compare the values, then put that info into a transform routine.