Known Participant
December 29, 2020
Answered

Custom blend mode or mask?

  • December 29, 2020
  • 5 replies
  • 1314 views

Hi folks,


Quick beginner question here.


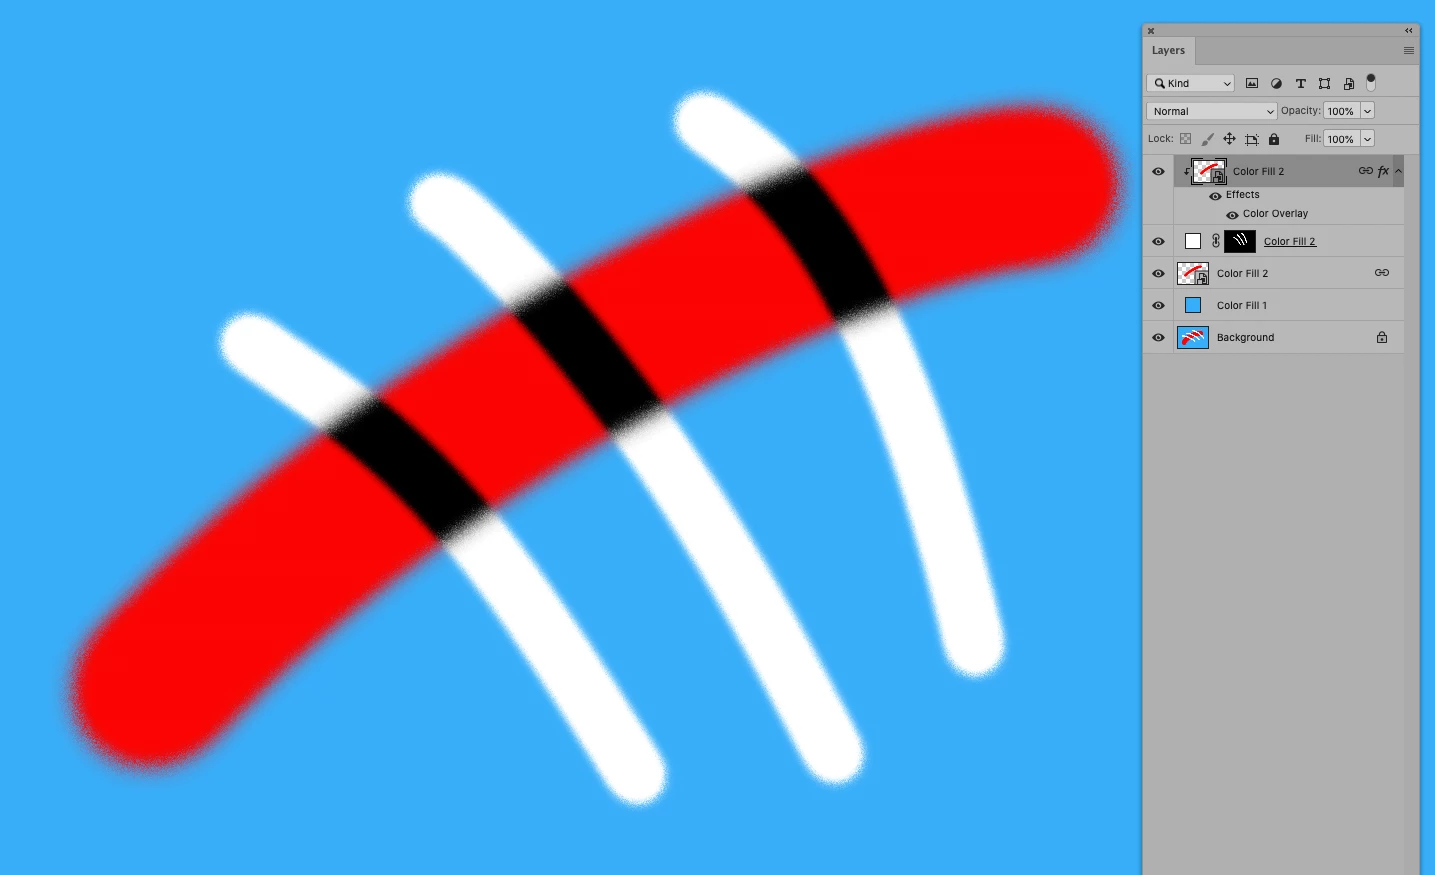
Please take a look at the attached pic.


The white stripes are on the layer above the red shape.


Imagine that i want the white stripes to become black at the point that they're over the red shape. How would one go abour achieving that?


Perhaps there's some sort of custom blend mode? Or is it something to so do with mask?


Any suggestions greatly appreciated!

This topic has been closed for replies.
Correct answer c.pfaffenbichler

5 replies

Norman Sanders
Legend
December 30, 2020

I couldn't let the chance go by without sharing this black & white nugget.

With the top layer in white and its Blending Mode set to Difference, as you use the Move tool to float the line around the area, it will automatically do the color break.

Daz VAuthor
Known Participant
December 30, 2020

Thanks folks. I found a sort of workaround. There's a free app called WindowTop, it allows you to make the smart object floating window semi opaque, then you can resize to match and place it on top of the main comp, so you can edit the smart object while seeing the rest of your comp in situ. At the same time i also open up the comp on a second monitor so its quite ok, i can see the full result. But this functionality should surely be available natively in PS.

Check out 20th century modern art, it's full of this kind of stuff, one should easily be able to have one layer effect only another layer, regardless of where it is in the layer stack.

c.pfaffenbichler
Community Expert
Community Expert
December 30, 2020

»one should easily be able to have one layer effect only another layer, regardless of where it is in the layer stack.«

But how would you define such a relationship without introducing another level of complexity (and user input)? 

Maybe you are looking for something node-based instead of layer-based? 

davescm
Community Expert
Community Expert
December 29, 2020

Another alternative

Depending on the colour changes you want, you could set up a Hue /Sat adjustment layer to change the individual colours of the underlying layers to new colours (remember you can target and adjust 6 colour bands) then paint on the mask to get the colour changes you want

Dave

Ro Hackett
Inspiring
December 29, 2020

I'd do what edgrimely said below... nice and simple ... put black lines on top of the red and fit them into the red by right clicking the black lines layer and select 'create clipping mask' or else just alt-click between those two layers... put your white lines under the red shape

Daz VAuthor
Known Participant
December 29, 2020

Thanks! .... but i don't understand how to turn my white lines into black lines!


Just to clarify: let's forget black and white because that confuses me because those are also the colors used to mask and unmask stuff.


Lets say i have a red square in th middle. When i draw outside the square the lines should be blue, but when i draw inside the square, they should be green. Is that possible in "real time"? By that i mean, will i see that as i draw, or do i first need to draw the blue lines, then stop, do some stuff with clipping mask etc and only THEN i'll see the desired result (green inside)?

Ro Hackett
Inspiring
December 29, 2020

Yes that is what I was saying. As a beginner you do not need smart objects and you dont need them for this. They are there for when you have a hundred instances of different files referencing one image so its easy to change them all by editing one file.


- If you put your lines on top of the red shape you right click the lines layer on top of it and select - create clipping mask


- The lines will then sit inside that shape


Them lines can be black... and you can have a copy of the lines under neath the red shape that are white..... and you can link the white lines layer and the black lines layer so they move together if you want to move them. Get me? 🤔 🤔


By the way ... your white lines layer... click it and press CTRL + J and it will duplicate that layer .... now to turn white to black press CTRL + I (which = image - adjust - invert)


drag red shape in between those two

Participating Frequently
December 29, 2020

Make two copies of the white lines. Select one and fill with black, move it below the red layer. Clip the top white line layer to the red layer.

c.pfaffenbichler
Community Expert
Community Expert
December 29, 2020

Linking the Layers can help make sure that the two instances are moved simultaneously. 

c.pfaffenbichler
Community Expert
Community Expert
December 29, 2020

Make the layer with the red shape a Smart Object, duplicate it, link the duplicate to the »original«, apply Color Overlay, move it atop the layer with the white stripes and Clipping Mask it. 

c.pfaffenbichler
Community Expert
c.pfaffenbichlerCommunity ExpertCorrect answer
Community Expert
December 29, 2020

Daz VAuthor
Known Participant
December 29, 2020

Many thanks guys!


@  c pfaffenbichler


You said: "apply Color Overlay,"


You could explain what you mean? How? To which layer? (sorry, i'm a total beginner with PS!)