• Global community
    • Language:
      • Deutsch
      • English
      • Español
      • Français
      • Português
  • 日本語コミュニティ
    Dedicated community for Japanese speakers
  • 한국 커뮤니티
    Dedicated community for Korean speakers
Exit
0

Dodge & Burn discoloration

Contributor ,
Sep 25, 2019 Sep 25, 2019

Copy link to clipboard

Copied

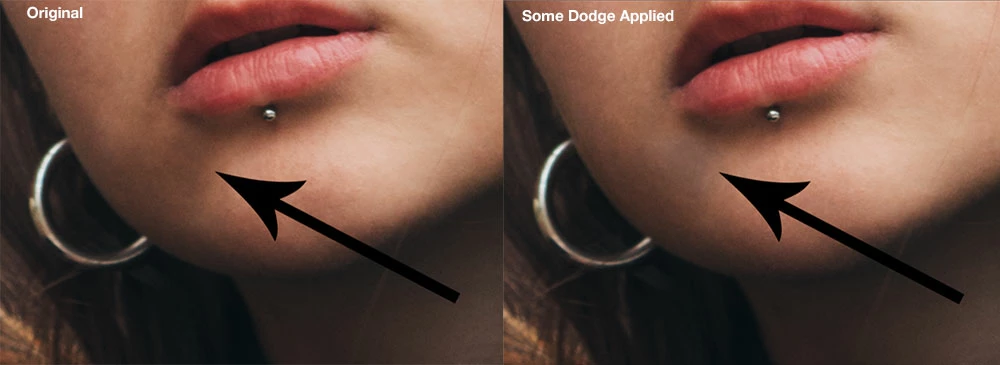
I'm using D&B with the 50% grey layer, soft light method. When I have a really dark area of skin that I want to lighten. I find that it does not lighten satisfactory when using dodge and burn, it goes slightly discolored/grey as you can see below.


What is the correct technique for dealing with this? 


dodge-prob.jpg

Views

1.1K

Translate

Translate

Report

Report
Community guidelines
Be kind and respectful, give credit to the original source of content, and search for duplicates before posting. Learn more
community guidelines
Adobe
Community Expert ,
Sep 25, 2019 Sep 25, 2019

Copy link to clipboard

Copied

You could try the same technique in Lab mode

Votes

Translate

Translate

Report

Report
Community guidelines
Be kind and respectful, give credit to the original source of content, and search for duplicates before posting. Learn more
community guidelines
Community Expert ,
Sep 25, 2019 Sep 25, 2019

Copy link to clipboard

Copied

If you are working in CMYK, it may give you some odd results. The best way is to work in RGB using the layer in Overlay mode, not Soft Light.

Votes

Translate

Translate

Report

Report
Community guidelines
Be kind and respectful, give credit to the original source of content, and search for duplicates before posting. Learn more
community guidelines
Community Expert ,
Sep 25, 2019 Sep 25, 2019

Copy link to clipboard

Copied

Sometimes using such techniques I get to a point which I need to creat a flat Layer on top of my working: shift+alt+Cmd/ctrl+ E and maybe use a lightened Levels Layer, Invert it cmd/ctrl+I and then with a soft brush with a low opacity paint the area you want to lighten:

Screenshot 2019-09-25 at 17.05.16.png  I hope this helps,


Sim

Votes

Translate

Translate

Report

Report
Community guidelines
Be kind and respectful, give credit to the original source of content, and search for duplicates before posting. Learn more
community guidelines
Community Expert ,
Sep 25, 2019 Sep 25, 2019

Copy link to clipboard

Copied

LATEST

In order to make an objective comparison, one image was placed on the other, the layers aligned and a Lab Color reading was made of the identical area in each image. It revealed that the Lightness in the two images varied materially with the right image 8 points darker (on a scale from 0/black to 100/white) in tone.

The result shows thess samples are not a reliable guide for a comparison of the two techniques.

Once the two L (Lightness) values are within a point, the color values can be objectively compared to learn which of the two samples is closer to zero, indicating its greater shift toward gray. 

(Also, superimposing the images and clicking on the top layer eye revealed a significant differnce in the retouched areas)


Fig_.png

Votes

Translate

Translate

Report

Report
Community guidelines
Be kind and respectful, give credit to the original source of content, and search for duplicates before posting. Learn more
community guidelines