

editing out a bra strap

Copy link to clipboard
Copied
how can i most cleanly edit out this bra strap. i'm trying the patch tool but it's not taking the entire patch and it's really hard to get the margins to not bleed into the new area.


Explore related tutorials & articles
 5
Replies
5
5
Replies
5

Copy link to clipboard
Copied
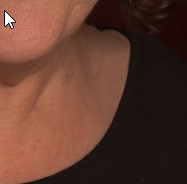
Well, you could just try traditional masking, selections and cloning using a few duplicate layers. Obviously there are limits to using those automated semi-smart tools. I see nothing particularly complicated there - create a simple seletion with the lasso or path tools, clone a few bits of skin into it, adjust the color, fix the neck line with a similar procedure. That's all that's required - basic touchup.
Mylenium

Copy link to clipboard
Copied
Exactly as per Mylenium's instructions


Copy link to clipboard
Copied
Hi
Try this:
1. Make a selection around the area (I used the pen tool then made a selection from the path)
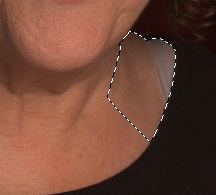
2. Add a new layer and use the clone stamp tool to clone onto the new layer. The selection will ensure you don't go onto the dress. Pay attention to the shadows - you want to keep them.

3. Deselect
4. Now run round the edge of the dress, where you cloned, with the blur tool to soften the transition and match the rest of the image

Dave
Copy link to clipboard
Copied
Dave, what I did was to make a layer mask on a new layer from the selection. Then unlink the mask so I could nudge it because I had applied some feather to soften the edge. I should have moved the retouch a bit more I'm thinking, as there is still a halo of lighter tone between fix and dress.

I also flipped the clone source so I could steal pixels from the other side of the lady's neck.
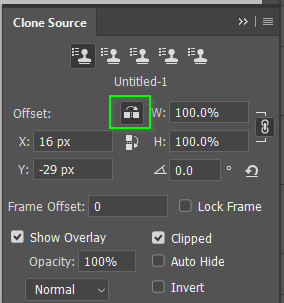
Rogas, if the fix is lighter or darker than the adjacent pixels, clip a curves layer to the fix layer and adjust to match the tonal values. You will almost certainly need to set the blend mode of the curves layer to Luminosity (Shift Alt Y) to prevent a hue change. If this differs along its length, invert the layer mask and paint it back in with a soft white brush set to a lower opacity 30% to 50%.
Copy link to clipboard
Copied
man you guys are good. my results are a mess. thanks for the tips.

 AdChoices