Answered
Filling text with an image
Hey.
I have an image of space and I want it to fill some text I've got, so that the text 'colour' is of that image basically. What's the best way of going about this?
Thanks
Hey.
I have an image of space and I want it to fill some text I've got, so that the text 'colour' is of that image basically. What's the best way of going about this?
Thanks
Here is a copy of a Tech Sheet I wrote for my students. It may be helpful
How to Drop an Image into a Shape or Letter

The command: Layer > Create Clipping Mask provides the ability to place an image inside shape or letter in a single step. The technique is precise, flexible and, perhaps best of all, avoids tedious silhouetting.
The procedure requires three or more layers. We will get to the “or more layers” in a moment. First, consider three layers, as seen below.
![]()
Here, the bottom layer is red with noise added for texture (Filter > Noise > Add Noise) and the top layer is the image to appear within the leaf. Note that the middle layer may be a Shape ayer (top sample) or pixel layer (bottom sample).
A specific Shape may be chosen from Custom Shape tool Options bar. In the first field choose Shape. Then click on the down arrow adjacent to the Shape field at the right and choose a shape from those appearing in the drop-down menu. The Shape layer is a vector graphic. It consists of a formula directing dots, lines and arcs to create the shape and as such, is sharp in all sizes. (A type layer is vector, as well.) The quality of a bitmapped (pixel) layer object, on the other hand, is resolution dependent: the greater the enlargement at a given resolution, the less sharp and more pixilated the object becomes. For that reason, a Custom Shape, with its added scaling flexibility, is often preferred.
To drop the image into the shape appearing in the middle layer, choose the top layer and then choose Layer > Create Clipping Mask. Note, in the layers panel, a down arrow appears to the left of the layer image signifying the Clipping Mask has been applied – and the image appears in the shape. At this point you may use any of the Edit > Transform tools to resize, rotate or otherwise adjust the top layer image so that the desired section of it appears within the shape or letter.
You are not limited to placing the image with a single letter. A single image was spread across an entire word.
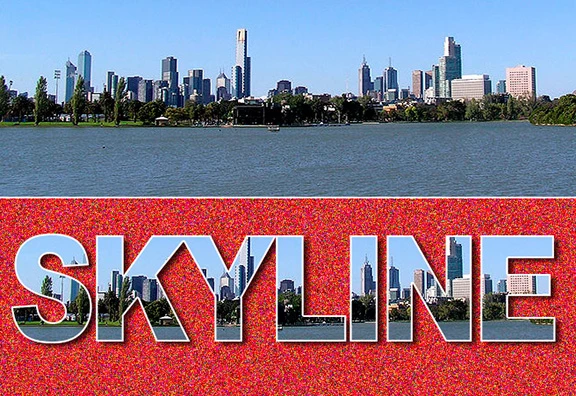
This sample above shows the full image used (top). In the final image, the type layer had Blending Mode Drop Shadow and Stroke adjustments applied for added definition. (Blending Modes are available by clicking on the middle layer. The bottom layer is the same red background that appears on all the samples.
The following sample addresses the “or more layers” mentioned earlier.

Here the bottom layer is the one used throughout all the samples, and Blending Modes (Drop Shadow and Bevel & Emboss) were applied to the type appearing on the layer above the bottom layer. Then the first picture was added, Clipping Mask applied and Edit > Transform fitted it to the letter. Part of the image extended into the second letter. That may be eliminated with either the eraser tool or a mask added to the image and painted with black to remove the unwanted part of the image from the adjacent letter. Then other images are added and placed in sequence. As you add each image, the Clipping Mask will be attached automatically. The final result consists of seven layers.
Note for those who are familiar with the Pen tool and the Paths Panel:
You may create your own custom Shapes (Vector graphics) in Photoshop that may then be saved among the Custom Shape library. Open a new file and set the first field in the Options Bar to Path. Draw the intended shape using Path Tool. Choose Edit > Define Custom Shape, name the Shape and click OK. The new Shape is now stored and available. To choose it, click on the Custom Shape tool. Click on the down arrow next to the Shape field on the right side of the Options bar. The new Shape is the last one of those displayed. Click on it to choose it
Already have an account? Login
Enter your E-mail address. We'll send you an e-mail with instructions to reset your password.