Exit
  • Global community
    • Language:
      • Deutsch
      • English
      • Español
      • Français
      • Português
  • 日本語コミュニティ
  • 한국 커뮤니티
0

Finding Camera Raw settings used previously

New Here ,
Oct 13, 2018 Oct 13, 2018

I'm an amateur at this, teaching myself along the way by trial and error and thankfully the net.....  I used Camera Raw to adjust a psd image that had no background around the subject.  I didn't save the settings that I used, and they were PERFECT for what I was doing.  I'm doing this to a series of 4, with slight color adjustments to each.  I've found on the web how to copy the camera raw settings from one image to a series of others with Bridge, but it doesn't seem to work with psd, only jpg type.  I don't want to have to go in and remove the background again individually since it involves hair blowing in the wind and took forever.....  is there a way to copy the camera raw settings from one psd to another, or at least see what the settings are in a psd? 

Any advice is appreciated, this is part of a birthday present and trying to save time.

2.1K
Translate
Report
Community guidelines
Be kind and respectful, give credit to the original source of content, and search for duplicates before posting. Learn more
community guidelines
Adobe
Community Expert ,
Oct 13, 2018 Oct 13, 2018

Camera Raw by itself (standalone) can only work with Camera Raw, tiff and jpeg files. You normally use Bridge to bring it up. Standalone saves those settings until you clear them.

It can work with psd, but only in Photoshop and only as a filter. Go to Filter > Camera Raw Filter and make your adjustments.

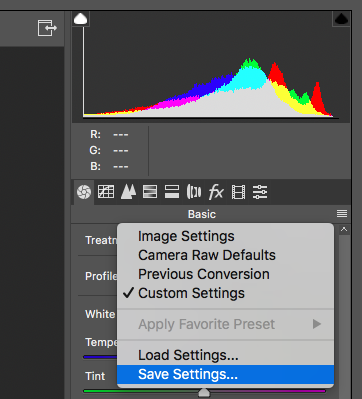
Then go to the Panel menu for the filter and select "Save Settings". You will be prompted to name the setting and place it in a directory.

If you are going to have a lot of custom settings, create a folder with a distinctive name "Camera Raw Custom Settings" and save the custom settings to that folder so they are not mixed in with other .xmp files. If I make adjustments to a melon, it's "melon.xmp" Then I ok the save.  To apply it to a picture you are woking on, use "Load Settings" in the Panel menu to pick the preset you need.

As an extra treat, when you use the Standalone Camera Raw, those very same saved presets can be loaded there as well.

Screen Shot 2018-10-13 at 5.16.48 PM.png

Translate
Report
Community guidelines
Be kind and respectful, give credit to the original source of content, and search for duplicates before posting. Learn more
community guidelines
New Here ,
Oct 13, 2018 Oct 13, 2018

Thanks Gener7, problem is I want to see the setting used in a psd that I didn't save the settings of.....  I need to duplicate settings that weren't saved from a psd image. I've used camera raw on a number of different images since, so the settings stored automatically after I altered that image have changed.  Ideally I want 4 identical subject images slightly altered each in colors, with different backgrounds.  If I can see the settings I used in the saved psd original, I can do it with no variation other than what I intend to make.  Make sense?

Translate
Report
Community guidelines
Be kind and respectful, give credit to the original source of content, and search for duplicates before posting. Learn more
community guidelines
Community Expert ,
Oct 13, 2018 Oct 13, 2018

Let me see... 

Load a pristine PSD and open the the Camera Raw Filter. You notice the sliders are at zero or "Camera Raw defaults". That's your starting point.

Then duplicate that file and make the adjustments or load the presets. Leave the original as is.

Does that work for you?

Translate
Report
Community guidelines
Be kind and respectful, give credit to the original source of content, and search for duplicates before posting. Learn more
community guidelines
Community Expert ,
Oct 13, 2018 Oct 13, 2018

It may not. The Camera Raw Filter only takes one picture at a time. Camera Raw is far more powerful and Tiff carries all the properties of a PSD.

So save your original PSD as a Tiff, and make a few duplicates.

Working from Bridge, you can select all those Tiffs and load the into Adobe Camera Raw. They will show up as a filmstrip on the left.

You then leave Tiff 1 alone as a reference and adjust 2, 3, and 4. When you click on the thumbnail you can see the difference by switching between thumbnails and the adjustment panel is displayed for each.

That may be easier.

Translate
Report
Community guidelines
Be kind and respectful, give credit to the original source of content, and search for duplicates before posting. Learn more
community guidelines
New Here ,
Oct 13, 2018 Oct 13, 2018
LATEST

Thanks - will give the suggestions a try. 

Translate
Report
Community guidelines
Be kind and respectful, give credit to the original source of content, and search for duplicates before posting. Learn more
community guidelines