• Global community
    • Language:
      • Deutsch
      • English
      • Español
      • Français
      • Português
  • 日本語コミュニティ
    Dedicated community for Japanese speakers
  • 한국 커뮤니티
    Dedicated community for Korean speakers
Exit
0

Finding the right program to fit my image into a Mockup

New Here ,
Mar 14, 2019 Mar 14, 2019

Copy link to clipboard

Copied

Hi everyone,

So here is my question : I'm trying to insert pictures into a mockup (first picture). However, when I click on any layer, I'm given a bland screen (picture 2) in which my pictures are not made to fit in. However, the layers we see on the third picture totally allow me to put my pictures in by clicking on one of the layers, thus presenting me a flat surface on which I only need to add my image (picture 4).

Would you guys know what prevents me from adjusting my pictures to the first mockup ? I noticed the second one has grids all around, could it be the reason why I can fit my pictures in its layers ?

Thanks in advance and have a great day/night

Capture dCapture dCapture dCapture d

Views

263

Translate

Translate

Report

Report
Community guidelines
Be kind and respectful, give credit to the original source of content, and search for duplicates before posting. Learn more
community guidelines

correct answers 1 Correct answer

Community Expert , Mar 14, 2019 Mar 14, 2019

Yeah, what Trevor said. I would add, add you image by placing it as a Smart Object. That way, you don't have to convert to a SO as a separate step, and the corners will be assured of being square.

Votes

Translate

Translate
Adobe
Community Expert ,
Mar 14, 2019 Mar 14, 2019

Copy link to clipboard

Copied

It looks like picture #4 is a Smart Object, open for editing. Paste your image there, and save. It should appear in your mockup, with the necessary transform to fit picture #2.

Votes

Translate

Translate

Report

Report
Community guidelines
Be kind and respectful, give credit to the original source of content, and search for duplicates before posting. Learn more
community guidelines
New Here ,
Mar 14, 2019 Mar 14, 2019

Copy link to clipboard

Copied

Hi Semaphore,

Thanks a lot for your reply. Picture #4 indeed works well when I add a picture in it, but #1 and #3 are two different mockups and I'd like to make #1 similar to #3 to be able to insert my pictures in it. You suggested that #4 could be a smart object, may I ask you how I may turn #1 into something similar ?

Thanks a lot

Votes

Translate

Translate

Report

Report
Community guidelines
Be kind and respectful, give credit to the original source of content, and search for duplicates before posting. Learn more
community guidelines
Community Expert ,
Mar 14, 2019 Mar 14, 2019

Copy link to clipboard

Copied

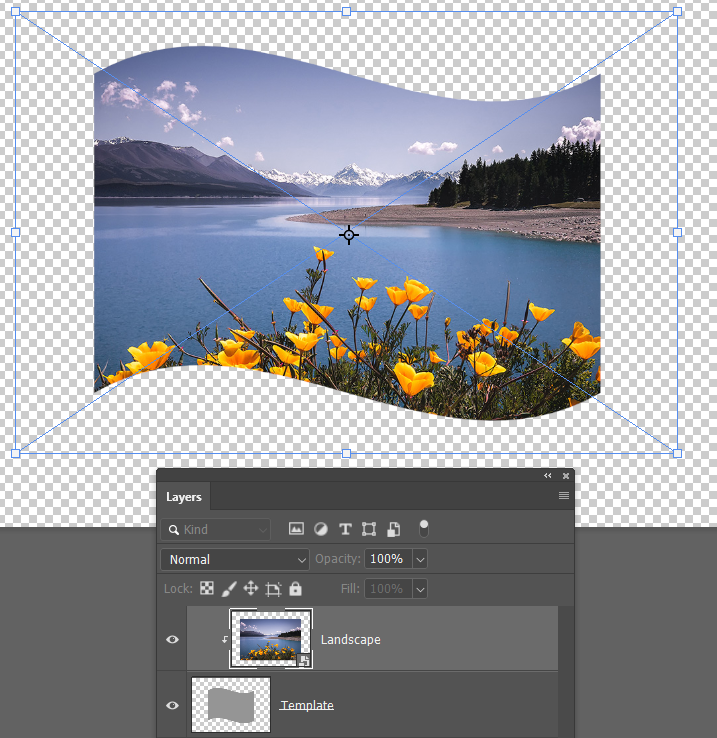
I prefer to start with an image perpendicular to the canvas, and make it a Smart Object.

Then drag the corners into position like below (holding down the Ctrl or Cmd key).

The advantage of this is that if you OK the Transform, and then Transform again, the handles are still in the corners.

If you don't use a Smarty Object, then if you want to Transform again, the bounding box does  not stay in the corners, which makes it a lot more difficult.

This is true of  a lot of drawing, compositing, illustrating techniques in Photoshop.  Make the object square. Make it a Smart Object, and Transform into required position.

Another big advantage is if you later want to edit the object, double click the SO to open in a new window, and it is square again, making for easier edits, like adding text, for instance.

Votes

Translate

Translate

Report

Report
Community guidelines
Be kind and respectful, give credit to the original source of content, and search for duplicates before posting. Learn more
community guidelines
New Here ,
Mar 14, 2019 Mar 14, 2019

Copy link to clipboard

Copied

Thank you a lot Trevor and Semaphoric, it seems like I'"m getting closer to what I need. I will check a tutorial about smart objects and try to apply it to my own creations, I'll be back with feedback when I'm done

Thanks so much !

Votes

Translate

Translate

Report

Report
Community guidelines
Be kind and respectful, give credit to the original source of content, and search for duplicates before posting. Learn more
community guidelines
Community Expert ,
Mar 14, 2019 Mar 14, 2019

Copy link to clipboard

Copied

LATEST

One more tip...

What I like to do is use the layer you are matching the picture layer to as a template, by clipping the image layer to it.  Probably not so important with straight sides and four corners, but if there is warping involved, it saves a  lot of time.

So exaggerating to make a point, I want to shape the landscape layer to match the grey template layer.  I usually make the template a mid grey to differentiate from background etc.

I've made the landscape layer a Smart Object again.

Hover over the intersection of the two layers till you see this icon, and click

We have immediately masked the area that does not overlap the template layer,  but there is not hint of the required distortion.

The trick  now is to use Free Transform > Warp, and get close to the line,  but not go  to far.  We don't need a perfect match.  We can OK this, and if we later want to fine tune, go  Ctrl T > Warp and the handles are right  where you  left  them.  It's a smart way to  work as it can  save a  lot of time.

Votes

Translate

Translate

Report

Report
Community guidelines
Be kind and respectful, give credit to the original source of content, and search for duplicates before posting. Learn more
community guidelines
Community Expert ,
Mar 14, 2019 Mar 14, 2019

Copy link to clipboard

Copied

Yeah, what Trevor said. I would add, add you image by placing it as a Smart Object. That way, you don't have to convert to a SO as a separate step, and the corners will be assured of being square.

Votes

Translate

Translate

Report

Report
Community guidelines
Be kind and respectful, give credit to the original source of content, and search for duplicates before posting. Learn more
community guidelines