• Global community
    • Language:
      • Deutsch
      • English
      • Español
      • Français
      • Português
  • 日本語コミュニティ
    Dedicated community for Japanese speakers
  • 한국 커뮤니티
    Dedicated community for Korean speakers
Exit
4

Fixing a curved horizon - NOT a crooked one, a curved one.

Enthusiast ,
Feb 11, 2024 Feb 11, 2024

Copy link to clipboard

Copied

Windows 11, Photoshop 25.4.0

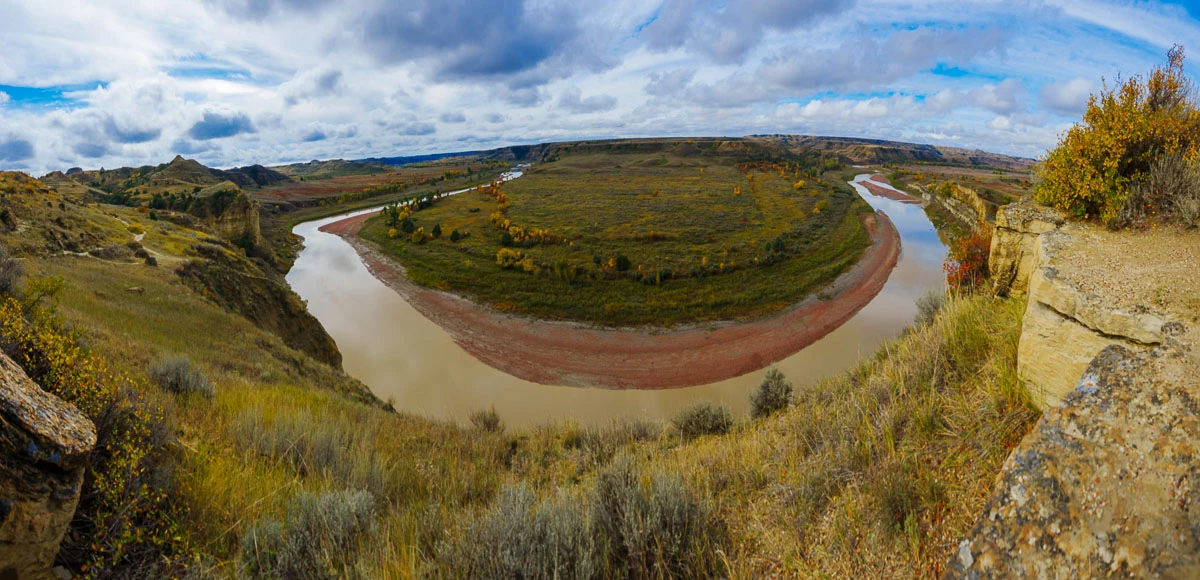
More out of curiosity than anything else, but I have a panorama I put together than ended up with the horizon being curved.  I've been wondering what the best way would be to fix it?  I played with the Transform>Warp, which worked but was clumsy and the puppet warp, which also probably would work, but again, clumsy.  If either of those is the prefered method, I'll just need to get better with the tool 'cause my outcome wasn't perfect.


When I searched, people kept talking about Filters>Distort>Lens Correction filter, but I don't see anything like that in the current Photoshop.


Is there something in Photoshop that would do a good job of making a curved line/object straight?


_A111402-Pano-2.jpg


TOPICS
Windows

Views

372

Translate

Translate

Report

Report
Community guidelines
Be kind and respectful, give credit to the original source of content, and search for duplicates before posting. Learn more
community guidelines

correct answers 1 Correct answer

Community Expert , Feb 11, 2024 Feb 11, 2024

The Lens Correction filter is just in the Filter menu (not Filter > Distort).


You could also try applying Camera Raw as a filter (Filter > Camera Raw Filter...). When it opens, go to the Optics panel to apply Distortion (drag it to the right to remove the curve).


Votes

Translate

Translate
Adobe
Community Expert ,
Feb 11, 2024 Feb 11, 2024

Copy link to clipboard

Copied

The Lens Correction filter is just in the Filter menu (not Filter > Distort).


You could also try applying Camera Raw as a filter (Filter > Camera Raw Filter...). When it opens, go to the Optics panel to apply Distortion (drag it to the right to remove the curve).


Votes

Translate

Translate

Report

Report
Community guidelines
Be kind and respectful, give credit to the original source of content, and search for duplicates before posting. Learn more
community guidelines
Enthusiast ,
Feb 11, 2024 Feb 11, 2024

Copy link to clipboard

Copied

Good grief!  OK, I'm going with senior moment on this one!

Thanks...

Votes

Translate

Translate

Report

Report
Community guidelines
Be kind and respectful, give credit to the original source of content, and search for duplicates before posting. Learn more
community guidelines
Community Expert ,
Feb 11, 2024 Feb 11, 2024

Copy link to clipboard

Copied

Oh, no worries. 


If my response helped, would you mind marking it as correct so that others with the same question can find it? Thanks! 🙂

Votes

Translate

Translate

Report

Report
Community guidelines
Be kind and respectful, give credit to the original source of content, and search for duplicates before posting. Learn more
community guidelines
Community Expert ,
Feb 11, 2024 Feb 11, 2024

Copy link to clipboard

Copied

I'd still do this with Warp, and a 3 x 3 grid to handle the assymetric curvature:


warp_1.png


Then crop and a bit of content aware to fill the remaining gaps. I also took the liberty to remove the yellow color cast in the foreground with a luminosity mask:


warp_2.png


When transforming, I prefer to always go inwards to avoid upsampling. But a little bit in the corners won't do any harm here.

Votes

Translate

Translate

Report

Report
Community guidelines
Be kind and respectful, give credit to the original source of content, and search for duplicates before posting. Learn more
community guidelines
Community Expert ,
Feb 11, 2024 Feb 11, 2024

Copy link to clipboard

Copied

This isn't actually a lens issue, so I don't think optical correction is the way to go. While it is (very!) clumsy, I would go for Transform > Warp.


Just using the default upper corner handles, I could get a straight horizon with the typical cylindrical panorama shape.

Semaphoric_0-1707673430344.png


Votes

Translate

Translate

Report

Report
Community guidelines
Be kind and respectful, give credit to the original source of content, and search for duplicates before posting. Learn more
community guidelines
Enthusiast ,
Feb 11, 2024 Feb 11, 2024

Copy link to clipboard

Copied

Thanks for the ideas everyone.

That's what I played with this morning, and I was able to get a better result than I got with the puppet warp, but I was curious if there was something in Photoshop I wasn't aware of that would do a better job, more simply.  I went the other direction with the warp because the image is so big - cropped, it's still around 13,500 x 6500, so having enough pixels for a normal print won't be a problem.  I think working at the horizon line worked pretty well.


_A111402-Pano-2_PSx.jpg

Votes

Translate

Translate

Report

Report
Community guidelines
Be kind and respectful, give credit to the original source of content, and search for duplicates before posting. Learn more
community guidelines
Community Expert ,
Feb 11, 2024 Feb 11, 2024

Copy link to clipboard

Copied

LATEST

Lens Correction isn’t on the Distort submenu, it’s at Filter > Lens Correction. But it’s probably not the best tool for the job anyway (unless it works right away, then of course it’s fine). The other warp tools you used may be challenging to use for this because they’re intended as creative tools for introducing distortion, not removing it.


In this example of a bent horizon, you should look into using Filter > Adaptive Wide Angle. It has tools specially designed for handling fisheye and very wide panorama images. In that filter, correcting this could be as quick as dragging a horizontal constraint guide across the horizon, especially if the right lens metadata is in the image so it can more easily work out the perspective.


Howard Pinsky goes over it in this video (under 3 minutes, so more succinct than some of the other videos out there). Although in his example I would have drawn the horizon constraint all the way across the image, not starting at the water; he left the buildings uncorrected.


Trying it out with the uploaded image…this example takes only a few seconds.


Photoshop DavePinMinn Adaptive Wide Angle.gif


Of course you don’t have to use that Scale option, if you’d rather fill in the corners with Content-Aware Fill or Generative Fill (both of which did not exist when this filter was first created). Or you can just manually crop the result.

Votes

Translate

Translate

Report

Report
Community guidelines
Be kind and respectful, give credit to the original source of content, and search for duplicates before posting. Learn more
community guidelines