• Global community
    • Language:
      • Deutsch
      • English
      • Español
      • Français
      • Português
  • 日本語コミュニティ
    Dedicated community for Japanese speakers
  • 한국 커뮤니티
    Dedicated community for Korean speakers
Exit
1

Gradient Tool now creates unwanted new layer

Community Beginner ,
May 24, 2023 May 24, 2023

Copy link to clipboard

Copied

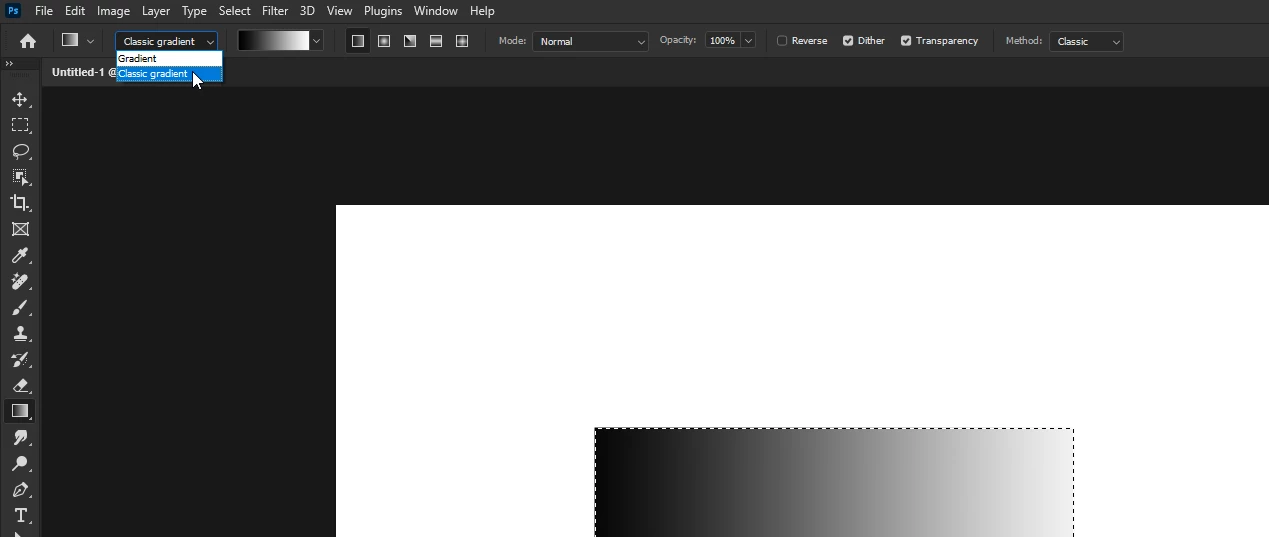
If I select an area, say with a rectagular marquee, and then hit my grandient tool to add a gradient within my selection, then draw my grandient, Photoshop will create a new Gradient Fill 1 layer.  Why?  I don't want this, I want the gradient on the layer I had selected.  Frustrating.

TOPICS
Windows

Views

2.9K

Translate

Translate

Report

Report
Community guidelines
Be kind and respectful, give credit to the original source of content, and search for duplicates before posting. Learn more
community guidelines

correct answers 1 Correct answer

Community Expert , May 24, 2023 May 24, 2023

@Chris29379353jpz4 change this option to classic gradient

2023-05-24 15_30_44-Untitled-1 @ 50% (RGB_8) _.png

Votes

Translate

Translate
Adobe
Mentor ,
May 24, 2023 May 24, 2023

Copy link to clipboard

Copied

look in your options bar for new options to change behavior...

Votes

Translate

Translate

Report

Report
Community guidelines
Be kind and respectful, give credit to the original source of content, and search for duplicates before posting. Learn more
community guidelines
Community Beginner ,
May 24, 2023 May 24, 2023

Copy link to clipboard

Copied

I have.  Nothing.

Votes

Translate

Translate

Report

Report
Community guidelines
Be kind and respectful, give credit to the original source of content, and search for duplicates before posting. Learn more
community guidelines
Community Expert ,
May 24, 2023 May 24, 2023

Copy link to clipboard

Copied

@Chris29379353jpz4 change this option to classic gradient

2023-05-24 15_30_44-Untitled-1 @ 50% (RGB_8) _.png

Votes

Translate

Translate

Report

Report
Community guidelines
Be kind and respectful, give credit to the original source of content, and search for duplicates before posting. Learn more
community guidelines
Community Beginner ,
May 24, 2023 May 24, 2023

Copy link to clipboard

Copied

Oh for crying out loud.  THANK YOU!  

Votes

Translate

Translate

Report

Report
Community guidelines
Be kind and respectful, give credit to the original source of content, and search for duplicates before posting. Learn more
community guidelines
Adobe Employee ,
May 24, 2023 May 24, 2023

Copy link to clipboard

Copied

Hello @Chris29379353jpz4 the gradient tool has been updated to work non-destructively by default hence it will create a gradient fill layer when the tool is set to Gradient mode. 

Switching to Classic gradient is how you can work with the tool as it used to. This setting should be remembered when restarting Photoshop. 

Thanks!

Votes

Translate

Translate

Report

Report
Community guidelines
Be kind and respectful, give credit to the original source of content, and search for duplicates before posting. Learn more
community guidelines
Community Beginner ,
May 24, 2023 May 24, 2023

Copy link to clipboard

Copied

I see.  Will there ever be a time where developers will realize just because something is new, or because they are releasing something they see as an improvement - it doesn't mean everyone wants it?  

Thanks for the reply.

Votes

Translate

Translate

Report

Report
Community guidelines
Be kind and respectful, give credit to the original source of content, and search for duplicates before posting. Learn more
community guidelines
New Here ,
May 24, 2023 May 24, 2023

Copy link to clipboard

Copied

We understand users have their own workflows and preferences. The tool was developed with that in mind, it provides both modes, non-destructively with more control on canvas (default mode) and destructively. Users can choose which mode to use.

Switching the tool to Classic mode will retain this preference and allow user to continue working as they prefer. 


Please let us know if the tool is not retaining your preference, Thanks

Votes

Translate

Translate

Report

Report
Community guidelines
Be kind and respectful, give credit to the original source of content, and search for duplicates before posting. Learn more
community guidelines
Community Expert ,
May 24, 2023 May 24, 2023

Copy link to clipboard

Copied

quote

I see.  Will there ever be a time where developers will realize just because something is new, or because they are releasing something they see as an improvement - it doesn't mean everyone wants it?  

By @Chris29379353jpz4


It sure might not mean everyone wants it, but an important enhancement like this is very likely to be something more users want than don’t want. So although some may not want it, it makes sense to make the new way the default, because it’s likely that more users want the vastly improved flexibility, especially in the future.


For context, Photoshop had been falling behind in this area. Easy-to-edit gradients have been available in other image editors that I use (such as Adobe Lightroom Classic, but non-Adobe software had also advanced beyond Photoshop in this area), and I am one of the users who was waiting a long time for Photoshop to catch up here. I probably won’t ever want to use it the old way again, because the new way is so much more powerful and productive.


This is not to dismiss your preference, you have a right to want to do it a certain way want. But this is to help explain why it is set the new way. Fortunately Adobe does let you still do this the old way; not all enhancements are reversible.


Adding a new nondestructive layer is a standard Photoshop way of preserving your options. It is how many of the advanced new features work (sky replacement,  AI generative fill…) so that you can easily back out of an edit any time in the future and try something else without wrecking the image, or just be able to turn off the edit or do a with/without comparison.

Votes

Translate

Translate

Report

Report
Community guidelines
Be kind and respectful, give credit to the original source of content, and search for duplicates before posting. Learn more
community guidelines
Community Expert ,
May 24, 2023 May 24, 2023

Copy link to clipboard

Copied

@ClaudiaR99 (employee) and @Claudia5FDC (new here)


Are you the same person with two IDs? 


Jane


Votes

Translate

Translate

Report

Report
Community guidelines
Be kind and respectful, give credit to the original source of content, and search for duplicates before posting. Learn more
community guidelines
New Here ,
May 24, 2023 May 24, 2023

Copy link to clipboard

Copied

Yes! sorry for the mix up.

Votes

Translate

Translate

Report

Report
Community guidelines
Be kind and respectful, give credit to the original source of content, and search for duplicates before posting. Learn more
community guidelines
Community Expert ,
May 24, 2023 May 24, 2023

Copy link to clipboard

Copied

I sent a PM to @ClaudiaR99 the Employee.


Jane


Votes

Translate

Translate

Report

Report
Community guidelines
Be kind and respectful, give credit to the original source of content, and search for duplicates before posting. Learn more
community guidelines
New Here ,
May 24, 2023 May 24, 2023

Copy link to clipboard

Copied

HAHAHA. I just said the same thing out loud when I saw the fix.  LOL!

Votes

Translate

Translate

Report

Report
Community guidelines
Be kind and respectful, give credit to the original source of content, and search for duplicates before posting. Learn more
community guidelines
New Here ,
Oct 03, 2023 Oct 03, 2023

Copy link to clipboard

Copied

Nothing is working for me. The layer is automatically created when using the Gradient Tool with "Method: Classic" and with "Layers Panel Options/Use Default Masks on Fill Layers" deselected. So frustrating, not the way I work at all! Why would anyone want to add unnecessary layers? How do you turn it off!


Votes

Translate

Translate

Report

Report
Community guidelines
Be kind and respectful, give credit to the original source of content, and search for duplicates before posting. Learn more
community guidelines
Explorer ,
Oct 09, 2023 Oct 09, 2023

Copy link to clipboard

Copied

Choose "Classic Gradient" from the drop down on the far left.  The options are: "Gradient or  Classic Gradient."   


JStuartJohnson_0-1696912596857.png


"Method" drop down on the right determines how the transition between colors is calculated, referred to as: the Interpolation Method.  Classic in this case refers to the previous (i.e. CS6 ) method of color interpolation.


The Adobe Docs, explains in detail:  https://helpx.adobe.com/photoshop/using/gradient-interpolation.html

Votes

Translate

Translate

Report

Report
Community guidelines
Be kind and respectful, give credit to the original source of content, and search for duplicates before posting. Learn more
community guidelines
Community Beginner ,
Oct 26, 2023 Oct 26, 2023

Copy link to clipboard

Copied

Using Classic Gradient DOES NOT HELP. Every thread about this topic has that marked as the right answer and it's wrong!

I need the tool to make a gradient from the color picker foreground color, to the color picker background color, as a raster image inside a selection. This "correct answer" is wrong because it doesn't explain how to switch back to that functionality. This is really frustrating.


Please tell me how to set the gradient preferences to:
- create a RASTER gradient in a selected area of the layer I already chose.
- use the COLOR PICKER foreground and background colors to make the gradient. 


I did not sign up for all this Gradietn Preset insanity to just make a gradient. I put the colors I want in the color picker. Forcing me to use these options is a massive interuption of my workflow.


If you can't set it back to the old way it's easier to just scribble it in with a paintbrush and blur it. The new design is terrible as a default setting. This should be something people have to set up if they want it as a default. YOu've added a 20 step detour to an intuitive process that used to take just a couple clicks. PLEASE STOP DOING THIS.

Votes

Translate

Translate

Report

Report
Community guidelines
Be kind and respectful, give credit to the original source of content, and search for duplicates before posting. Learn more
community guidelines
Community Expert ,
Oct 26, 2023 Oct 26, 2023

Copy link to clipboard

Copied

That's another very annoying issue; see This thread.

So many controls and dialogs regarding color are hosed these days. 😞

Votes

Translate

Translate

Report

Report
Community guidelines
Be kind and respectful, give credit to the original source of content, and search for duplicates before posting. Learn more
community guidelines
Explorer ,
Oct 26, 2023 Oct 26, 2023

Copy link to clipboard

Copied

If I understand your needs, the best solution involves a Gradient Preset and a Tool Preset to speed up your workflow. 


It does require a little set-up, especially if a "foreground to background" gradient doesn't exist. I don't recall if I made one or it was installed by default.  The one I use is located under [ Gradient Presets --> Basic -->  Foreground - Background ]  the icon should match your current foreground and background colors.


If you need to make a  "Foreground to Background" preset.  It can be a little tricky to find "foreground" and "background" options when defining  "color stops" for a gradient. Find them in the context menu, shown in the image below. Click the down arrow next to the Swatch, not the Swatch itself.


Make an "old School" gradient:

  1. Select your area.
  2. Select the Gradient Tool.
  3. Select Classic Gradients
  4. Select your Gradient Preset -> Foreground to Background
  5. Apply your gradient as you have in the past.


But "wait" you say, that's many steps! 

Lucky there are "Tool Presets",  They appear in the tool bar and/or the "Tool Presets" window.  So now your gradient is one or two clicks depending how you have your tool presets configured.


JStuartJohnson_0-1698350045091.png


Votes

Translate

Translate

Report

Report
Community guidelines
Be kind and respectful, give credit to the original source of content, and search for duplicates before posting. Learn more
community guidelines
Community Expert ,
Oct 26, 2023 Oct 26, 2023

Copy link to clipboard

Copied

It's found in Window > Gradients > Legacy Gradients > Legacy Default Gradients

Semaphoric_0-1698364453223.png

This, however, does not fix the issue.


Votes

Translate

Translate

Report

Report
Community guidelines
Be kind and respectful, give credit to the original source of content, and search for duplicates before posting. Learn more
community guidelines
New Here ,
Feb 28, 2024 Feb 28, 2024

Copy link to clipboard

Copied

LATEST

This was bugging me as well and FINALLY found the solution: Once CLASSIC GRADIENT is selected, click the arrow on the dropdown gradient box next to it-->then under 'Basic', select the first square from the left which should be "Foreground to Background"

Votes

Translate

Translate

Report

Report
Community guidelines
Be kind and respectful, give credit to the original source of content, and search for duplicates before posting. Learn more
community guidelines
Explorer ,
Oct 31, 2023 Oct 31, 2023

Copy link to clipboard

Copied

Screenshot 2023-10-31 at 5.12.03 AM.pngScreenshot 2023-10-31 at 5.12.14 AM.png

I'm confused. I switched to Classic gradient and painted it right into the layer without any issue. In my case I selected a foreground to transparent gradient. But it worked just fine. I painted in several gradients into the same layer inside a masked area. How is what you are trying to do different?

Votes

Translate

Translate

Report

Report
Community guidelines
Be kind and respectful, give credit to the original source of content, and search for duplicates before posting. Learn more
community guidelines