Grid Lines issues -
Copy link to clipboard
Copied
Hello,
after I create guides from dragging the blue line from ruler. I then select multiple lines using the marquee tool and the shift button I then go to edit then fill and fill it black. this will create the grid i want.
I am on the teacher computer and it works perfectly but 90 % of the students computers have missing lines after they go through the same process, it is very frustrating. If they select 5 lines maybe 3 will show up. Then we will try again and 1 might show up. Sometimes it appears that there is a line there just invisible.
I am very frustrated because I have tried myself on their computers with the same results
thank you
Explore related tutorials & articles
Copy link to clipboard
Copied
What version of PS are you using? With the newer versions, you can set the guide style in the preferences.
Copy link to clipboard
Copied
Can you please confirm that I am reading your post correctly and that the steps you are taking are as outlined below:
1. Dragging guidelines out from the ruler.

2. Using the marquee tool to try to select the area around the guideline you just created
3. Then you are filling this area with black to create a grid?

Please confirm.
Thanks
-Dax
Copy link to clipboard
Copied
Dax - that is correct
I know that i can draw a line and other potential methods but I find this
way gives me the best chance to create an accurate grid.
To understand it works fine on my computer it is the student computers that
are having the issue.
the PS version i am using Is Photoshop CC 19.1
Copy link to clipboard
Copied
The problem is that you are relying on the marquee tool and the user to select just a pixel or two. I would suggest you use the Line Segment tool to draw over your guidelines instead of the marquee tool. You can snap to guidelines and the lines are more reliable and will remain the same width each time.
My personal opinion is that it is most likely user error creating the differing results.
- Dax
Copy link to clipboard
Copied
Max, that is one strange workflow!
Rather than drag guides from the rulers, have a look at New Guide Layout.
I have a canvas that is 1000 pixels square, and I am creating a guide layout with 100 pixel margins.
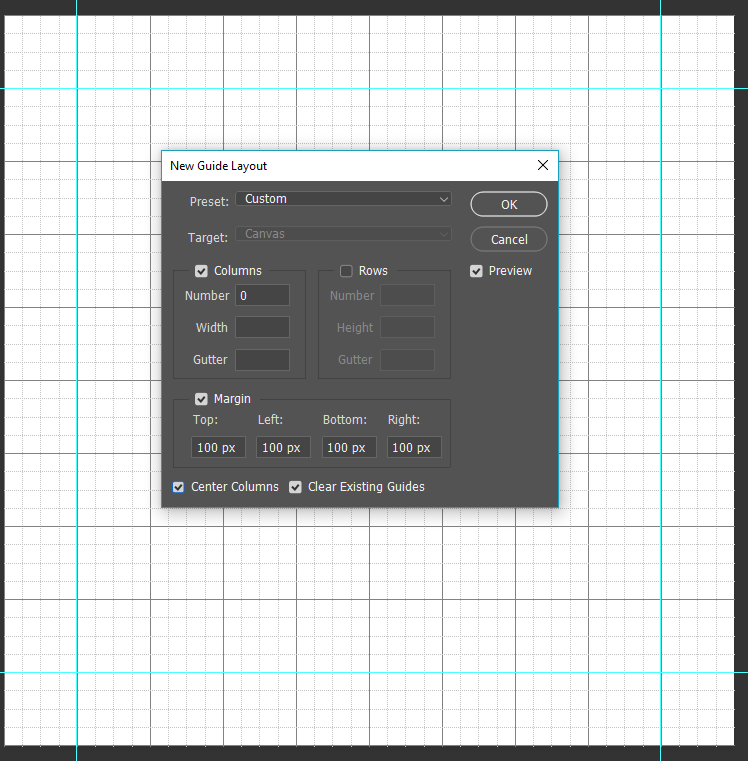
Using nice round numbers, I can uncheck Resample, and set the resolution to a sub-multiple of the canvas size, that being 100ppi in this case. So when I turn on the grid, it exactly aligns with the guides. Note I also dragged the ruler zero point to the intersection of the left and upper guide.
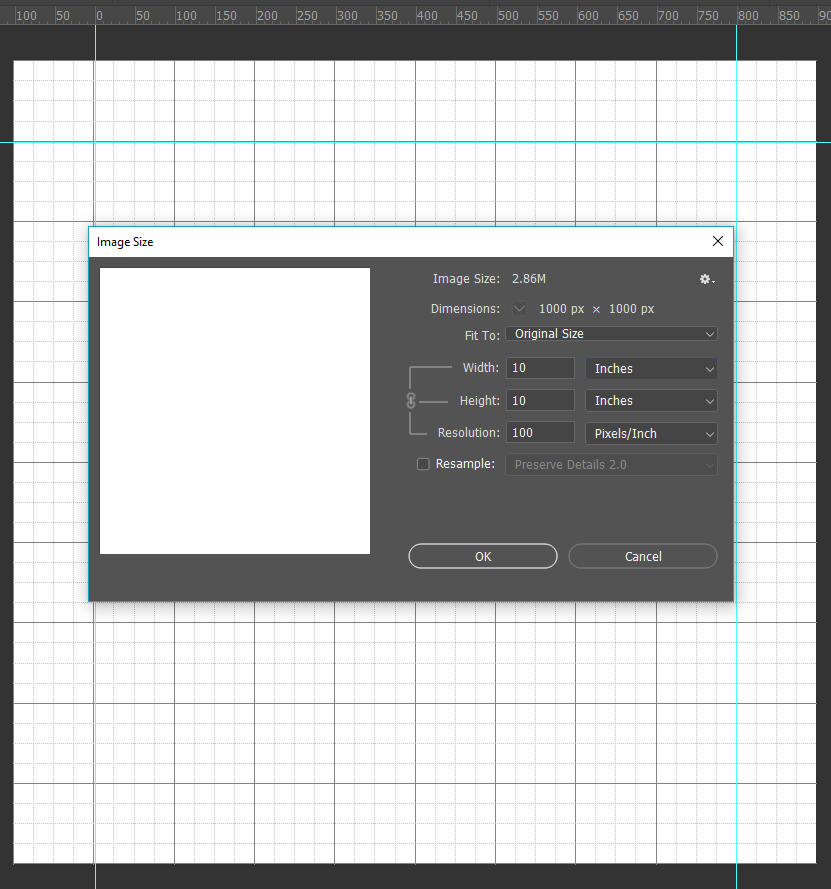
I find this a smarter way to work. Make sure that Snap to guides and grid is enabled, and that Smart Guides are turned on.
The rectangular Marquee tool will also snap to both guides and grid.
The Pen Tool will also snap to the grid with this Preference setting enabled:

When you make a new workpath that you want to keep, drag it to the New Paths icon

If you previously stroked a path with the paint brush, then you only need click on the Stroke icon at the bottom of the Paths panel to stroke with the current brush settings. Note I have named the guide lines layer and its designated colour. This is because I tend to use a lot of guide line layers, and I colour code them for clarity. It's a useful tool for keeping things like perspective right.

My apologies if I am teaching you to suck eggs.
Copy link to clipboard
Copied
Trevor.Dennis I only referenced the dragging from rulers because that was what the OP said he did. Personally I would not really use that method. I would figure out how many squares I need and create the appropriate grid similar to what you did. Automation almost always trumps manual creation when it comes to precision. I was just trying to understand what it was that he was trying to accomplish since his original post was very vague.
Copy link to clipboard
Copied
Sorry Max. I was a bit hasty there. I read the thread too quickly and confused you with the thread starter.
Copy link to clipboard
Copied
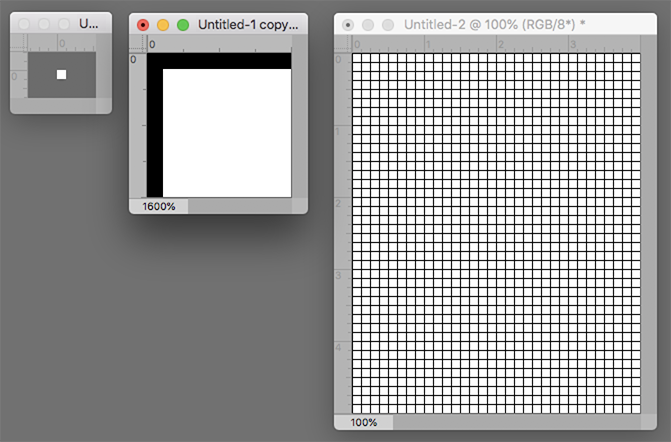
An efficient approach to creating a grid of — for example 1/8” boxes is to:
1. Open a new file with a height and width of 1/8” (Fig 1),
2. Cmd + several times to enlarge the view, perhaps 1,600% (Fig 2)
3. Choose the Single Row Marquee tool (it is nested with the Rectangular Marquee tool) to create a row of marching ants along the top edge of the file.
4. Choose the Single Column Marquee tool, hold down the Shift key and add a vertical row of marching ants along the left edge of the file.
5. Edit > Fill with black and Deselect the marching ants
6. Edit > Define pattern. Name it and OK
*
7. Open a new file of any size
8. Edit > Fill
Contents: Pattern
Custom Pattern: Use down arrow and choose the last in the group. Your grid of an inverted L
9. OK (Fig 3)
Copy link to clipboard
Copied
Typically when I am making Facebook compliant ads where I can only have 20% of the image covered with text, I simply go into the preferences > Guides and Grids and set my Guideline and subdivisions there. But I realize you are trying to make a physical line and not just a guideline. I still think the Line tool drawn over your guidelines is cleaner since these remain shapes. But there are many ways to get the end result you are looking for.
Good Luck
- Dax
Copy link to clipboard
Copied
I appreciate the time and feed back. When I do it the way I mentioned it allows me to select via the magic wand tool the individual squares that can be effected like so: the individual squares can be adjusted separately
when i did it with the line tool... I could not select an individual or groups of squares
I agree It might be user error.... but when I tried it myself on a new project on the students computer.... same issues
Seriously thank you for your time
Copy link to clipboard
Copied
You can try a script that I wrote for making grids. It's $5 on Adobe's exchange site. It will create grids of your choosing and either place guides or vector lines. Grid Creator


