• Global community
    • Language:
      • Deutsch
      • English
      • Español
      • Français
      • Português
  • 日本語コミュニティ
    Dedicated community for Japanese speakers
  • 한국 커뮤니티
    Dedicated community for Korean speakers
Exit
0

Hard Day's Night cover recreation

New Here ,
Mar 21, 2017 Mar 21, 2017

Copy link to clipboard

Copied

Hi,

I am really bad with photoshop.  So if this is easier than I think, please suspend judgment.  I want to create The Beatles Hard Day's Night cover with pictures of myself using photoshop, title at the top, image at the top left and all.  I am just not even sure what the first step would be to do this with photoshop.  I can think of longer avenues to take to accomplish this, but I was hoping someone can give me a step-by-step tutorial on how to do this.  I Googled it, but the results are not as popular as I thought they would be.  Here is the example of the cover I want to recreate:
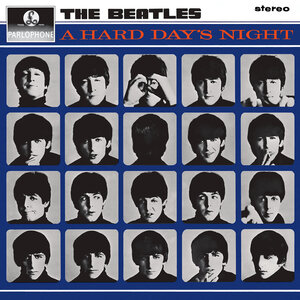
HardDayUK.jpg

Please help!

Views

2.2K

Translate

Translate

Report

Report
Community guidelines
Be kind and respectful, give credit to the original source of content, and search for duplicates before posting. Learn more
community guidelines
Adobe
Apr 25, 2017 Apr 25, 2017

Copy link to clipboard

Copied

Hi reubenw,

I would like to inform you we do not entertain editing requests.

Please take a look at this article Combine multiple images into a group portrait in Adobe Photoshop

Thanks,

Akash

Votes

Translate

Translate

Report

Report
Community guidelines
Be kind and respectful, give credit to the original source of content, and search for duplicates before posting. Learn more
community guidelines
Advisor ,
Apr 25, 2017 Apr 25, 2017

Copy link to clipboard

Copied

Wait....We don't??

Votes

Translate

Translate

Report

Report
Community guidelines
Be kind and respectful, give credit to the original source of content, and search for duplicates before posting. Learn more
community guidelines
Advisor ,
Apr 25, 2017 Apr 25, 2017

Copy link to clipboard

Copied

The main thing is to batch process x many images of yourself in the same way and all to the same size and ideally resolution.

Then it's quite easy really...

Votes

Translate

Translate

Report

Report
Community guidelines
Be kind and respectful, give credit to the original source of content, and search for duplicates before posting. Learn more
community guidelines
Community Expert ,
Apr 25, 2017 Apr 25, 2017

Copy link to clipboard

Copied

gridx.jpg

Since you have a scan of the album cover and probably want to avoid creating the grid ("really bad with Photoshop"), you may:

Open the album cover fiile

Change the mode to CMYK, choose the Cyan channel to create an alpha channel, and use Curves to recreate a maximum black/white grid, as shown in the Channels panel

Change the Mode back to RGB, choose the Alpha channel.

Select All, Copy and Paste as a layer into the Layers panel. Choose the Magic Wand to choose the grid, then Edit > Fill with the blue color.

Use the Magic Wand to choose one of the boxes. Then open a photo file: Select All, Copy and use Paste Special > Paste Into in the Alblum File to drop a photo into the a box.

Edit > Transform > Scale as necessary. Return to the grid layer for each Magic Wand choice of box

Votes

Translate

Translate

Report

Report
Community guidelines
Be kind and respectful, give credit to the original source of content, and search for duplicates before posting. Learn more
community guidelines
Community Expert ,
Apr 25, 2017 Apr 25, 2017

Copy link to clipboard

Copied

It's always better to start with a decent image as our guide. 

You could even use this as a template by selecting Color Range with the dark blue (using a high fuzzyness value like 50), and place you portraits beneath it in the layers panel.

The originals are not quite threshold (every pixel is either full black or full white) but they are _very_ high contrast.  So add a B&W Adjustment layer and a Curves layer that looks something like this:

Crop to a square aspect ratio, and resize all of the portraits to the required size, and save to a new folder.

Find that folder in Bridge. Select all of the files and go Tools > Photoshop > load into Photoshop layers

Group all the layers and drag to the cover template.

Note you can Free Transform the Group which would make all of the contained portraits the same 'correct' size.

Select the move tool, and hold down the Ctrl key while dragging each portrait roughly into position.

Select all the top row images (it might be easier to Group them) and use the align tools to align first vertically, and then equally spaced horizontally.

Repeat for the other rows

Votes

Translate

Translate

Report

Report
Community guidelines
Be kind and respectful, give credit to the original source of content, and search for duplicates before posting. Learn more
community guidelines
Community Expert ,
Apr 25, 2017 Apr 25, 2017

Copy link to clipboard

Copied

LATEST

I forgot the layers panel, and the forum is not letting me Edit at the moment

Votes

Translate

Translate

Report

Report
Community guidelines
Be kind and respectful, give credit to the original source of content, and search for duplicates before posting. Learn more
community guidelines