• Global community
    • Language:
      • Deutsch
      • English
      • Español
      • Français
      • Português
  • 日本語コミュニティ
    Dedicated community for Japanese speakers
  • 한국 커뮤니티
    Dedicated community for Korean speakers
Exit
0

Help! Unable to keep original 2D texture and color while creating a 3D layer

New Here ,
Aug 08, 2018 Aug 08, 2018

Copy link to clipboard

Copied

Hey there, I've only been using 3D functions for a couple of weeks, so please forgive my inexperience.

I am desperately trying to create a 3d-layer out of this original 2d layer, a vintage loudspeaker front

Lautsprecher Front1.png

But all I get is this:

3D_Loudspeaker.png

So I practically lost all the dots and the metal surface. I tried to fiddle around with the properties and controls: No way out - at least for me. Can anybody tell me what I am missing? Thanks

Views

513

Translate

Translate

Report

Report
Community guidelines
Be kind and respectful, give credit to the original source of content, and search for duplicates before posting. Learn more
community guidelines
Adobe
Community Expert ,
Aug 08, 2018 Aug 08, 2018

Copy link to clipboard

Copied

I wish I could help you,  but I really haven't had too much experience in 3d layers

Votes

Translate

Translate

Report

Report
Community guidelines
Be kind and respectful, give credit to the original source of content, and search for duplicates before posting. Learn more
community guidelines
Community Expert ,
Aug 08, 2018 Aug 08, 2018

Copy link to clipboard

Copied

What exactly did you do to get your result?

For me I opened the image you posted and

  1. 3D >> New 3D Extrusion from selected layer
  2. Rotated to get an Isometric view

Screen Shot 2018-08-08 at 12.33.18 PM.png

Votes

Translate

Translate

Report

Report
Community guidelines
Be kind and respectful, give credit to the original source of content, and search for duplicates before posting. Learn more
community guidelines
New Here ,
Aug 08, 2018 Aug 08, 2018

Copy link to clipboard

Copied

Thank you Mike. Unfortunately, I can't show you the exact steps until next monday. But I got there by inflating. And using one of the preset shapes...

Votes

Translate

Translate

Report

Report
Community guidelines
Be kind and respectful, give credit to the original source of content, and search for duplicates before posting. Learn more
community guidelines
Community Expert ,
Aug 08, 2018 Aug 08, 2018

Copy link to clipboard

Copied

I wonder if while you were fiddling with properties and controls at some point you have turned off Texture visibility.

screenshot.png

Votes

Translate

Translate

Report

Report
Community guidelines
Be kind and respectful, give credit to the original source of content, and search for duplicates before posting. Learn more
community guidelines
Community Expert ,
Aug 09, 2018 Aug 09, 2018

Copy link to clipboard

Copied

Hi

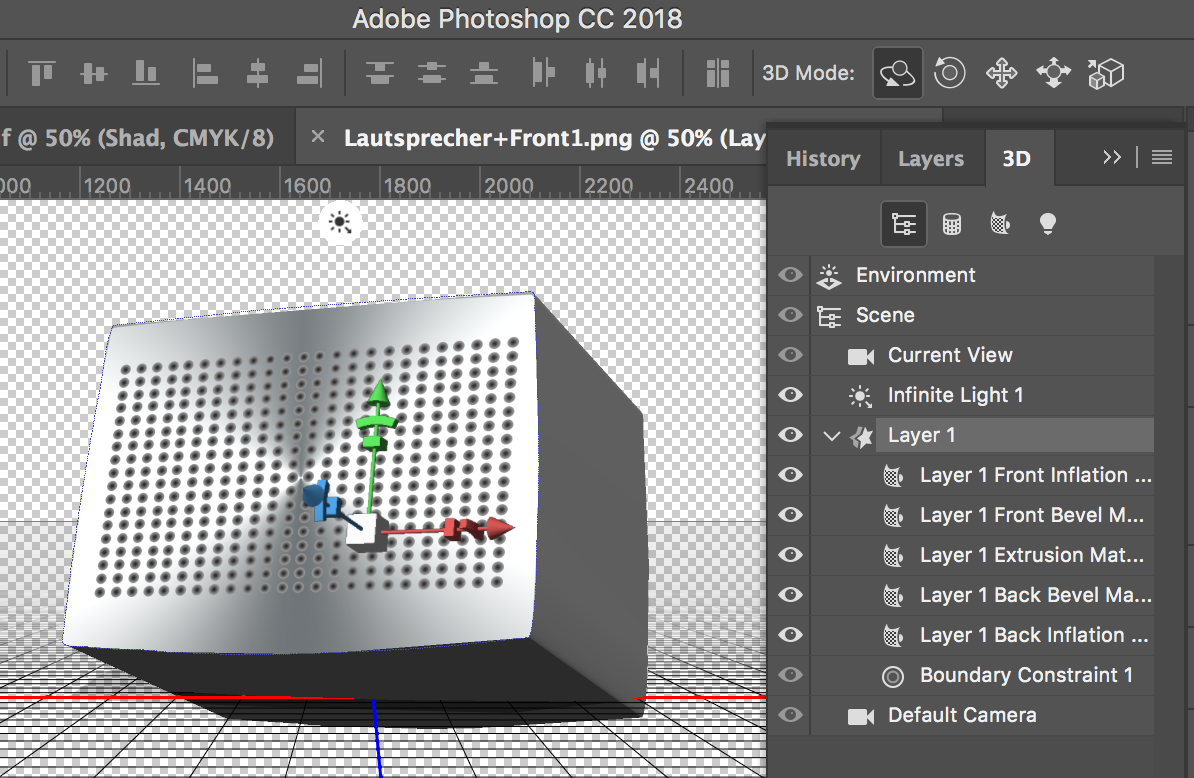
If starting from scratch, Mike's method to make an extrusion from the shape is the easiest and will automatically put the texture on the front material.

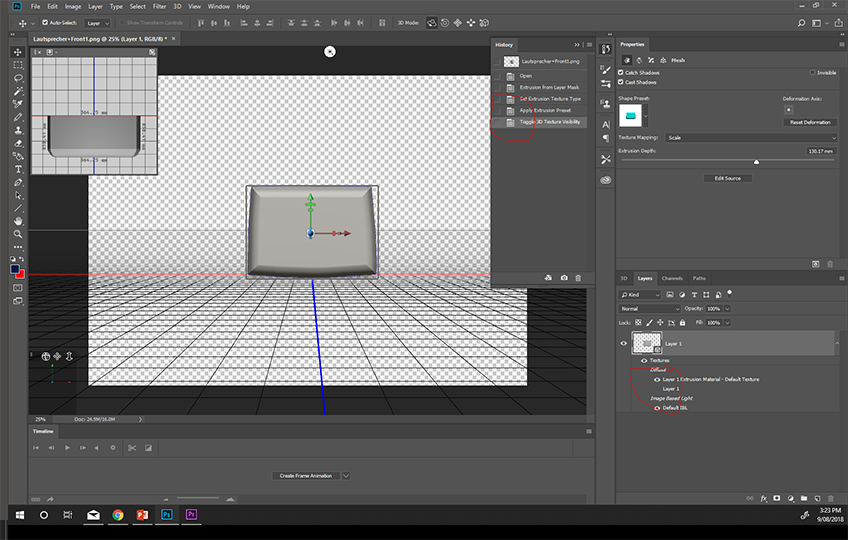
However, if you have already created your model, select the front face in the 3D panel and in properties click on the small folder next to Diffuse and then on Edit Texture (or New Texture if that is greyed).

This will open a psb document with your model surface represented on a flat layer. The wireframe that you see is the UV map. You can add your texture as a new layer in that document and transform/warp it into position. Save the psb document and your 3D view will update.

Dave

Votes

Translate

Translate

Report

Report
Community guidelines
Be kind and respectful, give credit to the original source of content, and search for duplicates before posting. Learn more
community guidelines
New Here ,
Aug 13, 2018 Aug 13, 2018

Copy link to clipboard

Copied

Yes, sorry, all my fault. starting from scratch I figured it out. Somewhere along the way I made some basic errors. Thank you all. And thanks for all the hints.

Votes

Translate

Translate

Report

Report
Community guidelines
Be kind and respectful, give credit to the original source of content, and search for duplicates before posting. Learn more
community guidelines
Community Expert ,
Aug 13, 2018 Aug 13, 2018

Copy link to clipboard

Copied

Thanks for following up and letting us know.

Can you please mark the post correct the best helped you, even if your own. This will changed  the post color to green, so those trying to help others can best utilize their time.

Votes

Translate

Translate

Report

Report
Community guidelines
Be kind and respectful, give credit to the original source of content, and search for duplicates before posting. Learn more
community guidelines
New Here ,
Aug 27, 2018 Aug 27, 2018

Copy link to clipboard

Copied

LATEST

Thank you Mike. If only I knew where I went wrong. I've done everything from scratch and I don't have a clue.

Votes

Translate

Translate

Report

Report
Community guidelines
Be kind and respectful, give credit to the original source of content, and search for duplicates before posting. Learn more
community guidelines