Ken Nielsen
Legend
December 21, 2021
Answered

How do I apply a 'gradient' blur to the background of an image

  • December 21, 2021
  • 2 replies
  • 10301 views

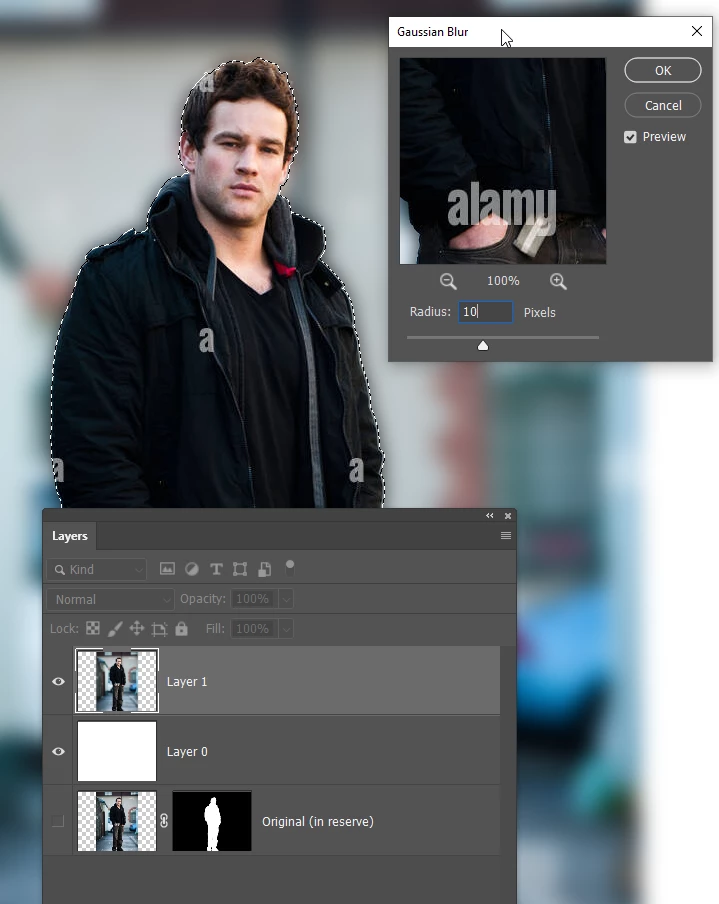
My attempts at this are disappointing. I need a step by step here as this will be something new to me. I'm aware that I will need to duplicate the layer and apply a gaussian blur to the back layer, but how to apply or make a mask to keep the subject separated from the background so the subject is not blurred and also applying the gradient to the background image to 'show through' and become like a 'soft' depth of field, gradually becoming sharp with the foreground subject. Hope this makes sense, I'm sure Photoshop can accomplish this, but need expert advice so I can do this the most practical effective way. I want a nice result to become studio quality outdoor portraits. 

This topic has been closed for replies.
Correct answer Trevor.Dennis

We'd be able to give you better advice if we could see the image you are working with.  That would make a different to the best way to make the selection.  Rather than using Gaussian Blur, you should try the lens blur options, as they can be made to stop the subject bleeding out into the blurred background.


In this example I simply use Select Subject to select the person, and Select & Mask to create a new layer with layer mask.  I'm just keeping that in reserve though.  I can Ctrl click the mask to reload the selection.  I've inverted the selection, and opened Gaussian blur with a value of 10.  Can you see the halo where the man in the background is bleeding through to the blurred area?  You don't want that,


If you use Lens Blur, then you don't get that bleed


What I have done here is copy the selection of the subject to a new layer (Ctrl J)

The original unblurred image as at the bottom of the layer stack.

The layer with the blurred background is in between them, and has a layer mask.

A white to black gradient runs down that mask.  Where the mask is white it shows the blurred layer, and where the maskl is black it reveals the unblurred layer beneath it.

You can experiment with the position of the gradient.  In fact, if you unlink the mask by clicking on the chain icon to the left of the mask, you can then move the mask independantly of the image.


Does this help.  If not, a screen shot of the image you are working with would help us to help you.

2 replies

Stephen Marsh
Community Expert
Community Expert
December 31, 2021

In my experience, Gaussian Blur (at least at higher values) spreads the background pixels including the subject into a halo. You could explore mixing different blur methods together, some may "spread" less than others.


To work around this halo from large Gaussian Blur values:


1) Original flattened image, only the Background layer

2) Dupe the Background into a new layer in order to preserve the original

3) On the duped layer, select the subject

4) CMD/CTRL J to copy the selection to a new layer

5) With the selection active, go back to the duped background layer, use content aware fill and or healing or clone stamp to "fill in" the selection of the subject with background content. This way when you blur this layer, the halo is from similar background content and not the subject (the subject is not there anymore). One may not need to perfectly remove the subject as the blur will hide inaccuracies. EDIT: Very rough picture below to illustrate...


You should probably make the duped background a smart object layer so that the blur filter will be a smart filter.


This is just a brief overview, hope this helps.


Yes, select subject missed the paw and tail hair whispies, I'm guessing that the neural network was trained on a dataset containing people more so than dogs.

Ken Nielsen
Legend
December 31, 2021

Yes, the bleeding of Gaussian Blur was pointed out early by Trevor.Dennis in his answer above. I was. hoping he could help me with some of the intricasy of getting the steps he mentions to work like he showed so well in his examples above. If I could get the steps to work as he points out I would be home free with this. Thanks for your reply here as all of this is educational to me.


Stephen Marsh
Community Expert
Community Expert
December 31, 2021

I'll review Trevor's steps, I'm guessing that the only thing I didn't go into was applying a layer mask and using a black to white gradient tool to the mask.

Trevor.Dennis
Community Expert
Trevor.DennisCommunity ExpertCorrect answer
Community Expert
December 21, 2021

We'd be able to give you better advice if we could see the image you are working with.  That would make a different to the best way to make the selection.  Rather than using Gaussian Blur, you should try the lens blur options, as they can be made to stop the subject bleeding out into the blurred background.


In this example I simply use Select Subject to select the person, and Select & Mask to create a new layer with layer mask.  I'm just keeping that in reserve though.  I can Ctrl click the mask to reload the selection.  I've inverted the selection, and opened Gaussian blur with a value of 10.  Can you see the halo where the man in the background is bleeding through to the blurred area?  You don't want that,


If you use Lens Blur, then you don't get that bleed


What I have done here is copy the selection of the subject to a new layer (Ctrl J)

The original unblurred image as at the bottom of the layer stack.

The layer with the blurred background is in between them, and has a layer mask.

A white to black gradient runs down that mask.  Where the mask is white it shows the blurred layer, and where the maskl is black it reveals the unblurred layer beneath it.

You can experiment with the position of the gradient.  In fact, if you unlink the mask by clicking on the chain icon to the left of the mask, you can then move the mask independantly of the image.


Does this help.  If not, a screen shot of the image you are working with would help us to help you.

Ken Nielsen
Legend
December 30, 2021

I must come back and ask for basic help. My subject and the background are too confusing for Photoshop to make a selection and it tells me so. So, I made a path around my subject to carefully select and then made a slection. When I go to Select & Mask it goes into a menu but when I hit okay nothing is done. The subject is selected with a path around it, I tried reversing that and still no mask is made. I'm on the right track with this as you have laid out so clearly, but for some reason I'm not getting a new layer with layer mask. Can you help me with this?

Ken Nielsen
Legend
December 31, 2021

There is very new feature called "Depth Blur Neural Filter", it will blur the background automatically using AI, but you need to be online to use it and have the latest version of Photoshop.

This YouTube tutorial will show you how: https://m.youtube.com/watch?v=YNXQuPSDUv4


Thanks Derek, and yes I have the latest version and am online, but to go back to the original post of what I am trying to achieve is a gradient blur. Trevor.Dennis laid out the plan very well for this above and now I was hoping he could come back to help as I am having trouble getting the intermediate steps working. That's the key with Photoshop... once you know how to do something then it's a cinch, but to break into new territory, as this is for me, can leave you slid off the road into the ditch... right where I am right now.