• Global community
    • Language:
      • Deutsch
      • English
      • Español
      • Français
      • Português
  • 日本語コミュニティ
    Dedicated community for Japanese speakers
  • 한국 커뮤니티
    Dedicated community for Korean speakers
Exit
0

How do I feather an image in photoshop?

New Here ,
Oct 10, 2015 Oct 10, 2015

Copy link to clipboard

Copied

How do I feather or airbrush an image in photoshop?

Views

23.4K

Translate

Translate

Report

Report
Community guidelines
Be kind and respectful, give credit to the original source of content, and search for duplicates before posting. Learn more
community guidelines

correct answers 1 Correct answer

Community Expert , Oct 10, 2015 Oct 10, 2015

Norman has an excellent suggestion as always, but I really like the Camera RAW tools for doing this.  You also have two options with the Camera RAW filter

The first is to use Post Crop Vignetting, but move the Amount slider to the right.  Note that you have further control with sliders after Amount.

The other is the Radial filter (J) Set the Effect to Outside, and adjust Exposure for amount.  You have to drag an ellipse over the image initially, but you can resize by dragging the handles.

The examp

...

Votes

Translate

Translate
Adobe
Adobe Employee ,
Oct 10, 2015 Oct 10, 2015

Copy link to clipboard

Copied

Hi sandrag,

I would suggest you to please have a look at the following video : Retouch, Airbrush, and Smooth Skin Professionally in Photoshop - YouTube

Regards,

Tamik

Votes

Translate

Translate

Report

Report
Community guidelines
Be kind and respectful, give credit to the original source of content, and search for duplicates before posting. Learn more
community guidelines
Community Expert ,
Oct 10, 2015 Oct 10, 2015

Copy link to clipboard

Copied

xxx.jpg

There are several ways to create a vignetted image using Photoshop. One which will allow you to view and adjust the degree of edge fade visually as you work is this: (It takes longer to describe than to do.)

1. Open the file containing the image you want to vignette. In the Toolbox, set the foreground color to black, and the background color to white by striking the D key.

2. In the Layers panel, drag the Background layer lock into the trash. This will convert the Background to an unlocked, editable layer: Layer 0.

3. Cmd click on the Create New Layer symbol at the bottom of the layers panel next to the Trash symbol. It creates Layer 1 beneath Layer 0. To fill Layer 1 with white choose Edit > Fill and in the Contents field select Background Color or White.

Or:

Use a key shortcut: Since the Background Color was set to white in Step 1, Cmd+Delete to fill Layer 1 with White.

4. Click on Layer 0, which contains your image. Then select the Elliptical Marquee tool, and in the Options bar, set Feather to 0.  Select part of the image. To reposition the selection, click in its center and drag it.

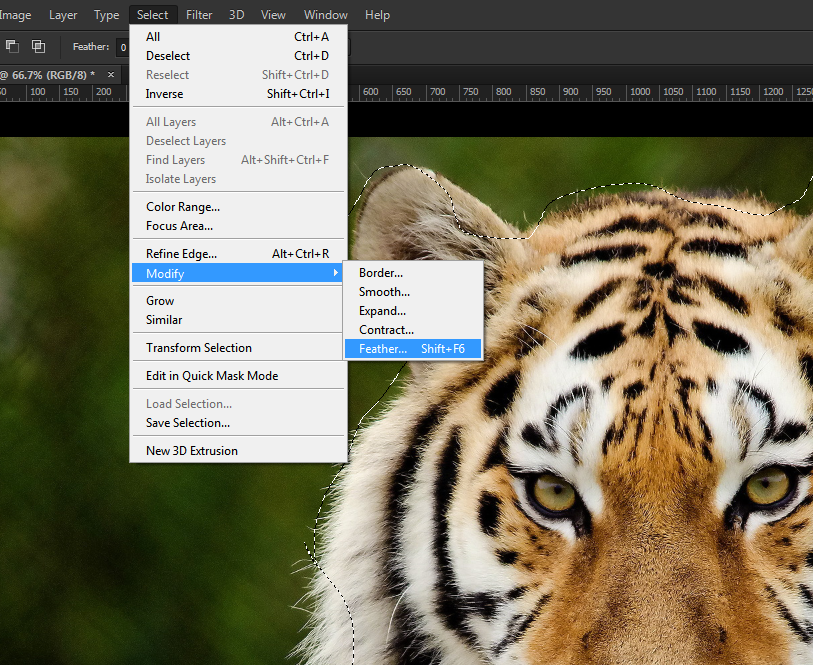
Note: If, after creating the selection, you want to alter its dimensions, choose Select > Transform Selection, and make the adjustment. Then either click on the Commit checkmark in the upper right of the Options bar, or use the Return key to complete the change.)

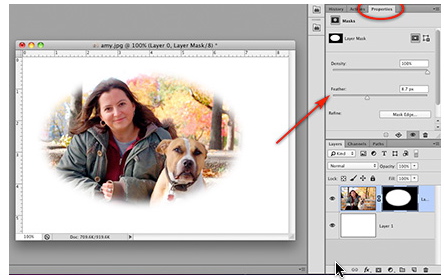
5. Still in Layer 0, click on the Add Layer Mask symbol at the bottom of the Layers panel. It is the second symbol from the left. This will produce a hard-edged oval containing the selected portion of the image.


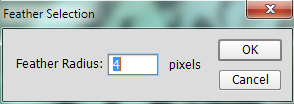
CS5: With the mask in the Layers panel highlighted, go to Filter > Blur > Gaussian Blur, adjust the slider to produce the degree of vignette you prefer, and click OK.

CS6  and later: Choose the Properties panel, move the Feather slider to produce the degree of vignette you prefer and click OK. If the Properties panel does not currently appear, choose Window from the

Menu bar and click on Properties from the drop-down menu.

At this point you may drag Layer 1 (the image with its linked mask) over another Image. Simply click on Layer 1 and drag it to the new image. Then use the Move tool to place it with greater precision.  You may also resize the vignetted image by choosing Edit > Transform > Scale. When scaling, hold down the Shift key to maintain the current proportion. Then either click on the Commit checkmark in the upper right of the Options bar, or use the Return key to complete the change.

Votes

Translate

Translate

Report

Report
Community guidelines
Be kind and respectful, give credit to the original source of content, and search for duplicates before posting. Learn more
community guidelines
Community Expert ,
Oct 10, 2015 Oct 10, 2015

Copy link to clipboard

Copied

Norman has an excellent suggestion as always, but I really like the Camera RAW tools for doing this.  You also have two options with the Camera RAW filter

The first is to use Post Crop Vignetting, but move the Amount slider to the right.  Note that you have further control with sliders after Amount.

The other is the Radial filter (J) Set the Effect to Outside, and adjust Exposure for amount.  You have to drag an ellipse over the image initially, but you can resize by dragging the handles.

The examples above are a fair representation of how well they work.  Vignetting is the more controllable method IMO, and gives a lovely soft effect.   Norman's method is non destructive.  To have a same advantage using Camera RAW filter you need to make the layer a Smart Object.

Votes

Translate

Translate

Report

Report
Community guidelines
Be kind and respectful, give credit to the original source of content, and search for duplicates before posting. Learn more
community guidelines
LEGEND ,
Oct 10, 2015 Oct 10, 2015

Copy link to clipboard

Copied

That's nice

Votes

Translate

Translate

Report

Report
Community guidelines
Be kind and respectful, give credit to the original source of content, and search for duplicates before posting. Learn more
community guidelines
LEGEND ,
Oct 10, 2015 Oct 10, 2015

Copy link to clipboard

Copied

Not bad for a corny gentleman Norman

Hope your well

Terri

Votes

Translate

Translate

Report

Report
Community guidelines
Be kind and respectful, give credit to the original source of content, and search for duplicates before posting. Learn more
community guidelines
Community Expert ,
Oct 10, 2015 Oct 10, 2015

Copy link to clipboard

Copied

One more comment regarding the method I outlined. (Here comes the pitch to sell this approach)

1. You are free to use another Selection tool -- including the lasso -- to create an irregular outline before vignetting.

2. You have the option of choosing the bottom layer and Edit > Fill with a color.

Votes

Translate

Translate

Report

Report
Community guidelines
Be kind and respectful, give credit to the original source of content, and search for duplicates before posting. Learn more
community guidelines
Community Expert ,
Oct 10, 2015 Oct 10, 2015

Copy link to clipboard

Copied

LATEST

And I'll add something to using additional layers because it is so flexible.  Start with a flat red disk , fill a smaller circle with white on the layer above, and use Gaussian blur, and the disk becomes a sphere. You can reposition the highlight.  You can resize with Free Transform.  If too thin copy the layer, if too heavy lower opacity.  If the blur causes the highlight to spread  too far, clip it to the underlying layer.  The bottom right disk also has an Inner Shadow layer style.

Same thing with cylinders.  I always start with them square to the image boundaries.  Run a white paint brush down the rectangle ? Gaussian Blur and clip.  The the same on the left edge on another new layer with black.  I like to start with an oversize object I can resize and rotate because it adds flexibility.

Votes

Translate

Translate

Report

Report
Community guidelines
Be kind and respectful, give credit to the original source of content, and search for duplicates before posting. Learn more
community guidelines
LEGEND ,
Oct 10, 2015 Oct 10, 2015

Copy link to clipboard

Copied

Hello to feather make your selection using any of the tools

feather.png

In the box apply a numeric value in pixels. In this case each side of the selection is feathered by 2 pixels

featherSetting.png

Then you can use a brush or use an air brush to modify the feathered selection whichever way you want

airbrush.png

Votes

Translate

Translate

Report

Report
Community guidelines
Be kind and respectful, give credit to the original source of content, and search for duplicates before posting. Learn more
community guidelines