- Home
- Photoshop ecosystem
- Discussions
- Re: How do I fix the "gray" backgrounds on studio ...
- Re: How do I fix the "gray" backgrounds on studio ...
How do I fix the "gray" backgrounds on studio photos?
Copy link to clipboard
Copied
I have a batch of photos I need to get ready for a print publication. They were all shot in a studio on a gray background. I see two problems:
1) the "gray" isn't really gray. In some shots it is purplish; in others it is yellowish. How do remove all hint of hue without changing the value (lightness/darkness) of the background? It looks perfect in that regard - I simply want to turn it into a perfectly neutral color.
2) in some places there is an unpleasant introduction into the background. Perhaps you can see it in this screen shot - about 25% of the way down from the top a band of greenish pixels appear. Is this what people call "noise"? How can I remove it?

Explore related tutorials & articles
Copy link to clipboard
Copied
mos10279273 wrote
the "gray" isn't really gray. In some shots it is purplish; in others it is yellowish.
That's a color cast, plain and simple. The photographer was apparently in a hurry - this is something you normally take care of in ACR/Lightroom by setting the correct white balance.
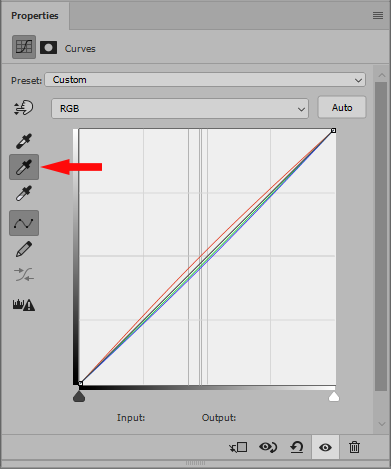
Color casts can happen in the shadows, the midtones or the highlights, or all three. Without seeing your full original, there's no telling which - so a quick fix is to use a Curves layer and use the midtone eyedropper. Click on your neutral gray background. You may get a curve similar to this, which fixes the midtones to R=G=B:

Set the Curves layer to Color Blend mode, so that luminosities are not affected.
Again, this is a quick fix. More targeted approaches with higher precision may be worthwhile, depending.
Copy link to clipboard
Copied
Are you saying that clicking the button fixes the problem, or that I have to move that curve around? I'm afraid I don't fully understand your answer.
Copy link to clipboard
Copied
Try it. Just click on a neutral area in the image. The point where you click is then adjusted to R=G=B, in other words neutral gray.
There is also a white point eyedropper and a black point eyedropper. Try them and see what happens.
Beginners often use Curves just as a single composite curve. But you can set curves per color channel, and that's when it turns into a very powerful tool.
Copy link to clipboard
Copied
I would recommend to try the filter > camera raw filter and then use the white balance too (I) in the background. That is a fast way that often works.
Copy link to clipboard
Copied
You can most likely use one of the selection tools, then create a hue/saturation adjustment layer to reduce the saturation, since it is a gray BG. Or you could add another layer, and sample the gray you like and fill the selection with that color, and set the blend mode to color.
Copy link to clipboard
Copied
Yes, but if a certified neutral background isn't neutral, it's a global color cast that should be corrected globally.