

How do you combine (merge) multiple layer masks in the layer panel??

Copy link to clipboard
Copied
I have 2 copies of a background in my layers panel. One copy has a selection made with the magic wand tool/inverted with a layer mask applied. Another one of the copies has a selection made with the polygonal lasso tool (done for small details)/inverted with a mask applied to the other background layer.
Two layers with layer masks … How can I merge or group them to represent one selection??
Allen


Explore related tutorials & articles
 22
Replies
22
22
Replies
22

Copy link to clipboard
Copied
Layer mask a nothing more the selections and can be save as Alpha Channels and Aalpha channels can be combined many ways.
Ctlr+Click on a layer in the layer palette will load the layer transparency as a slection. ie the layer mask.
Shift+Ctrl+Click on a layer in the layers palette will add the layers transparency to the current selection.
Background Layers can not be masked. Background layers do not support transparency their transparency is lacked. Newer version of Photoshop will automatically convert a background layer to a normal layer when one mask it.

Copy link to clipboard
Copied
How to Combine Layer Masks in Photoshop: Hands-on Photo - Episode 1 - How to combine layer masks in Photoshop - YouTube .
Copy link to clipboard
Copied
I have watched the tutorial several times however the demonstration is not clear as to the starting point. It seemed like the 3 layer masks were in fact grouped together (removed from their copied backgrounds). I have succeeded in creating the group configuration but have not been able to carry out steps 2 -3 of selecting the other masks and combining and creating a composite of both masks.
And why is the final combined mask placed in a sub group of the main group in one tutorial and added to the main group in another??
Copy link to clipboard
Copied
OK, that did get confusing. Let's try this again.
How can I merge or group them to represent one selection?
- Control click your first mask in the Layers panel to load it as a selection (Cmd click on a Mac)
- Control Shift click the second mask in the Layers panel to add to the existing selection (Cmd Sh click on a Mac)
(At this point you will see marching ants around both selections. Don't deselect.) - Layer > Layer Mask > Delete
- Layer > Layer Mask > Reveal Selection
That gives you a new mask that combines both of the original masks.
Copy link to clipboard
Copied
thanks....I'll try using these instruction
Copy link to clipboard
Copied
Did it work for you, AllenL?

Copy link to clipboard
Copied
You are a godess from heaven 😃 Also my personal hero, thanks this helped me!
Copy link to clipboard
Copied
clicking on the first mask revealed the selection
however
when I followed the instructions to cmdshclick on the second mask it didn’t make the selection (there’s a + sign in the hand)
are there other adjustments or is the software corrupted or misbehaving? (I’m using PS CS6)
I reversed the order of selections and it still only “selected” the first mask
thanks for your patience, Barb
Allen
Copy link to clipboard
Copied
Happy to help! Would you please post a screen shot that includes your layers panel?
Copy link to clipboard
Copied
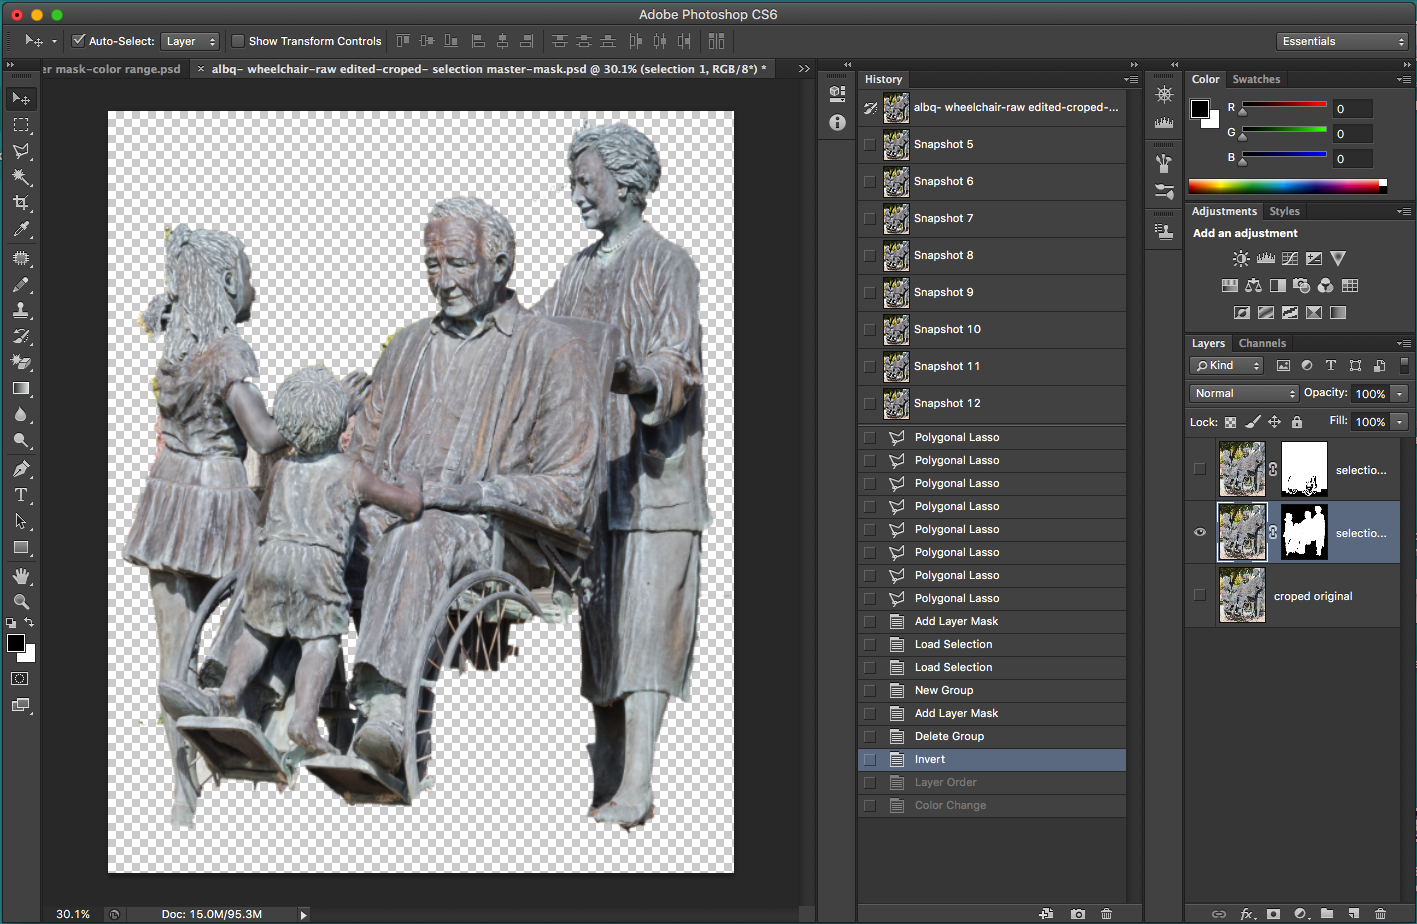
thank you. The first of the screen shots shows the selection of the wheel with the polygonal tool on a layer.The second of the screen shots shows the selection of the people done with the magic wand tool on the other layer. your patience is greatly appreciated. I have been struggling on my own to learn photoshop!
Copy link to clipboard
Copied
Can you post the screen capture of your Photoshop window using this button?

Copy link to clipboard
Copied
Copy link to clipboard
Copied
How can I merge or group them to represent one selection??
Ok:
- Outlined in pink: click the word selectio... to make the top layer active.
- Outlined in red: click the eyeball to show the top layer
- Outlined in green: Command+click the bottom mask
- Outlined in blue: Command+ Sh+ click the top mask
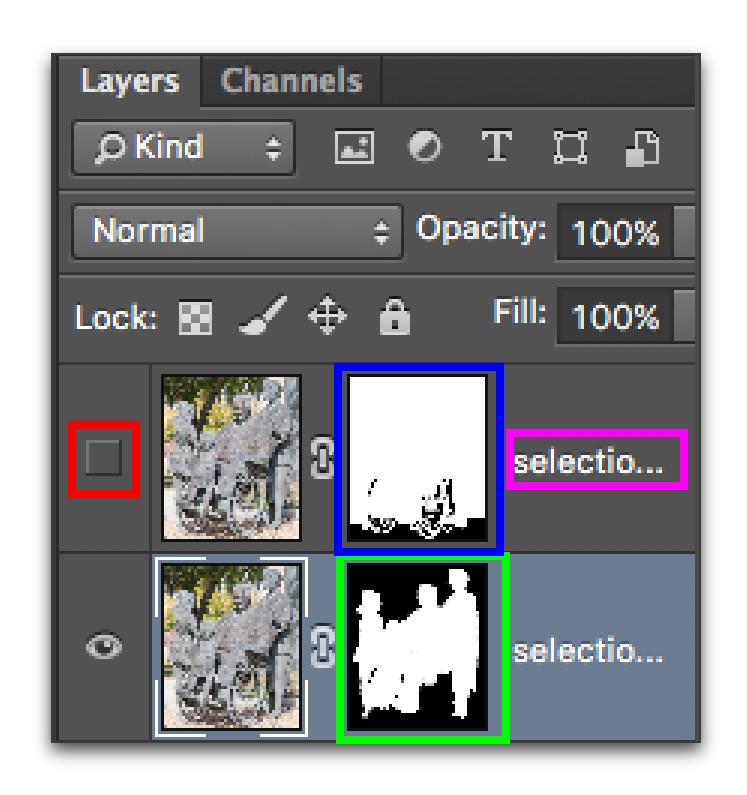
This will show marching ants around the statue.
- Layer > Layer Mask > Delete
- Layer > Layer Mask > Reveal Selection
Copy link to clipboard
Copied
If you combine those two layer mask you will most likely wind up with a selection like the top layer mask it seems to have selected all the areas that are select in the lower layer mask.
Copy link to clipboard
Copied
I have followed your instructions, however, the people mask seems to disappear because I am left with only the upper mask (wheel) no matter how many times I try. I even had my wife stand over my shoulders so that I was sure of following your instruction. Do you think something I did (unwittingly) in steps in creating the selections preceding the merge attempt could be the problem?

Copy link to clipboard
Copied
Yes That is what should happen. I wrote that in a previous append. The upper mask includes all of the areas that what the bottom mask select. Adding in the bottom mask to the top mask would add nothing to the top mask. The result would be the same as the top mask. The top mask has the set of area the bottom mask has already.
Copy link to clipboard
Copied
For example if you had a 5 image collage you wanted to create a Mat layer on top of. It would be very easy to do. A Ctrl+Click on the First image layer mask followed by a Shift+Ctrl on the 2nd, 3rd, 4th and 5th. To select all the images the Invert the selection to have a mask for the mat layer. Add a solid fill layer on top with this selection active the add a layer style.

Copy link to clipboard
Copied
I feel if that video was not clear to you. You need to spend more time using Photoshop.
For when you look at video like that one and we write you can save selection as alpha channels and combine alpha channels may way using calculations. That loading a layers transparence with a ctrl+click is like loading the layer mask and using Shift+Ctrl+Click can add to a selection. That a selection and a layer mask are the same thing. It all goes in one of your eyes and out the other for you have not used Photoshop long enough to know how Photoshop works. You need more time in the saddle.

Copy link to clipboard
Copied
Hey JJMack, how about you just let Barb help AllenL instead of drilling him for not understanding photoshop...
Copy link to clipboard
Copied
Do you understand you posted your opinion about my reply in this thread that is two years old to the day. There were other append by me in this thread also after Aug. 3, 2016 did you read any of them. IMO you should try to help users like other user here do. Your is the only reply in this thread that was not trying to help the OP.

Copy link to clipboard
Copied
Hi JJMack - not sure if you're still around, but your explanation was the clearest in the thread and I very much appreciated the step-by-step instructions. They were very helpful!

Copy link to clipboard
Copied
Sadly, JJMack passed away in 2022. His posts continue to help many users.
https://community.adobe.com/t5/photoshop-ecosystem-discussions/r-i-p-jjmack/m-p/12701028
Jane

 AdChoices