Exit
  • Global community
    • Language:
      • Deutsch
      • English
      • Español
      • Français
      • Português
  • 日本語コミュニティ
  • 한국 커뮤니티
0

How do you create this effect?

Explorer ,
Aug 05, 2020 Aug 05, 2020

Hi All,


Hope you are well. I am trying to create the effect in the attached picture on the billboard but really struggling to find out how. Any help would be gratefully received 


Tevez.jpg

1.2K
Translate
Report
Community guidelines
Be kind and respectful, give credit to the original source of content, and search for duplicates before posting. Learn more
community guidelines

correct answers 2 Correct answers

Deleted User
Aug 05, 2020 Aug 05, 2020

Hi

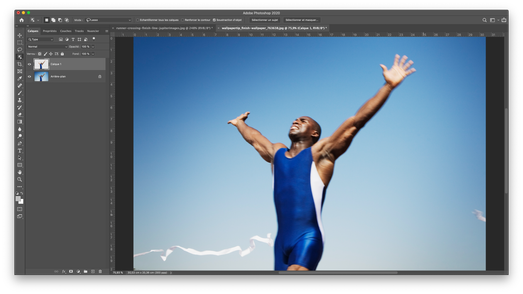
Are you talking about this kind of effect

2020-08-05 10_33_02-Window.png


Translate
Community Expert , Aug 05, 2020 Aug 05, 2020

Strictly speacking this will likely reatain part of the layer’s image content beyond a pure white with transparency. 

To circumnavigate that one can put it into a Group and apply a white Color Overlay to the Group. 


Screenshot 2020-08-05 at 12.05.06.png


Translate
Adobe
Community Expert ,
Aug 05, 2020 Aug 05, 2020

Please post the image (or a lores or a section of it) you want to edit thusly. 

Translate
Report
Community guidelines
Be kind and respectful, give credit to the original source of content, and search for duplicates before posting. Learn more
community guidelines
Explorer ,
Aug 05, 2020 Aug 05, 2020

Hi,


I don't yet have an image in particular. I am just trying to learn how to convert an image in to that blue and white effect if that makes sense. 


Thanks for the reply 

Translate
Report
Community guidelines
Be kind and respectful, give credit to the original source of content, and search for duplicates before posting. Learn more
community guidelines
Guest
Aug 05, 2020 Aug 05, 2020

Hi

Are you talking about this kind of effect

2020-08-05 10_33_02-Window.png


Translate
Report
Community guidelines
Be kind and respectful, give credit to the original source of content, and search for duplicates before posting. Learn more
community guidelines
Explorer ,
Aug 05, 2020 Aug 05, 2020

Yeah that's it - is it pretty straight forward? (I've only been doing photoshop about 2 months)

Translate
Report
Community guidelines
Be kind and respectful, give credit to the original source of content, and search for duplicates before posting. Learn more
community guidelines
Guest
Aug 05, 2020 Aug 05, 2020

All I done was copy a selection on the subject to it's own layer, added a new layer below that layer and filled it with the blue colour, added a black and white adjustment layer and clipped it to the subject layer.

Then double click on the subject layer and adjust the Blend If to get the desired look as in the screenshot

Translate
Report
Community guidelines
Be kind and respectful, give credit to the original source of content, and search for duplicates before posting. Learn more
community guidelines
Explorer ,
Aug 05, 2020 Aug 05, 2020

Thank you. I have now tried this and think I have set it up as advised but when I do the blend if - I dont get blue and white and his eyes go blue haha Layers.JPGLayers1.jpg

Translate
Report
Community guidelines
Be kind and respectful, give credit to the original source of content, and search for duplicates before posting. Learn more
community guidelines
Community Expert ,
Aug 05, 2020 Aug 05, 2020

Strictly speacking this will likely reatain part of the layer’s image content beyond a pure white with transparency. 

To circumnavigate that one can put it into a Group and apply a white Color Overlay to the Group. 


Screenshot 2020-08-05 at 12.05.06.png


Translate
Report
Community guidelines
Be kind and respectful, give credit to the original source of content, and search for duplicates before posting. Learn more
community guidelines
Explorer ,
Aug 05, 2020 Aug 05, 2020

Hi c_pfaffenbichler,


Trying to follow your screen shot. It has a Grey Group and a Group 1 - can you please advise what is supposed to be in each group 


(sorry for being thick, still getting my head round everything)

Translate
Report
Community guidelines
Be kind and respectful, give credit to the original source of content, and search for duplicates before posting. Learn more
community guidelines
Community Expert ,
Aug 05, 2020 Aug 05, 2020

• Select the Layer and the Adjustment Layer 

• Layer > Group Layers (cmd-G) 

• Layer > Layer Style > Color Overlay 

Translate
Report
Community guidelines
Be kind and respectful, give credit to the original source of content, and search for duplicates before posting. Learn more
community guidelines
Explorer ,
Aug 05, 2020 Aug 05, 2020

Sorry to hassle again - I think I have copied what you advised but all I get is a white sillouette 

Layers1.jpg

Translate
Report
Community guidelines
Be kind and respectful, give credit to the original source of content, and search for duplicates before posting. Learn more
community guidelines
Community Expert ,
Aug 05, 2020 Aug 05, 2020

The Blend if-setting should not go on the group with the Color Overlay but on the Layer in the Group. 

Translate
Report
Community guidelines
Be kind and respectful, give credit to the original source of content, and search for duplicates before posting. Learn more
community guidelines
Explorer ,
Aug 05, 2020 Aug 05, 2020

Thank you so much for your help. I think I've finally got it. Much appreciated

Translate
Report
Community guidelines
Be kind and respectful, give credit to the original source of content, and search for duplicates before posting. Learn more
community guidelines
Community Expert ,
Aug 05, 2020 Aug 05, 2020
LATEST

By alt-click/dragging you can split the Blend if-handles to get a »softer« edge. 

Translate
Report
Community guidelines
Be kind and respectful, give credit to the original source of content, and search for duplicates before posting. Learn more
community guidelines
Community Expert ,
Aug 05, 2020 Aug 05, 2020
  • Select a subject put it on is own layer


Capture d’écran 2020-08-05 à 11.45.56.png


  • Convert image to greyscale then a few settings to change contrast

Capture d’écran 2020-08-05 à 11.47.24.png

  • Then isohelie to 4 tints only
  • Then Bitmap and bichromy

Capture d’écran 2020-08-05 à 11.53.16.png

  • Then a new layer behind 


Capture d’écran 2020-08-05 à 11.53.50.png 

 all this settings may vary according to the pic… Also can do it better with Illustrator

Hope it helps


Translate
Report
Community guidelines
Be kind and respectful, give credit to the original source of content, and search for duplicates before posting. Learn more
community guidelines