
How to add neural filter to an Action: this method works
Photoshop neural filters are great for enhancing your old scanned photos. But until today, I couldn’t figure out how to get Photoshop neural filters to work as part Actions and the Image Processor. I searched Reddit, Adobe, and YouTube for a way to do it. People have asked the question. But unless I missed something, everyone said it wasn’t possible.
Well, it’s February 2024, and I can confirm it’s possible. At least on Adobe Photoshop Version 25.4.0 on Windows 10, 64-bit. Read on for the explanation or watch the video.
BACKGROUND
I am in the process of scanning thousands of family snapshots. So I was looking for an automated way to fix these photos. I know this won’t be as good as adjusting each one at a time. But there are more than 4,000 images. If you’re watching this video, maybe you’re trying to find the same solution.
I bought an Epson FastFoto-680W last month to scan the photos. The consensus is that the FastFoto is much better than every other consumer auto-feed photo scanner, but not as good as flatbed scanners. In particular, the Epson FastFoto doesn’t render black backgrounds and clothes as well as a flatbed. But my thought from the beginning of this project was, if I’m able to auto-correct my scanned photos really well, then the differences between the FastFoto and a flatbed wouldn’t be noticeable. I’m not a photographer enhancing images of birds for clients. I’m just a guy trying to get images look nicer for family members viewing them on their smartphones.
While looking for a solution I considered buying Topaz Photo AI because you can throw your images into it, and its Auto-Pilot feature will recommend the right denoise and sharpen settings to apply to make your photos better. It also sharpens faces. I tested it and it works. And it easy to batch correct photos. But I have Photoshop already and I wanted to see if I could make it work. The trouble with Photoshop is that it seemed to not be able to batch correct photos using the neural filters. The Internet seemed to agree. Until now.
I figured out what the problem was and I’m going to show you how to enhance all the photos, all at once, using Photoshop’s neural filters.
INSTRUCTIONS
Here is a graphic to explain the steps. A longer explanation follows.
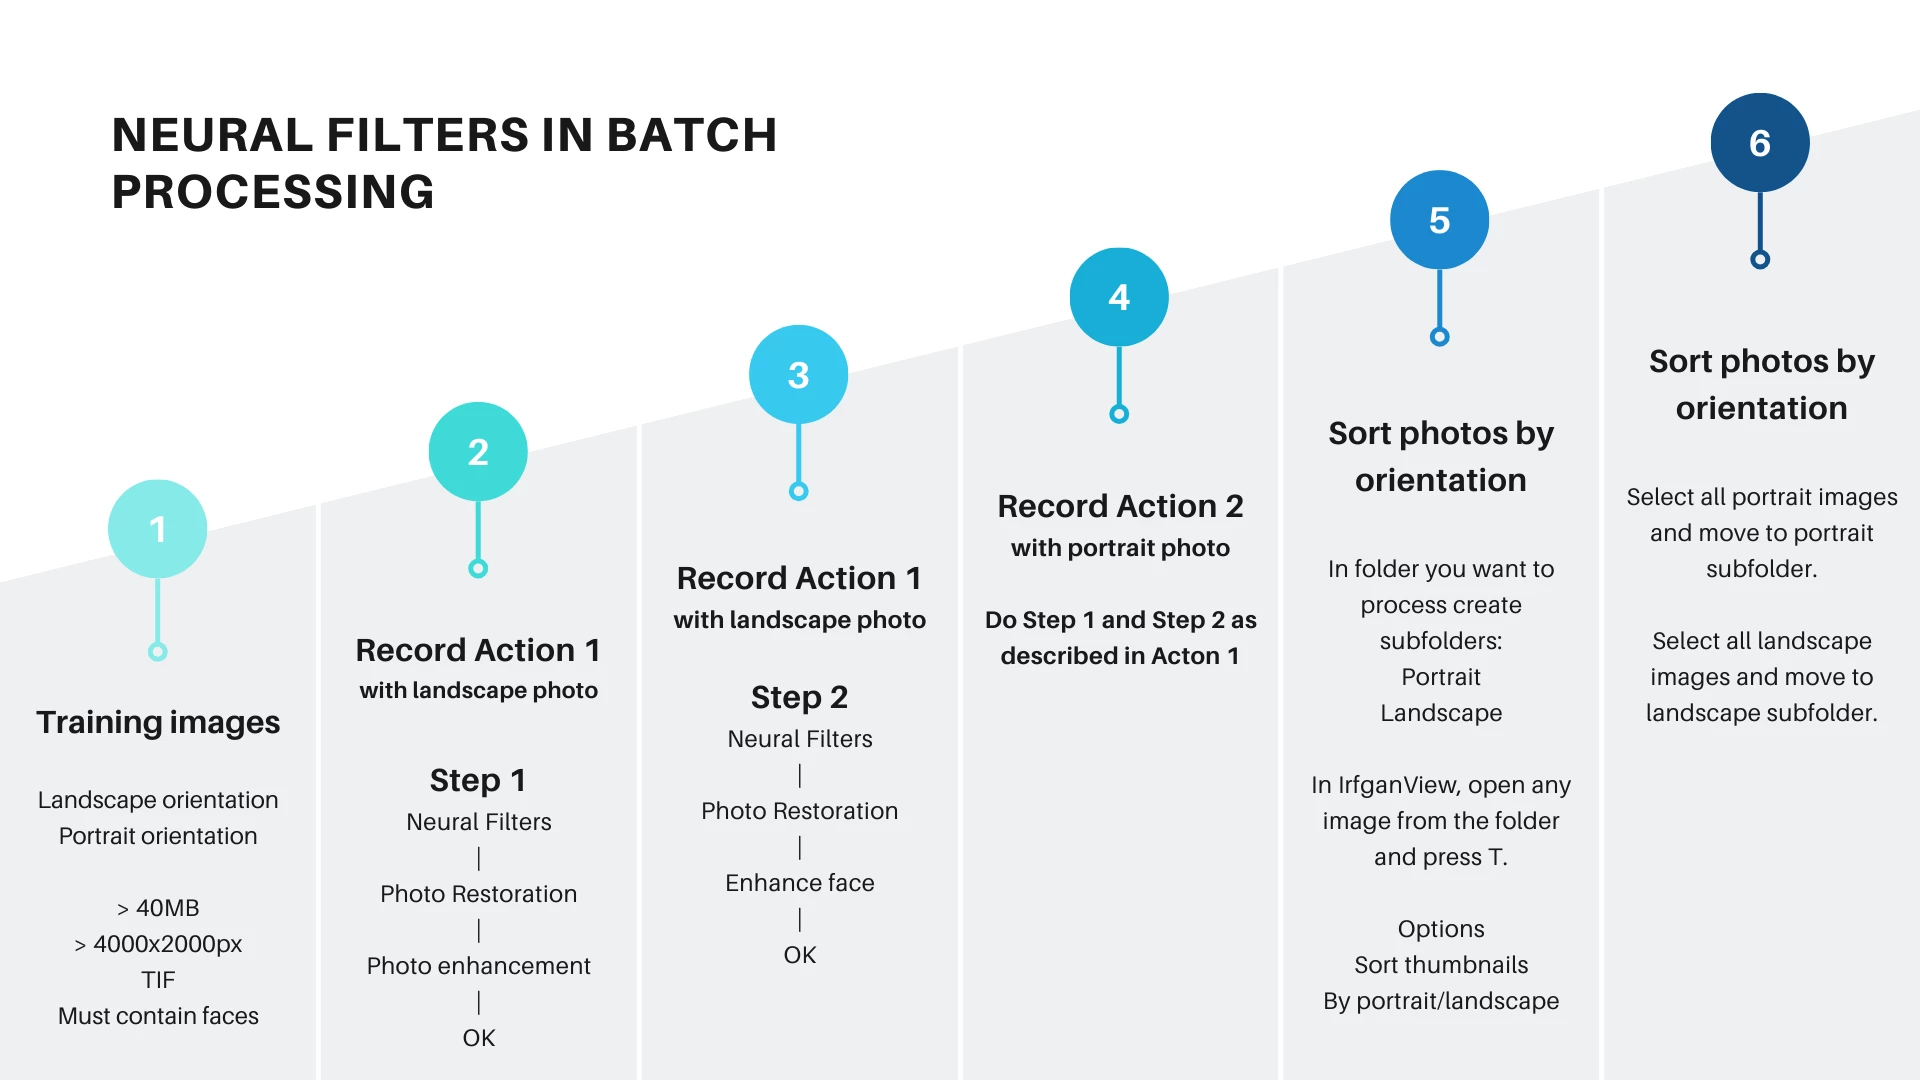
To make this work, you’re going to need two photos with large resolutions. One portrait-oriented. One landscape.
Photo 1 should be landscape-oriented. I tested this with a photo with a resolution 4032x2056. The file size might also make a difference, so I recommend making the photo at least 30MB. You can do this by converting your JPG image to TIFF and adding some layers. The dimentions (and maybe file size) need to be greater than any photo you plan on later enhancing with the Action. Photo 2 should be portrait-oriented. Same specs as above.
- Now open Photoshop and open the landscape photo.
- Click Windows-Actions to open this window.
- Click the folder-looking icon, which is called Create new set.
- Name it something like Neural.
- Click the plus symbol, which is Create new action.
- Name it something like LandscapeEnhance.
- Click Record.
- Click Filter--Neural Filters.
- Click Photo Restoration.
- Set Photo Enhancement to something like 40 or 50, but leave all the other settings at 0.
- Once the Photo Enhancement is complete, click OK.
- Click Filter--Neural Filters.
- Click Photo Restoration.
- Set Photo Enhancement to 0, and set Enhance Face to 15 or 20. (I found this to be the safest setting to get some benefit from this filter without becoming noticeably weird-looking.)
- Press OK.
- Press the Stop icon in the Actions window.
- Open your landscape image
- Click New Action and call it PortraitEnhance.
- Click Record.
- Repeat the steps you did for the other photo.
- Press the Stop icon in the Actions window.
Before jumping back into Photoshop, we need to leave and organize the photos we want to enhance. In short, we need to separate the landscape photos from the portrait photos. Here's how.
- Open one of our photos (any photo) in Irfanview
- Press T to access the thumnails screen (an alternative to Windows Explorer)
- Browser to the folder containing your photos
- Click Options--Sort thumbnails--by Portrait/Landscape
- Select the portrait-oriented photos and press F7 to move them to their own folder
- Do the same for the landscape-oriented photos
Now in Photoshop:
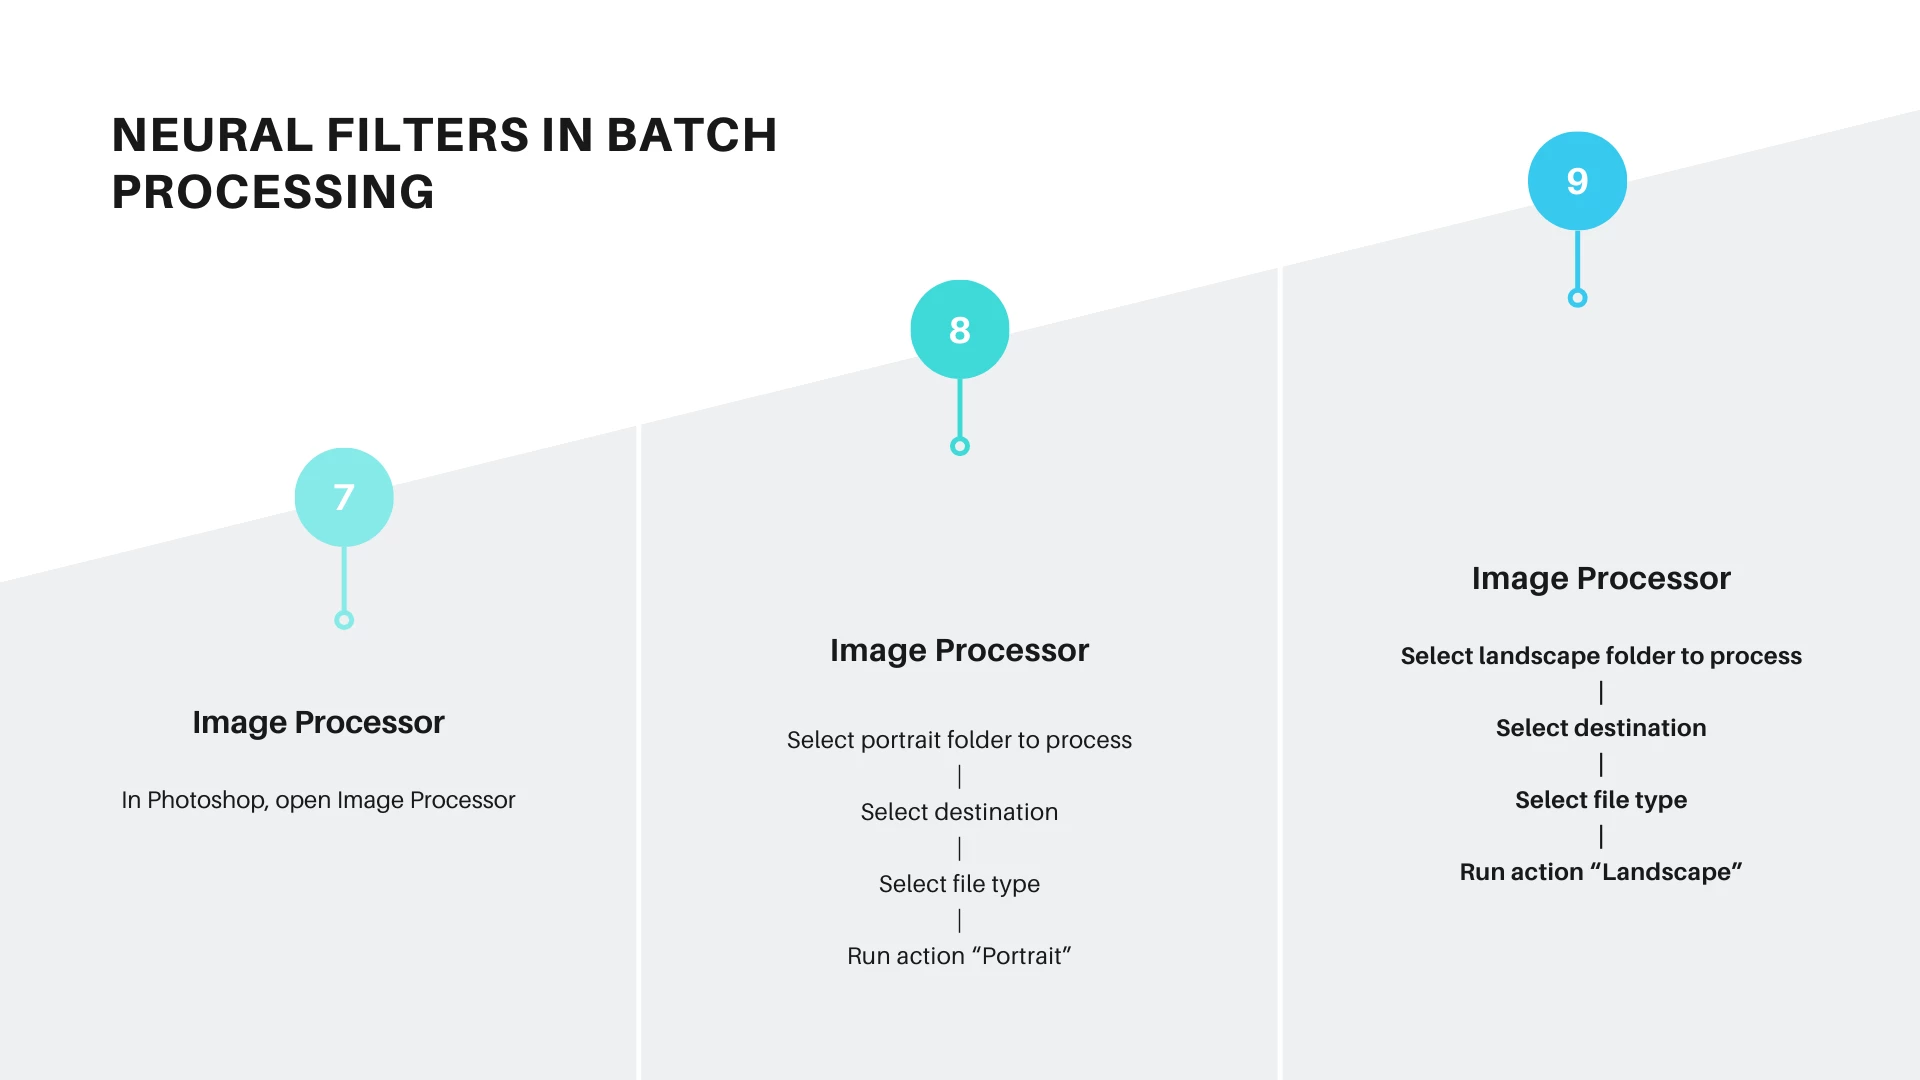
- Click File-Scripts-Image Processor.
- Select the landscape folder you just created.
- Select the folder location of where to save the processed images.
- Select whether to save as JPG, PSD, or TIF.
- Select the Run Action box.
- Select the Action you created (eg, Landscape).
- Click Run.
- Once the Action is complete you can repeat these steps for the portrait-oriented photos.
If you have perfectly square photos, they should go in your landscape folder as Photoshop seems to treat them as landscape.
NOTE: There's an alternate way to do this that avoids having to split up your landscaped and portrait photos, and run separate actions on each folder. You can simply put all four steps into one action. The drawback is that it will take longer to process because landscape photos with be processed with four steps instead of two. And vice versa. While the extra processing won't ruin the photos (because Photoshop won't apply the "portrait" actions to landscape photos, it will take longer to process each one.
WHAT'S THE DEAL WITH LANDSCAPE-PORTRAIT?
The reason we needed a landscape-orieneted image and a portrait-oriented image is because the orientation of the image seems to be important when creating Action steps using Neural Filters. If we have created the Action with only a landscape image, then when playing the action on portrait images, the Neural Filter wouldn’t work. So the step with the portrait image only works on other portrait images, and the step with the landscape image only works on other landscape images. And they don’t work on each other. So, there’s no chance that your image will be neural-filtered twice, which would be bad.
WHY DO WE NEED TO SEPARATE PHOTO ENHANCEMENT FROM ENHANCE FACE IN SEPARATE STEPS?
We also needed to create separate steps for the Photo Enhancement setting, and the Enhance Face setting. I discovered that once you create the Action with a photo of a person and applied a Photo Enhancement setting, and an Enhance Face setting in the same step, then the Neural filters wouldn’t work on any image with no faces.
WHY DO WE NEED LARGE FILES WHEN CREATING THE ACTION?
The reason why we need a very large resolution image with a large file size is because the image used when creating the action needs to be bigger than the images the Action is later applied to. I’m not sure if this is because a larger image creates more of a delay in the Action step or some other reason. If you have a theory, please share it in the comments.
It took a lot of trial and error to figure all this out. But I’ve tested it again and again and this method appears to work in February 2024.
That’s it. You can now automate the Neural Filters in Photoshop provided you use a large landscape image, a large portrait image, and make the enhancement settings their own action steps.