- Home
- Photoshop ecosystem
- Discussions
- How to blur the boundary between two selected colo...
- How to blur the boundary between two selected colo...
How to blur the boundary between two selected color
Copy link to clipboard
Copied
Is there any automated plugin or any built in function in Photoshop to make the boundary between different colors smoother, as can be achieved by OLM Blur in Adobe After Effects? That plugin is only for AE on windows, but unfortunately I'm a Mac user so I'm interested if there is any way to achieved the same effect using photoshop. Applying gaussian blur directly doesn't work here because that's also going to blur the boundary between, say, the outline and the skin color, so is there anyone who knows how to do this, preferably in an automated manner? 
Explore related tutorials & articles
Copy link to clipboard
Copied
If I can understand what exactly you want then Blur Tool is your friend. Perhaps and Smudge Tool can do some job there. For now I do not have idea how to automate that task.
Copy link to clipboard
Copied
You might be able to do this with a combination of Select > Color Range and Find Edges to make a mask for Gaussian Blur, but it would likely involve lots of trial and erro, and manual touch-up.
Copy link to clipboard
Copied
Thanks for the comment. I've tried the blur tool previously but the problem with that is that it's kind of hard to get a coherent result, and usually the boundary is not nearly as neat as I want it to be. I was thinking about whether it was possible to use a gradation tool that keeps the shape of the boundary line instead of using the linear shaped (or other preset offered in Photoshop) to smooth out transition between colors, but as far as my knowledge is concerned I could find no such way/tool. It's really too bad these Japanese Anime specific plugins are only offered in Aftereffects on Windows.
Copy link to clipboard
Copied
Which application was used to create the artwork?
Copy link to clipboard
Copied
From your example and description, it looks like you don't want the character outlines blurred. It would be best if the outline and the colors were on separate layers, so that you could blur the colors easier without blurring the lines. If they are on one layer, using color range to select the black lines then creating a mask to protect them might work. You could then use lens blur, which will not make the black bleed into the other colors. You could also then paint over various color transitions with varying shades of gray to control how much blur various areas get.
Copy link to clipboard
Copied
Right, but then I think the sample photo I provided was not a very illustrative one because the shape of the boundary was still relatively simple so there are easy technics that can be applied. But when coloring more complicated parts like the eyes it was much more difficult and the process becomes painstakingly time consuming, so I was wondering if there was a plugin that works in photoshop for Mac because I don't really think there's a significant technical difficulty to derive that result. Though I personally don't have much knowledge about Adobe AE, what could be done in AE which was primarily for video editing and compositing should also be possible in PS since there's only a single frame to deal with.
Copy link to clipboard
Copied
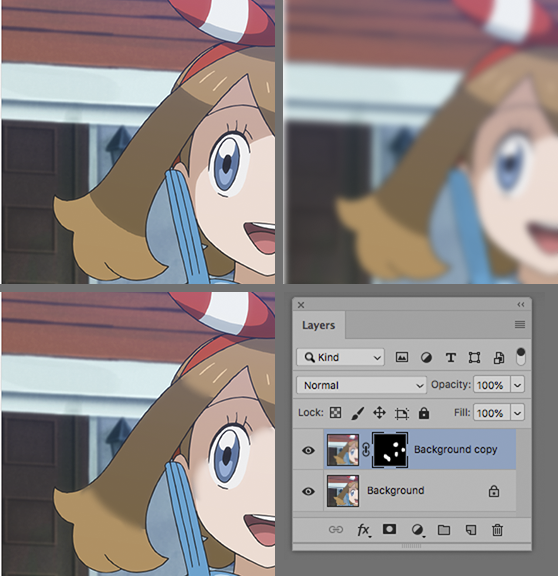
These are the step-by-step instructions that accompany my solution shown above (Post #7):
1. Add a duplicate layer (Cmd+J)
2. Filter > Blur > Gaussian Blur set to 7.5 or more. It governs the amount of feathering
3. Add a black mask (Hold down the Opt key and click on the Mask symbol jin the Layers panel)
4. Paint on the mask with vertical strokes across the color-difference dividing line with a soft edged brush.
Copy link to clipboard
Copied
Thanks! That's by far the most detailed solution I've seen so far, definitely will give it a try!
Copy link to clipboard
Copied

Consider a blur layer with mask if you are working with art that is a composite.
In comparison to the Blur tool, this method of applying the contents of a blurred layer provides consistency blur.
Copy link to clipboard
Copied
Thanks, I will give it a try.
Copy link to clipboard
Copied
Hi, interesting question.
I remembered a similar problem I had a few years ago.
Here is my solution which still requires some manual work and some possibilities for optimization for sure.
It´s based on two recorded Actions.
Please excuse if i don´t use the correct terms in some cases, i have a german version of Photoshop and may not use the proper english terms.
For the same reason it doesn´t make sense to upload may recorded actions. I´m sure they won´t work in an other language.
It´s some hassle to record the actions but after that it works realty quick.
In my case your Image is the background layer and I recorded two actions.
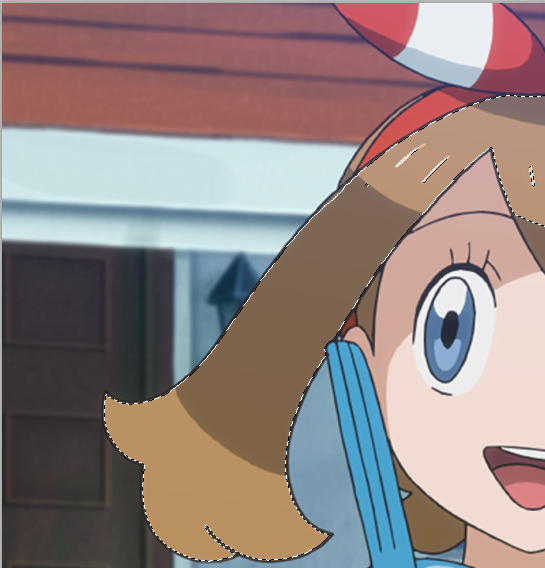
1. select the regions where you want to blur the edges (i.e. the hair) with the magic wand

2. start to record action "blur_1" which executes the following (you could give this action a shortcut):
- duplicate the background layer
- Name the new Layer "Layer 01"
- select the new Layer
- set Photoshops Foreground-Color to white
- add a new Channel in the Channels Palette (your selection of the hair should be still active)
- Fill the selected ares in the channel with white
- Go back to the layers palette and select "Layer 01"
- Deselect all width "strg + D"
3. Some more manual work:
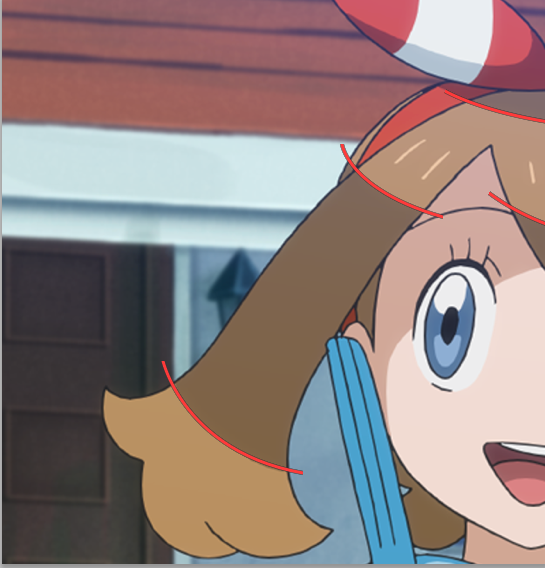
- Draw an open Path over each edge you want to blur (this can be made very quick)
It should look now like this:

Now you are ready to record the second action "blur_2" (you could give this action a shortcut too):
- Select the blur tool and tweak the properties to your needs (i selected a stroke width of 50px)
- In the Paths-Palette select the working path
- in the upper right corner of the Path-Palette click on the menue-icon amd select "Fill Path Contour" (I don´t know the proper english name of this)
- In the upcoming dialog select the blur-tool
- repeat "Fill Path Contour" some times (I did this about 15 times, it will be really quick when executing the action)
- Deselect the working path and switch to the channels palette.
- Load the saved channel by "Strg+click" on the Channels miniature-image
- Change to the "layers palette"
- Make a mask of the selection
- reduce all layers to the background layer (shift+strg+E).
- Delete the saved Alpha-Channel in the Channels Palette and delete the Working Path in the Paths-Palette.
Otherwise the action wouldn´t work for the next time - The resulting image should look like this now
This solution may sound complicated, but once the two actions are prepared, it´s really quick and easy.
After recording the actions this was done in under a minute:
1. make the selection
2. start action "blur 1"
3. draw the paths
4. start action "blur_2"

It sure would be posiible to reduce it to just one recorded action...
The drawbacks of this solution are that you still have some manual work and the amount of blur is restricted to the possibilities of the "blur tool".
I didn´t find a solution which works with blur filters like "Gaussian Blur" since these will always respect the surrounding colors or the transparency surrounding the selected area and ends with smeared edges.
I still have to work with Photoshop CC 19, perhaps there are other possibilities with newer versions of PS
I hope this helps (and still curious for a more straightforward solution)
Copy link to clipboard
Copied
Thanks! This is really instructive.
Find more inspiration, events, and resources on the new Adobe Community
Explore Now

