🔎 Quick Tip: How to change colors in your image in Photoshop

Change color with a Hue/Sat Adjustment Layer
Did you know you can change the hue and saturation in your image using Adjustment Layers? Sometimes you just want to make a quick color change to items in the image, but don't want to bother making a selection. This is a quick and easy option you can try. Here are 3 different ways to create an adjustment layer and details on how to change the color. Check out the video and then use the steps below to try it for yourself.
Note: Using Image > Adjustments > Hue/Saturation will also work to adjust hue and saturation, but I prefer using Adjustment layers since the changes are non-destructive.
Watch the video

❶ Create a Hue/Saturation adjustment layer
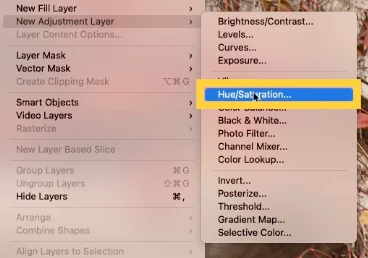
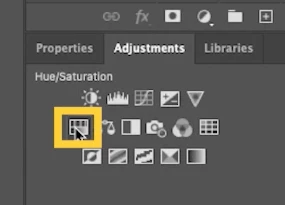
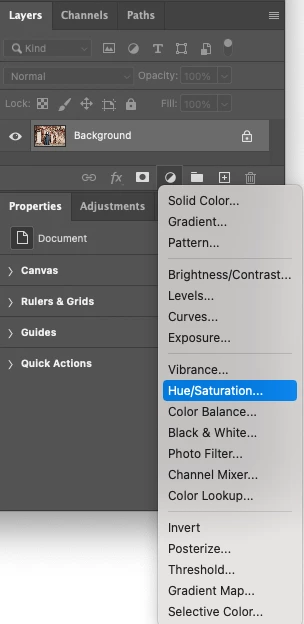
Here are 3 different ways to create a Hue/Saturation Adjustment layer. You can choose one of these options:
-In the menu bar, choose Layer > New Adjustment Layer > Hue/Saturation and Click OK in the New Layer dialog box.

-As an alternative, you can click the Hue/Saturation option from the Adjustments panel.

-Or, from the Layers Panel, click the new adjustment layer icon  and choose Hue/Saturation.

❷ Make color adjustments
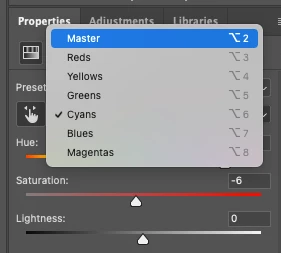
In the Properties Panel, you can choose a specific color or leave it set to master, then adjust the sliders for Hue, Saturation, and Lightness as desired

If you prefer to make changes from within the canvas, you can do the following:
To adjust Saturation, you can select the adjustment tool  and click a color in the image, then drag sideways.
To adjust the Hue, you can select the adjustment tool  and Ctrl/Cmd-click a color in the image, then drag sideways or, you can make adjustments using the slider. (The video below shows both ways) For more details, see Adjust Hue and Saturation.
This was an example of a quick and simple way to modify items of a particular color in an image without the need to create a complicated selection. You may have noticed that all items that were the color you changed were affected when you adjusted the hue and saturation this way. If you successfully changed the color of an item, such as the dress in this example, but did not want other items in the image of the same color to change, you can use a layer mask to hide the adjustment for other parts of the image. For details on masking, see Mask layers in Photoshop.
There are many ways to adjust colors in Photoshop. If you find that a Hue/Adjustment Layer alone doesn't accomplish your goal, then here is yet another method using a Solid Color Fill layer, Adjustment Layers, and Fill Modes: Change the Color of an Object in Photoshop.
Share your favorite color adjustment method in the comments below.
If you want to learn more about Photoshop in little bite-sized chunks, visit our Photoshop Quick Tips home page. It is loaded with tips, features, and projects you can try,
Related links:
Adjust the intensity of colors: tutorial with video
Color and monochrome adjustments using channels in Photoshop
