Thank you, Norman, for your patience.
>>Create a copy of the b channel, copy it and add it as a Layer in the Layers panel. What do you mean "b channel"?
*** Choose Image > Mode > Lab Color Choose the Channels panel and choose b (it contains blue and yellow information)
Done.
***********
…copy…
****
The channels are Lightness, a and b. Choose b and drag it down to the symbol to the left of the Trash. If you rest the cursor on the symbol (a plus inside a box) it will read “create new channel.” The new channel is named “b copy” Choose “b copy” then Select > All followed by Edit > Copy. Then click on the channel that reads Lab. "b copy" will turn off and Lightness, a and b will be chosen. …
Done.
***********
... add it as a Layer in the Layers panel…
Choose the Layers panel and Edit > Paste. The copy of the b channel is now a layer above your image layer.
Done.
***********
>>Invert the Layer Is it the same at "Edit/Adjustment/Invert"?
**** Yes.
Done.
***********
>>Duplicate the Layer,
***
Cmd+J
Done.
***********
… increase its density by changing the Mode to Multiply.
***
Change Normal in the Layers panel to Multiply
Done.
***********
… Merge them…
Layer > Merge Down
Done.
***********
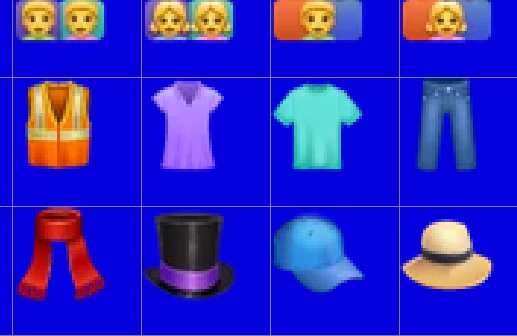
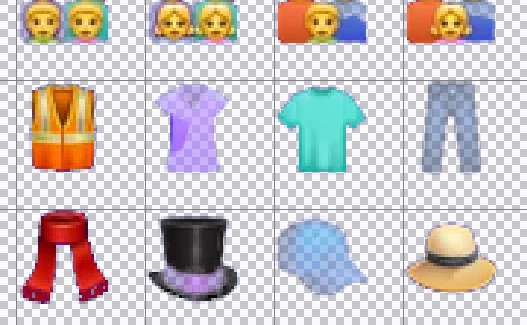
… and use Blend if to produce the transparent area shown.
***
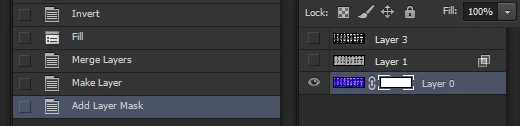
Turn off the eye of the Background layer and add a blank layer above the Background layer. Then choose the top layer. In the Layers panel double click the top layer to bring up Layer Style. Move the top right slider in the Blend if section at the bottom of the Layer Style. Move that slider to the left until the area surrounding the objects in the image is replaced with transparency. Click OK Then (Cmd+Opt+Shift E) to put them in a separate layer.
Only the newly made composite layer is now active. It is the only one with an eye.
Done.
Note 1: Blend If needed slider to 170 to reaches transparency.
Note 2: After that, 3 layers was with an eye -> newly one, layer 1 (from where I apply BlendIf) and layer 2 (blank one created above Background).
***********
>>Apply it to the original image layer
***
From what I have written previously I assume you can now make the mask looks similar to Image 5, choose that layer and Select > All followed by Edit > Copy. Then turn off the eye of the mask layer and turn on the eye of background layer. Choose the Background layer Click on the Mask symbol at the bottom of the Layers panel. A white area will appear in layers alongside the image. Option-click in that white area. Note that it has a frame around it. Edit > Paste and then click on the eye of the Background area.
Done.
Note: If I paste, your image 5 will be a new layer above Background. And I end with a black/white mask as a final image, not an actual colored one.
Sorry for my lack of skills, but I'm missing something.
All explained was done, but this last step.
You have confirmed that you have a layer that looks similar to Step 5 of the six-picture set I originally posted. The layer has solid white objects on a solid black surround. If that mask consists of two layers combine them by placing one below the other and use the Merge down command as described previously and, combine them. The mask must be one layer. Well done. Let’s call that layer the Mask Layer.
By following the next steps the contents of that layer are going to copied, then the Mask Layer will be turned off (click off the eye) and its copied contents will be deposited as a mask alongside the Background layer image. Let’s review the steps:
- Choose the Mask Layer. Select > All followed by Edit > Copy
- Turn off the eye of the Mask Layer (to deactivate it). In fact, at this point the only active layer (with the eye) is the Background layer. If Backgound eye is not on. Click it on. All the others are not active, including the Mask Layer.
- Choose the Background Layer…the only active layer. There is nothing below or above it that is active. Confirm that the Background layer is the only one with an eye, signaling it is active.
- Click on the Mask symbol at the bottom of the Layers panel. It is a gray circle within a black box. A white area will appear in the Background layer alongside the Background image. Notice it has a frame around it. It is the mask area.
- Now we are going to drop the contents of the Layer Mask that we copied in Step 1. Option click on the Mask’s white area. The picture area will turn white.
- Edit > Paste and the copy of the Layer Mask layer will be deposited in the mask area but the eye of the Background layer will have been turned off. Turn it back on by clicking on the eye of the background layer and its mask. No other layers will be active. It will look like this:

Job done.