Exit
  • Global community
    • Language:
      • Deutsch
      • English
      • Español
      • Français
      • Português
  • 日本語コミュニティ
  • 한국 커뮤니티
0

how to Create an action after you have already edited the photo

Community Beginner ,
Aug 25, 2018 Aug 25, 2018

Is it possible to create an action after the image was already edited and saved?

Usually you have to record the action before you start editing but is it possible to already have the edited photo and then record or gather that edit's settings?

1.8K
Translate
Report
Community guidelines
Be kind and respectful, give credit to the original source of content, and search for duplicates before posting. Learn more
community guidelines
Adobe
Community Expert ,
Aug 25, 2018 Aug 25, 2018

I have never used the record history feature.  It logs what you do in Photoshop perhaps if you log what you do in Photoshop you lane be able to read the log see whet you edited the images and gather the information you need to record the steps and step setting.  All things you doe  in Photoshop can not be recorded into Actions.  I do not know what is logged into the History log. I have never used this feature. There are options ins you Photoshop's preferences

I have never used it.my preferences look like this

JJMack
Translate
Report
Community guidelines
Be kind and respectful, give credit to the original source of content, and search for duplicates before posting. Learn more
community guidelines
Community Expert ,
Aug 25, 2018 Aug 25, 2018

No, but you can record them using a new photo. And if you haven't closed the edited file, you can review what you already did (the last 50 steps anyway) in Window > History.

~Barb

Translate
Report
Community guidelines
Be kind and respectful, give credit to the original source of content, and search for duplicates before posting. Learn more
community guidelines
Community Expert ,
Aug 25, 2018 Aug 25, 2018

You can see what step you did but there is no information about the setting used these steps in the the history palette

JJMack
Translate
Report
Community guidelines
Be kind and respectful, give credit to the original source of content, and search for duplicates before posting. Learn more
community guidelines
Community Beginner ,
Aug 25, 2018 Aug 25, 2018

I am unable to even see that. i guess once you close the file you can no longer go back to that files history

Translate
Report
Community guidelines
Be kind and respectful, give credit to the original source of content, and search for duplicates before posting. Learn more
community guidelines
LEGEND ,
Aug 25, 2018 Aug 25, 2018

  wrote

I am unable to even see that. i guess once you close the file you can no longer go back to that files history

correct

Translate
Report
Community guidelines
Be kind and respectful, give credit to the original source of content, and search for duplicates before posting. Learn more
community guidelines
Community Beginner ,
Aug 25, 2018 Aug 25, 2018

I believe i've closed the file already and re-opened it. so i d not think i am able to see anything when i open window> history

Translate
Report
Community guidelines
Be kind and respectful, give credit to the original source of content, and search for duplicates before posting. Learn more
community guidelines
Community Expert ,
Aug 26, 2018 Aug 26, 2018
LATEST

thedonleeboy  wrote

I believe i've closed the file already and re-opened it. so i d not think i am able to see anything when i open window> history

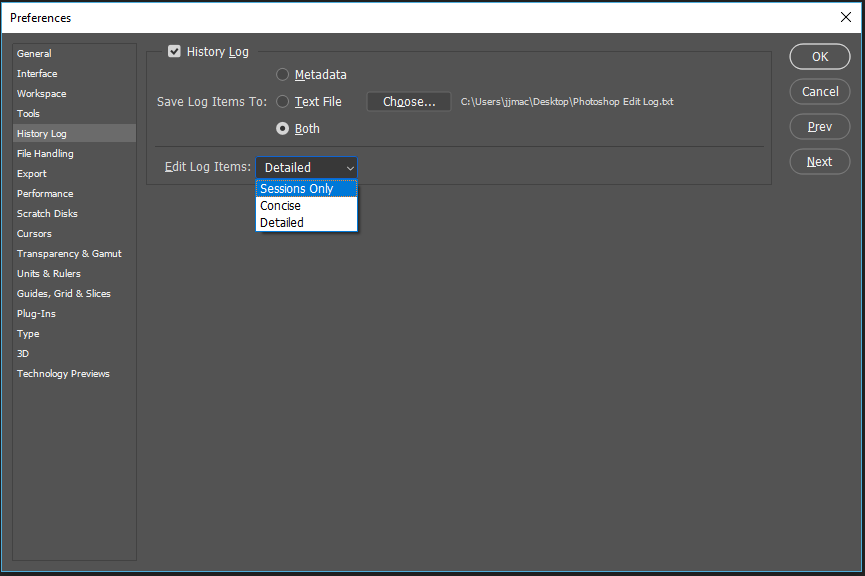
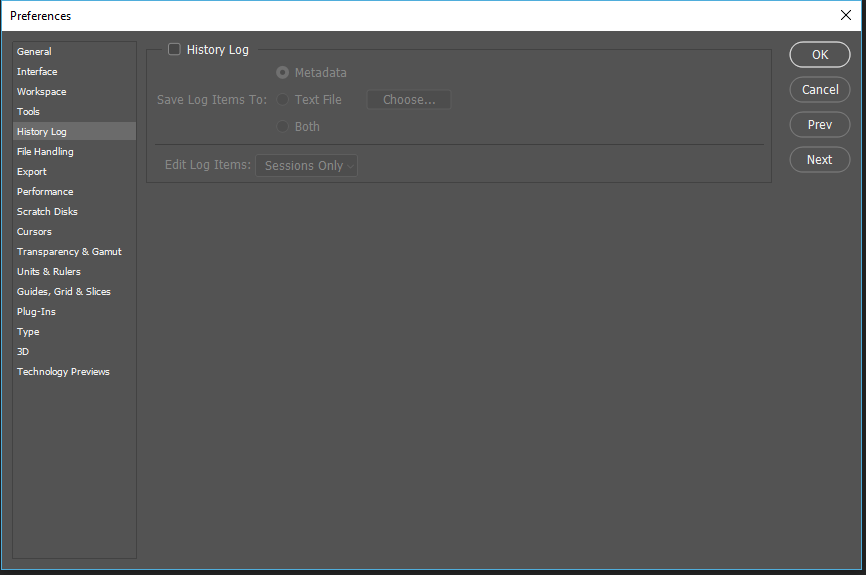
Correct however if you configure your Photoshop Histort Log preference what you did would have been logged into your "Photoshop Edit Log.txt" in whatever folder you configured in your Preferences. In there you wous see data like this.

2018-08-26 09:52:48 Photoshop quit

2018-08-26 09:52:53 Photoshop launched

2018-08-26 09:53:31 File LO2G5037.CR2 opened

2018-08-26 09:53:32 File LO2G5037-1 opened

New Layer

Make layer

3

Rectangular Marquee

Set Selection

To: rectangle

Top: 1230 pixels

Left: 383 pixels

Bottom: 1878 pixels

Right: 1923 pixels

Fill

Fill

Using: foreground color

Opacity: 100%

Mode: normal

Deselect

Set Selection

To: none

Custom Shape Tool

Set Work Path

To: custom shape

Name:  “Chris”

Top: 1332 pixels

Left: 916 pixels

Bottom: 1770 pixels

Right: 1354 pixels

Undo

Custom Shape Tool

Make fill layer

Using: fill layer

Type: gradient

With Dither

Angle: 90°

Type: linear

Gradient: gradient

Name:  “Black, White”

Form: custom stops

Interpolation: 4096

Colors: color stop list

color stop

Color: RGB color

Red: 0

Green: 0.003

Blue: 0.155

Type: user specified color

Location: 0

Midpoint: 50

color stop

Color: RGB color

Red: 255

Green: 255

Blue: 255

Type: user specified color

Location: 4096

Midpoint: 50

Transparency: transparency stop list

transparency stop

Opacity: 100%

Location: 0

Midpoint: 50

transparency stop

Opacity: 100%

Location: 4096

Midpoint: 50

Shape: custom shape

Name:  “Chris”

Top: 1290 pixels

Left: 826 pixels

Bottom: 1850 pixels

Right: 1264 pixels

Stroke Style: vector stroke

2

With Stroke Enabled

With Fill Enabled

Stroke Width: 4 pixels

Stroke Dash Offset: 0 points

Stroke Miter Limit: 100

Stroke Line Cap: Butt Cap

Stroke Line Join: Miter Join

Stroke Alignment: Inside

Without Stroke Scale Lock

Without Stroke Adjust

Stroke Dash Set: none

Stroke Blend Mode: normal

Stroke Opacity: 100%

solid color

Slot Color: RGB color

Red: 0

Green: 0

Blue: 0

300

4

Select vector mask path of current layer

Modification: Remove

2018-08-26 09:56:21 File C:\Users\jjmac\Desktop\Output Folder\LO2G5037-1.psd saved

Save

As: Photoshop

With Maximize Compatibility

In: C:\Users\jjmac\Desktop\Output Folder\

585

2018-08-26 09:56:26 File LO2G5037-1.psd closed

Close

585

true

2018-08-26 09:56:28 Photoshop quit

JJMack
Translate
Report
Community guidelines
Be kind and respectful, give credit to the original source of content, and search for duplicates before posting. Learn more
community guidelines