• Global community
    • Language:
      • Deutsch
      • English
      • Español
      • Français
      • Português
  • 日本語コミュニティ
    Dedicated community for Japanese speakers
  • 한국 커뮤니티
    Dedicated community for Korean speakers
Exit
0

How to easily replace background for an all white one (product photography)

Community Beginner ,
Mar 01, 2017 Mar 01, 2017

Copy link to clipboard

Copied

Hi there,

How do I easily remove the background of an image for an all white background  (product photography).

The way I do this now is select the object with the lasso tool, then add a new layer and then work around the edges with the dodge tool but this takes a lot of time. Is there any quicker way? My object is pretor isolated in the original image already so I would guess there is an simpler way?

Views

1.3K

Translate

Translate

Report

Report
Community guidelines
Be kind and respectful, give credit to the original source of content, and search for duplicates before posting. Learn more
community guidelines

correct answers 1 Correct answer

Community Expert , Mar 01, 2017 Mar 01, 2017

Use a mask and a solid fill layer , that way you can adjust the mask later if the selection needs altering.

Select the object

Layer - Layer Mask - reveal Selection

Layer - New Fill Layer _ Solid Color - White

Move the new layer down in the layer panel

Hope that helps

Dave

Votes

Translate

Translate
Adobe
Community Expert ,
Mar 01, 2017 Mar 01, 2017

Copy link to clipboard

Copied

Use a mask and a solid fill layer , that way you can adjust the mask later if the selection needs altering.

Select the object

Layer - Layer Mask - reveal Selection

Layer - New Fill Layer _ Solid Color - White

Move the new layer down in the layer panel

Hope that helps

Dave

Votes

Translate

Translate

Report

Report
Community guidelines
Be kind and respectful, give credit to the original source of content, and search for duplicates before posting. Learn more
community guidelines
Community Expert ,
Mar 01, 2017 Mar 01, 2017

Copy link to clipboard

Copied

Adding to what Dave has told you, as soon as the words 'product' or 'commercial' are used in conjunction with 'photography', there is no escaping the need to use clipping masks with the Pen tool.   It is at least as fast as using the lasso tool, but is way more flexible as you can go back and fine tune points, and produce perfect curves.

Clipping paths are so fundamental that an entire industry has evolved to undertake the work for busy photographers.  Google the words Clipping Path or Clipping Mask, and you'll get a ton of hits, many of the companies being in India. So if you are not currently comfortable with the pen tool, take the time to master it.  You'll thank yourself later.

Forum regular Mike Hoffman has an excellent series of tutorials on Tip Squirrel.

Votes

Translate

Translate

Report

Report
Community guidelines
Be kind and respectful, give credit to the original source of content, and search for duplicates before posting. Learn more
community guidelines
Community Expert ,
Mar 01, 2017 Mar 01, 2017

Copy link to clipboard

Copied

Hi Lilian,

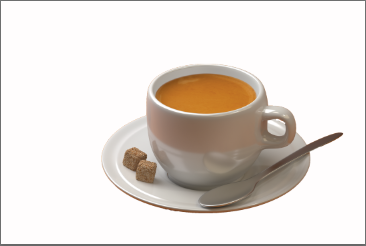
it's right that the original background will need masking out, so that you can replace it with the new white you'd like to see.

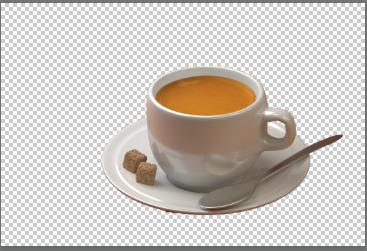
It may be necessary also to adjust the tone and colour of the edge of your product. A product taken from a black background can't easily sit happily on a white background. That cup above in the quick demo looks a little dark on some edges to sit on the white comfortably.

The path tool is certainly a very accurate way to work, but it can be very time consuming if the object is complex, like hair / fur / trees etc.

It's possible that there might be some really helpful masks already hiding in the channels pallet. Basically you choose the channel, invert it and use it as a mask (in the layers pallet) to mask some of the original image.

It's really worth having a read up on using Photoshop's channels to make masks because that’s a fabulous part of Photoshop's capability.

There are plenty of videos on youtube which teach this process.

Here's a useful tutorial, too

Save selections and alpha channel masks in Adobe Photoshop

I hope this helps

if so, please do mark my reply as "helpful" and if you're OK now, please mark it as "correct answer" so others who have similar issues can see the solution

thanks

neil barstow, colourmanagement.net

Votes

Translate

Translate

Report

Report
Community guidelines
Be kind and respectful, give credit to the original source of content, and search for duplicates before posting. Learn more
community guidelines
Community Expert ,
Mar 01, 2017 Mar 01, 2017

Copy link to clipboard

Copied

Just to add to what everyone's (excellently) said, be sure to employ the Properties panel (Window > Properties on the menu bar if it's not active) as it contains a very handy option of being able to feather a mask. (Don't go crazy; a little feathered edge goes a long way.) The option can be used on both layer masks and vector masks non-destructively.

Votes

Translate

Translate

Report

Report
Community guidelines
Be kind and respectful, give credit to the original source of content, and search for duplicates before posting. Learn more
community guidelines
Community Beginner ,
Mar 11, 2017 Mar 11, 2017

Copy link to clipboard

Copied

LATEST

Thanks a lot Dave, Trevor, NB and Warunicorn!

Votes

Translate

Translate

Report

Report
Community guidelines
Be kind and respectful, give credit to the original source of content, and search for duplicates before posting. Learn more
community guidelines