• Global community
    • Language:
      • Deutsch
      • English
      • Español
      • Français
      • Português
  • 日本語コミュニティ
    Dedicated community for Japanese speakers
  • 한국 커뮤니티
    Dedicated community for Korean speakers
Exit
0

How would one photoshop this photo?

Community Beginner ,
Sep 02, 2017 Sep 02, 2017

Copy link to clipboard

Copied

I really liked this photo of Nav, you can view it here.

If you had the raw image of this, or the original photo that was taken, how would you edit in all the lighting and different colors and blurs?  I like the style and would like to learn how it was edited.  Thanks in advance!

[Moved from the non-technical Lounge Forum to the specific Program forum... Mod]

[Here is the list of all Adobe forums... https://forums.adobe.com/welcome]

Views

414

Translate

Translate

Report

Report
Community guidelines
Be kind and respectful, give credit to the original source of content, and search for duplicates before posting. Learn more
community guidelines
Adobe
Community Expert ,
Sep 02, 2017 Sep 02, 2017

Copy link to clipboard

Copied

Please post the image using the symbol in the header of your post that matches the one shown below.

insert image.jpg

Votes

Translate

Translate

Report

Report
Community guidelines
Be kind and respectful, give credit to the original source of content, and search for duplicates before posting. Learn more
community guidelines
Community Beginner ,
Sep 02, 2017 Sep 02, 2017

Copy link to clipboard

Copied

a15c2a96dce7888bdec3ea804db5af2ed353bee3

Votes

Translate

Translate

Report

Report
Community guidelines
Be kind and respectful, give credit to the original source of content, and search for duplicates before posting. Learn more
community guidelines
Community Expert ,
Sep 03, 2017 Sep 03, 2017

Copy link to clipboard

Copied

Yeah. In short, this is just a correctly exposed photo, in a situation where automatic exposure usually fails and overexposes, burning out the highlights beyond recovery.

Everything isn't Photoshop! Some things are still done with a camera...

Votes

Translate

Translate

Report

Report
Community guidelines
Be kind and respectful, give credit to the original source of content, and search for duplicates before posting. Learn more
community guidelines
Community Beginner ,
Sep 03, 2017 Sep 03, 2017

Copy link to clipboard

Copied

So how is the lighting purplish?

Votes

Translate

Translate

Report

Report
Community guidelines
Be kind and respectful, give credit to the original source of content, and search for duplicates before posting. Learn more
community guidelines
Community Expert ,
Sep 03, 2017 Sep 03, 2017

Copy link to clipboard

Copied

LATEST

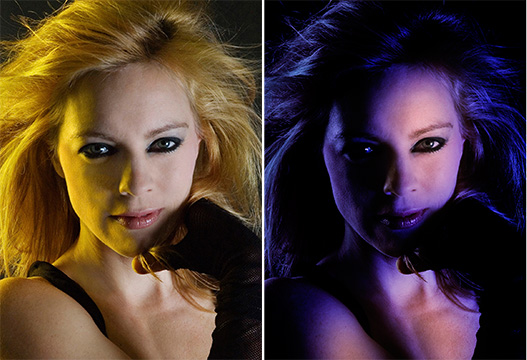
You asked about creating the purple cast. As I mentioned previously, a Curves adjustment can produce that effect and adjust the contrast, as well.

In the example below, the adjustment in color and contrast was done using Curves. A soft-edged mask was used, as well, so that I could play with the flesh tone. For the most part, the mode was Lab Color so that color adjustments were separate from tonal range and contrast adjustments.

comp.jpg

Votes

Translate

Translate

Report

Report
Community guidelines
Be kind and respectful, give credit to the original source of content, and search for duplicates before posting. Learn more
community guidelines
Community Expert ,
Sep 02, 2017 Sep 02, 2017

Copy link to clipboard

Copied

This is a slightly soft image using a broad single light source: the window. I assume exposure was the result an automatic setting that kept the window area from blowing out to pure white and, in doing so, had underexposed much of the subject. Closeness to the window (with no fill light) caused contrast in the face to have abrupt light falloff. The blur on the left is probably the result of something that appears closer to the camera than the subject.

Photoshop: The window area was burned in so that it had weight while keeping face in high contrast. The other adjustment was in color balance, a Channel adjustment that can be made in Curves or Levels. It is possible that there was some additional local burning in of the dark area to enhance the mood.

Votes

Translate

Translate

Report

Report
Community guidelines
Be kind and respectful, give credit to the original source of content, and search for duplicates before posting. Learn more
community guidelines
Guide ,
Sep 03, 2017 Sep 03, 2017

Copy link to clipboard

Copied

In Camera Raw or Lightroom you can adjust the Tint value to give a color cast like this. You can also adjust the Temperature values. Adjusting the Highlights and Shadows allow you to accentuate the light and darl areas of the image with a lot of control. And of course, exposure can be adjusted. The beauty of Camera Raw and Lightroom is that all changes are essentially "Live"

and non-destructive. Better than mKing the adjustments in Photoshop IMHO.

hope this helps,

Angie Taylor | http://wwwcreativecabin.co.uk

Votes

Translate

Translate

Report

Report
Community guidelines
Be kind and respectful, give credit to the original source of content, and search for duplicates before posting. Learn more
community guidelines