

- Home
- Photoshop ecosystem
- Discussions
- Re: Layer Mode - Hard Light *AND* Desaturated?
- Re: Layer Mode - Hard Light *AND* Desaturated?
Layer Mode - Hard Light *AND* Desaturated?

Copy link to clipboard
Copied
Question 1: If I switch a layer's blend mode to Hard Light, is there a way to make it so that the layer is also desaturated at all times? So that if I paint on the layer with a saturated color (green for example), that it will only paint the *value* of that green?
If not, then:
Question 2: If I use an adjustment layer, then painting on it using a black color will *show* the adjustment, and white will *hide* it. Can I reverse this somehow, so that white will hide it and black will show it?


Explore related tutorials & articles
 9
Replies
9
9
Replies
9

Copy link to clipboard
Copied
Hi
https://forums.adobe.com/people/boo+radley+2013 wrote
Question 1: If I switch a layer's blend mode to Hard Light, is there a way to make it so that the layer is also desaturated at all times? So that if I paint on the layer with a saturated color (green for example), that it will only paint the *value* of that green?
I don't understand what you mean by the "value of green" - the Lightness value , the Hue …..? You could combine an adjustment layer e.g. Hue and Sat ,clipped to the pixel layer (Alt-Click on the border between the two in the layers panel) , then set the blending mode of the pixel layer to Hard Light
Question 2: If I use an adjustment layer, then painting on it using a black color will *show* the adjustment, and white will *hide* it. Can I reverse this somehow, so that white will hide it and black will show it?
Any layer mask - shows the layer (or adjustment ) where white and hides the layer (or adjustment) where black. You can't change that - although you can of course use Ctrl+I to invert the layer mask
It is not clear what you trying to achieve with this. Can you post a description with images that show what you are trying to achieve - that way we may be able to suggest the best way
Dave

Copy link to clipboard
Copied
You cannot reverse the internal logic of how image masks work. You'd be putting in question 50 years of computer graphics or going back even further 100 years of photography/ making movies. Opaque areas are always white since this is derived from "blocking" light on exposed film with cardboard whereas unblocked areas would be fully exposed and turn black. That's how it came about. Otherwise I woulkd advise against making things too complicated and unpredictable. You will have much better luck controlling this if you simply duplicate the actual layer with teh blending mode and adjustment layer on top, and mask outh both by applying a group mask, putting them inside a smart object or whatever works best for you and then "brush it on" as needed by ways of manipulating the mask.
Mylenium
Copy link to clipboard
Copied
Thank you Mylenium. I do appreciate the help. This is a little complicated so bare with me. This might be painful lol:
Your suggestion to use a hue/value adjustment layer on top works! It's perfect. But there's one last hurdle.
Let me try to explain this:
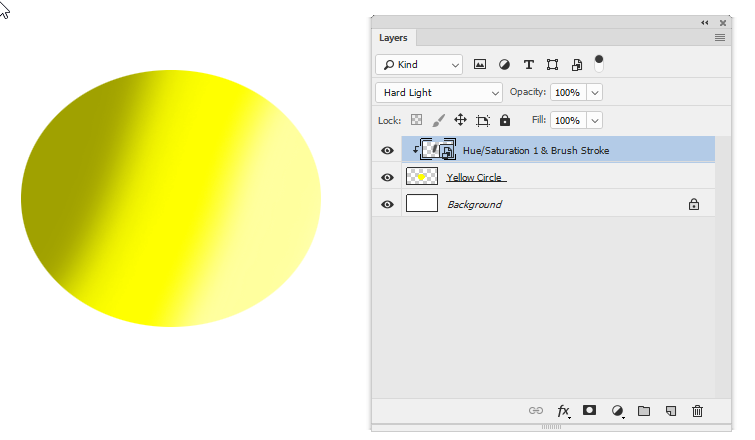
On the bottom layer I have painted a solid circle with a hard brush, using a yellow color.
The layer above is set to Hard Light. Now when I paint on this layer, it adds highlights or shadows to the yellow circle beneath, and the intensity of those shadows/highlights depends on the value of the color I am using. Using grayscale colors(shades) work perfect for this. But if I use anything other than grayscale colors (i.e. any other color), then the shadows/highlights that I am painting become saturated with color - not what I want. So, I want to restrict this hard Light layer to grayscale only when painting on it, so that even if I paint with colors on it, it forces those colors to completely desaturate and become grayscale only.
So, your trick worked - above the Hard Light layer, I added a Hue/Sat adjustment layer, and pulled the saturation slider all the way to the left - and it works. So I now have 3 layers in total. The bottom is the solid color, the middle is the Hard Light layer for painting highlights/shadows, and then the top layer which is the adjustment layer which forces the Hard Light layer to be desaturated. Perfect.
Here's the problem:
I need the the shadows/highlights to be clipped to the bottom layer (yellow circle). So, I added a clip to the two top layers and the clipping works, but the yellow circle on the bottom is now desaturated - no color shows through. The problem here is within the clipping masks, but I don't know how to solve this.
I know there are other ways to do this very easily, but for the time being I need to go this route (I'll explain later).
Still with me? Thanks! Is there a way to do this?
Copy link to clipboard
Copied
Hi
Starting with this

Make the Brush strokes and Hue/Sat a smart object. Then change the blending mode of the smart object to Hard Light and clip the smart object to the Hue/Sat layer
Dave
Copy link to clipboard
Copied
Thanks Dave! But how do i do this:
Make the Brush strokes and Hue/Sat a smart object. Then change the blending mode of the smart object to Hard Light and clip the smart object to the Hue/Sat layer
I can't figure out how to do that - also, can I paint on a smart object layer?
Copy link to clipboard
Copied
Hi
Select both layers and right click. From the menu that appears choose Convert to Smart Object
You can't paint on a smart object but you can double click to open it and paint on the original layers contained within it. Then save the smart object to update the main document
Dave
Copy link to clipboard
Copied
Thanks again - this probably won't work though. When I double-clicked on the smart object, it opened up a new document with only the Hue/Sat and brush strokes layers available. The "yellow circle" layer doesn't get carried over to this new document. I'm working on a live canvas-style painting (using chalk/pastel brushes, mixer brushes, etc) so I wouldn't be able to jump back and forth between smart objects all the time.
Can I go back to the original idea and find a way to use the clipping layer method instead? The problem is, the top layer clips to the middle layer *and* the bottom layer as well.
Can I somehow clip the top layer *only* to the middle layer, and then clip the middle layer *only* to the bottom layer?
(sorry for the confusion)
Copy link to clipboard
Copied
I can't think of a way to do that without the smart object. You could make a mask from the bottom layer - but it would not dynamically change with changes to the bottom layer
Dave

Copy link to clipboard
Copied
This is an interesting discussion! I recall a conversation on the Photoshop support forum between a user and Chris Cox, former senior Photoshop developer. At the time when smart objects were first tested, the developers did test the real-time performance of smart objects - suggesting that they had tested some sort of layer clone solution, and found it to be too slow, and the developers decided against implementing these.
Instead they opted for the smart object approach. Which means Photoshop never received any real-time layer cloning functionality. Perhaps a safe and correct rational decision at the time, but nowadays processing power increased quite a bit, and that safe decision turned out to stymie the workflow inside Photoshop - in particular seen in the light of other applications which implemented the very same cloned layers, and prove that it works very, VERY well.
Fast forward to today, and the lack of real-time layer instancing (and many other legacy Photoshop architecture code decisions such as only one bitmap layer mask per layer, 15bit instead of real 16bit image mode, 8bit selections, smart object limitations, etcetera, etcetera ) are hurting Photoshop's flexibility, such as the OP's case.
Comparing how other software solves the OP's quandary is enlightening:

PhotoLine on the left, Krita on the right. BOTH support cloned (instanced / virtual) layers, which makes it simple to solve.
PhotoLine allows anything to be cloned and re-used in the layer stack (aside from smart objects which it also supports). In this example the circle layer is cloned and re-used as a layer mask. The painting layer it masks doesn't even need a desaturation adjustment layer, because in PhotoLine any given layer can be set independently to any resolution, image mode, and bit depth: in this case the layer is an 8bit greyscale one (so painting with colour is automatically translated to grey values).
Krita provides a quite simple solution as well. While Krita doesn't allow the user to re-use cloned layers as a layer mask, it does give the user a plethora of interesting layer blend modes: in this case the "Destination In" blend mode is applied to the clone and it behaves like a clipping mask.
And both Krita and PhotoLine support live non-destructive adjustment layers without the (forced) need of smart objects: in Krita the painting layer is directly accessible while the desaturate adjustment layer takes care of (real-time) desaturation. The layers are then grouped.
@Boo Radley 2013: perhaps consider downloading Krita (free and open source), and do your painting in Krita. Better painting tools as well compared to Photoshop 😉
Anyway, it is always informative to compare competing products, since it provides new perspectives on a problem. In my opinion Photoshop is in need of a core architecture update. Whether this will happen? I doubt it somewhat.

Find more inspiration, events, and resources on the new Adobe Community
Explore Now
 AdChoices