Looking for a photoshop brush
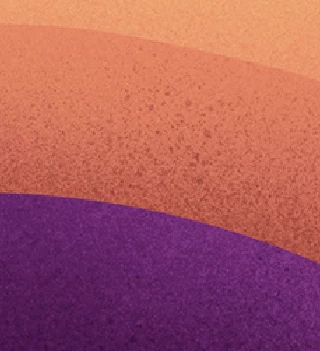
Copy link to clipboard
Copied
Hi,
Can anyone help me with a brush for photoshop that is similar to this style, made in procrete? (I dont know the name of the brush it in procreate) I have looked all around internet, just to find brushed that are more static stippled. The brush will be used on shadows and highlights like in the reference.
Any ideas?
Explore related tutorials & articles
Copy link to clipboard
Copied
In the brushes panel type Spatter into the search box. If that doesn't give you what you need from the brushes on your system, click at the top right of the brushes panel and select 'get more brushes'. That should take you to the Kyle brush collections, which include spatter brushes.
Dave
Copy link to clipboard
Copied
The splatter appears to lay atop sharply separated areas, so I am not completely sure what you want to achieve.
Could you post another example.
Copy link to clipboard
Copied
I am looking for a brush as well, maybe its not a brush but made with filters etc. This is what it looks like. Can someone help me create this, please?? I have searched for grunge brushes, sponge brushes, and splatter and ink brushes but have not found anything close. I am in desperate need of creating this.
Copy link to clipboard
Copied
What are you actually trying to achieve?
• You could simply make a Brush from the element.
Copy link to clipboard
Copied
Yes those are exactly what I am trying to achieve!! What brush is that please please please:)?
Copy link to clipboard
Copied
Actually the example you posted includes a few noticable repetitions.
Maybe you would be better served by using a stock image or an image created with Generate Image/Generative Fill.
If it’s not about one »splash« (as in the example) but more »freeflow« painting you should check out @davescm ’s recommendation of Kyle T Webster’s brushes.
Even if they should not meet your expectations they may serve as examples of what one can achieve with Photoshop brushes.
And what not …
Copy link to clipboard
Copied
What brush did you show me above? That is the one that I want.
Copy link to clipboard
Copied
What brush did you show me above? That is the one that I want.
By Mona3319
I removed the text and logo, inverted black and white and defined a new Brush Preset based on the image you posted.
Copy link to clipboard
Copied
@Mona3319 do you realise that you could easily make a brush preset from your graphic?
You need to invert it and paint over the logo with black, and then use Edit > Define brush preset.
It's only 500 odd pixels, so probably not big enough, but you could upscale and sharpen it.
Something else you could do is give the brush 100% Angle jitter in Brush Settings, which will rotate the brush every time it is stamped down
Copy link to clipboard
Copied
Ok, I will try that. I am definitely not an expert with this.
Copy link to clipboard
Copied
What brush would I start with? Sorry for stupid questions.
I really appreciate the quick responses from all of you!
Copy link to clipboard
Copied
You are going to create a brand new brush preset which you'll make from your t-shirt graphic.
When you use Edit > Define Brush Preset anything that is black will be included, and everything that is white will remain transparent. So:
Crop down to just the graphic, and invert it (Ctrl i)
Draw a loose selection around the text and logo with the Lasso tool, and fill with black (Alt Backspace)
It needs to be a decent size, so use Image size (Ctrl Alt i). Lets make it 2000 pixels.
It's going to be a bit muddy after the resize, so sharpen it to firm up its outline (Use Unsharp Mask to avoid fringing).
Then go Edit > Define Brush Preset give it a name and you are done.
You can stamp that directly to your project, or you can add some settings.
In Brush Settings >> Shape Dynamics give 100% Angle Jitter
Now the brush will be rotated between every stamp down, but because you'll have probably made the brush smaller, its outline will be less jagged.
You can use Scattering > Scatter Jitter to make the brush move randomly between each stamp, but don't go too high or you'll separate each stamp down. Use the preview window at the bottom opf the panel as a guide.
The Photoshop Brush Engine can be a lot of fun. You can't break anything by experimenting, and it is an incredibly useful tool to have in your Photoshop box of tricks.
If you want to keep any Brush Settings you apply, you need to save the preset again via the Brush Settings pop-out menu (three bars top right corner). That will keep it safe untill you ether delete it, or do a major Photoshop update. Tou keep it forever you need to export it ether as a single preset, but usually as a group.
In the Brushes panel, select your new brush presets, and group them. Give the group a name.
Select your new group in the Brushes panel, and in its pop-out menu choose Export Selected Brushes
This will save them to a .abr file that you can keep forever, or share with friends, or sell on Brusheezy etc.
Copy link to clipboard
Copied
This is so awesome! Thank you for this!
One more question. Once i have this splatter the way I want, I want to subtract my logo from it. Can you please give me step by step on how to do this as well? I think I am using the wrong terminology when searching in google. I'm not sure if I have to convert my paint splatter to a shape first before my logo can subtract from it. So sorry, you must think "Oh boy, these newbies"..lol
Copy link to clipboard
Copied
I used the Lasso tool to draw a selection around the graphic, and filled it using Alt Backspace.
It does not matter how you do it, or even the order you do it, so long as you end up with the intended preset in Black, and surrounding area white or transparent.
i.e.
I'm using a fully hard white brush below. When done invert to make it black (Ctrl Alt i)
It really is a lot of fun. If I make a spidery shape like below, and define it as a new brush preset.
Make background and foreground colours bright and saturated.
Add 100% Hue Jitter, and tick Apply per tip
Increase brush spacing (I used 20%)
you can have all sorts of fun making garish brush strokes.
Copy link to clipboard
Copied
Once i have this splatter the way I want, I want to subtract my logo from it. Can you please give me step by step on how to do this as well? I think I am using the wrong terminology when searching in google. I'm not sure if I have to convert my paint splatter to a shape first before my logo can subtract from it. See pic.
Copy link to clipboard
Copied
Could you please post screenshots with the pertinent Panels (Toolbar, Layers, Options Bar, …) visible?
Clipping mask the logo to the splatter layer, set it to knock out and set its fill to 0%.
Copy link to clipboard
Copied
This detailed video tutorial shows the custom brush-making process. Jesus's Photoshop Training Channel tutorials are some of my favorites. Enjoy!
Copy link to clipboard
Copied
Jesus's Photoshop Training Channel tutorials are some of my favorites. Enjoy!
By Nancy OShea
I'll second that. I love that he has started a more advanced series of videos, like how to make Parametric Filters. He always manages to include a solid gold gem or two that's new to me. I also love that he is now working with Lisa Carney, and that she has enthused about how much time he is saving them.
This is a good example. They did an amazing session together at MAX last year, but I was unable to find it last time I looked. I'll have to check ProDesignTools to see if Jim has cataloged the sessions from last year.
Copy link to clipboard
Copied
I think this is the one (S6305)
https://www.adobe.com/max/2024/sessions/advanced-photoshop-techniques-from-two-hollywood-s6305.html
Copy link to clipboard
Copied
Once i have this splatter the way I want, I want to subtract my logo from it.
Copy link to clipboard
Copied
Can you tell me what you did in the second layer? I see a mask but I am not sure what you did there. Also, I would like to subtract a logo and not text, not sure if the process is the same. I just always see a text layer used in these explanations but I can never find someone using an actual logo. Does the logo need to be a certain file extension? Sorry I'm such a newbie at this. So my logo would be either a png or a psd. I would like to have my paint in white at this time. The green would be my tshirt. So I would like to have the black part of my GOAT logo subtracted from my white. So you can see my green tshirt color where the black is on my GOAT logo. Did I explain that correctly?
Copy link to clipboard
Copied
• select the logo layer
• Layer > Create Clipping Mask
• set it to Knockout »Deep« and Fill Opacity 0%
• select »Layer 1«
• uncheck »Blend Clipped Layers as Group«
Copy link to clipboard
Copied
Thank you however I think I am missing a step. I think it has something to do with my layer 1. Your second layer has had something done to it. I tried putting a layer mask but then my green didn't show up at all.
Copy link to clipboard
Copied
This was so amazing, I can't get over how great you provided instructions. I appreciate this so much!!


-
- 1
- 2