

- Home
- Photoshop ecosystem
- Discussions
- My method for adjusting ink limit (total area cove...
- My method for adjusting ink limit (total area cove...
My method for adjusting ink limit (total area coverage)

Copy link to clipboard
Copied
OK, folks. I've decided to post this suggestion as requested. Some may look at this workflow and decide it's way too much work and that there's an easier way. But, I've done this a number of times and have seen excellent results and after a few times running through it I can do it in my sleep. I also feel that this is the least damaging to my image and keeps the file from changing visually too much.
1. First, open the offending image and save as so that you have an original file to go back to if you have to. Here is my example image. I am being informed by the publication I am sending it to that my ink limit should be under 300. But when I check my image with the eyedropper set to "Total Ink" I am seeing 320-350 in many areas.

2. With this new file open, duplicate the file so that you now have two images open. In the "copy" select the black channel and duplicate that channel within the file. In most cases, your high total ink areas will be found in the "darkest" parts of your images. By duplicating the black channel, I will be using this as a selection mask.

3. Now on the "copy" image, you want to choose Edit > Convert to Profile. Here you will choose Custom CMYK and in the next dialog box change the Total Ink Limit to the desired amount, in this case 300.
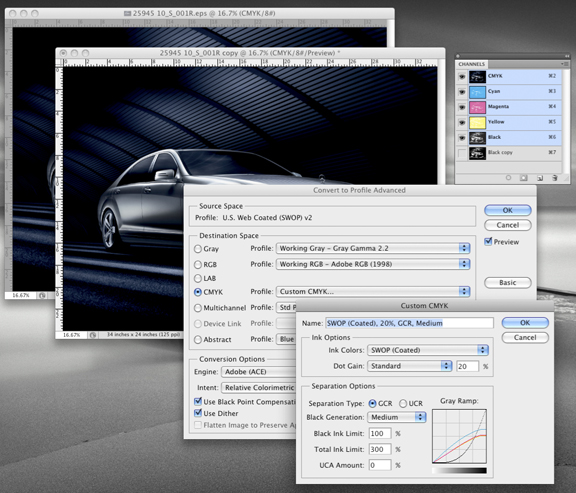
4. After this conversion, use your eyedropper and check the Total Ink in the areas that previously you discovered was too high. You will now see much lower numbers, and actually the numbers may have gone too far and you'll see that your converted image looks very different from your original image. But, not to worry, the following steps will solve that.
5. In the "copy" image, with the CMYK channels active, select all pixels.
6. Go to your other, "original" image you have open and Select > Load Selection. Choose the "black copy" channel from your "copy" image and also choose invert. This will load a selection mask in your image of just the "darkest" parts of your image.

7. Now with this selection active, you want to Edit > Paste Into. You are now pasting into the selection your converted image, but it will be only affecting the darkest parts of your image. The result will also create a new layer and layer mask. If you turn off the view of your bottom layer, you can see what you have actually pasted into your image.

8. Now what I do is use my eyedropper to check the Total Ink with the top layer turned on and then off. I then use the Opacity slider on the top layer to get my image so that the Total Ink meets my desired 300 level. Once it's where I want, I flatten my image and then all is done. Your "copy" image you can just close and no save.


Explore related tutorials & articles
 36
Replies
36
36
Replies
36

Copy link to clipboard
Copied
It would be really nice to have some kind of ink limit viewer widget in Photoshop, instead of having to flip back and forth to Indesign to see where it is going over.
Definitely.
I thought that had come up in the Feature Request-section more often, but I can find only one thread at the moment:
http://forums.adobe.com/message/2829509#2829509
You might want to add your support there.

Copy link to clipboard
Copied
I came up with an action that gives a color warning in PS for TIL limits. Basically, it applied each channel (@ 25% opacity) in linear burn mode to a blank layer and then uses blend if to mask a color overlay. It needs to be run to be updated, but that seems quicker than jumping back and forth between Photoshop and InDesign. Of course it's limited to multiples of four for warning limits.
Copy link to clipboard
Copied
Not surprisingly I have a Script for the task which also includes Spot Channels – but as it has to compress the total possible ink-amount into 256 steps the results get progressively more inexact with increased number of colors.
Copy link to clipboard
Copied
Yes, mine is even more inexact.

Copy link to clipboard
Copied
I have an easy one.... make an action to add a threshold layer at correct value, which can happen as part of the action (I assign mine to f2) then you have it at one click and just turn off layer when not in use. It will not always work the same but it is handy for highlighting the darkest part of the image quickly.
Copy link to clipboard
Copied
How do you make threshold aware of the sum? Or is it more of a "suspected areas" thing? Like if I pull the yellow way down, my TIL drops to acceptable levels, but given the density of yellow, the threshold ignores my move...
Since I'm action-updating anyway, I do like the idea of an adjustment layer, as it gives you the before values to preview. Much better than what I'd come up with. I guess I was prioritizing being able to edit the blend if, but I could just make that an editable action step instead.
Copy link to clipboard
Copied
As I understand it, threshold is based on sum, so will change when
level is reached... if set correctly which may take experimentation... Sounds like you need to fine tune the level of threshold.
Where I found this very handy was where a batch of RGB images need conversion and checking, I set an action to convert to cmyk (with appropriate policies), apply a levels adj layer, curves adj layer and threshold layer. Then, when completed, I could instantly see the out-of-TIL areas and toggle off the threshold and straight into adjusting. Very efficient.

Copy link to clipboard
Copied
I have shared more then once, the fix for Adobe's garbage solutions for print. Serch the forums for my posts. The solution is here with a TIL preview solution. It's not the best solution, but then again, Adobe's solution is far worse considering the implementation of color manglement.
Copy link to clipboard
Copied
Yes, mine is even more inexact.
That I doubt; anyway the Script does also not update automatically, so the benefit is limited.
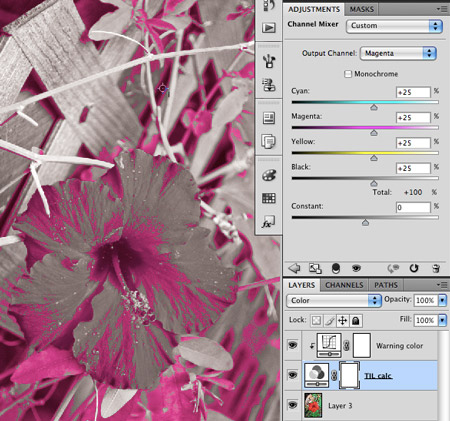
Anyway, you mentioning your way of doing it in the Action gave me an idea for an almost interactive method for straight CMYK-images:
• Create a Layerset
• add a Channel Mixer setting Magenta to 0-25-0-0 and all others to 0-0-0-0 with Blend Mode Normal
• add a Channel Mixer setting Magenta to 25-0-0-0 and all others to 0-0-0-0 with Blend Mode Linear Burn
• add a Channel Mixer setting Magenta to 0-0-25-0 and all others to 0-0-0-0 with Blend Mode Linear Burn
• add a Channel Mixer setting Magenta to 0-25-0-0 and all others to 0-0-0-0 with Blend Mode Linear Burn
• add a Curves Adjustment Layer setting the white-handle to just below a quarter of the sum to warn about and the black handle to the exact quarter
see screenshots

The resulting display obstructs the view of the underlying image, but it updates and can be hidden/shown easily.
Edit: I tried to attach a layered tif to make it easier to test, but unfortunately tif seems to be a prohibited format for upload, so if someone wants to test it they’ll have to recreate the layer-structure themselves.
Copy link to clipboard
Copied
What about just channel mix output magenta c - 25, m - 25, y - 25 and k - 25. Use your threshold curve adjustment and clip it the channel mix. Set the channel mix to color blend (luminosity would work too, and give you some idea of what's underneath, particularly at 80% opacity). That way you get a TIL reading with either adjustment highlighted (one convert to /100 values).
Honestly, I couldn't get your stack to work out. Time for bed. I did a little searching for MO's advice and all I found was post after post by you with the linear burn method. I promise, between forums I don't visit (scripting, SDK?) and times I was on vacation, I wasn't (intentionally) poaching...
Copy link to clipboard
Copied
What about just channel mix output magenta c - 25, m - 25, y - 25 and k - 25. Use your threshold curve adjustment and clip it the channel mix. Set the channel mix to color blend (luminosity would work too, and give you some idea of what's underneath, particularly at 80% opacity). That way you get a TIL reading with either adjustment highlighted (one convert to /100 values).
Right you are!
That’s the easier way – unnecessarily complicated layer structure in my post.
It would more or less accurately preview the consequence of any CMYK-edits below the Channel Mixer-layer on the total area coverage.
But either way results in a presence in the actual CMYK, so one would have to remember to remove it before actual output.
Copy link to clipboard
Copied
Dang, it might get even better with your method:
By setting the Channel Mixer for all but Magenta to 0-0-0-0 with Blend Mode Normal and then using the Blend If Setting for This Layer’s Magenta to remove the white parts one gets a pretty good warning color (if the image is not very magenta itself at least).

-
- 1
- 2

Find more inspiration, events, and resources on the new Adobe Community
Explore Now
 AdChoices