Participant
March 5, 2018
Answered

Need to design a wrap for a hardhat - how to wrap an image around a half cylinder

  • March 5, 2018
  • 5 replies
  • 2810 views

Hello all!

I am doing design using an older Mac with Adobe CS6.

I have a project on my desk that requires setting up a design for a wrap for a miner's type helmet/hard had.

The manufacturer has no templates....   The design is specific enough that I need to get things pretty accurate, as opposed to just not distorted, if that makes sense.

Imagine a hard-had.  It had a plastic wrap around it for graphics.

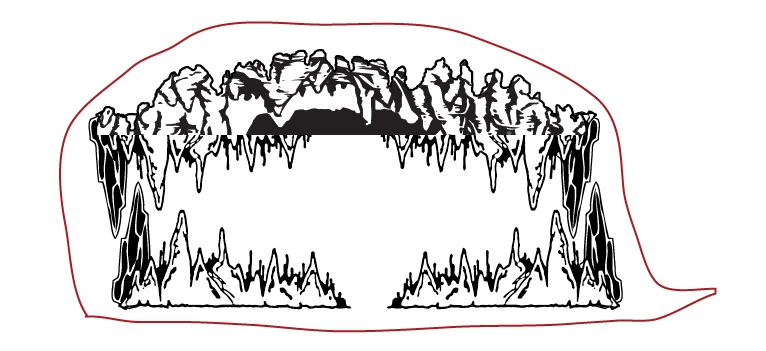
I need to get stalactites and stalagmites coming from the top and bottom of the helmet, leaving approximately 2"x5" in the relative center of the left and right sides of the helmet "open" with a solid color, so custom stickers can fit there.

I think if I can set up a half-sphere, and wrap the art around that, the tiny bill of the hat will fall in to place.

However, this isn't a proof design, where the art just needs to wrap around a model....

I need to wrap it, see how it looks, then flatten it out.  Plus, provide the wrapped version as a sort of proof to the manufacturer.

I am pretty lost.  I can wrap a texture around a sphere - not even close to what I need to do...

See attached for a terrible 5 second idea of what a flat side view of the helmet would/should look like.

It'll be full color etc.

I'd like to do it in vector format as well, but that's not necessary - it's just easier for me to design my cave art that way!

Thanks all!

-Mark

PS - the "wrap" image is terrible, of course.  It'll be full color, and the bill of the hat from the top will have cave rocks on it etc etc - that bit is relatively easy.

Wrapping the cave stuff up, and around, the sides/top of the helmet, without the crazy distortion I would get just providing "flat" art to the factory is what I am trying to suss out.  Thanks again!

This topic has been closed for replies.
Correct answer rayek.elfin

I would do this either by

  1. Create my design, then creating or downloading a 3d model of the hard hat, and then use Blender to unwrap the hard hat's surface to a flat image. Then use image projection to project the design on the hard hat in Blender. Export design at a high resolution. Print on transparent white Decal paper at home, and apply to real helmet to test. Adjust if required, and send design to client. You may need multiple pieces to make this work.

    OR
  2. Do it the old-fashioned way. Use the real hard hat, and wrap pieces of lightweight paper representing the decals, inserting cuts where you need to conform to the surface. Draw your base design on these pieces of paper, test, and scan each piece. Continue your design in Photoshop and/or Illustrator. Print on decal paper, and test on your design.

You haven't mentioned what print process you intend to use. Perhaps contact a firm like this one to help you out: TAG

They specialize in this area of complex shaped surface printing work. Or find a similar firm in your area.

Here is a quick example in Blender:

5 replies

rayek.elfin
rayek.elfinCorrect answer
Legend
March 7, 2018

I would do this either by

  1. Create my design, then creating or downloading a 3d model of the hard hat, and then use Blender to unwrap the hard hat's surface to a flat image. Then use image projection to project the design on the hard hat in Blender. Export design at a high resolution. Print on transparent white Decal paper at home, and apply to real helmet to test. Adjust if required, and send design to client. You may need multiple pieces to make this work.

    OR
  2. Do it the old-fashioned way. Use the real hard hat, and wrap pieces of lightweight paper representing the decals, inserting cuts where you need to conform to the surface. Draw your base design on these pieces of paper, test, and scan each piece. Continue your design in Photoshop and/or Illustrator. Print on decal paper, and test on your design.

You haven't mentioned what print process you intend to use. Perhaps contact a firm like this one to help you out: TAG

They specialize in this area of complex shaped surface printing work. Or find a similar firm in your area.

Here is a quick example in Blender:

Participant
March 9, 2018

That is EXACTLY what I need to do.

Unfortunately - it's not for a specific client per se so much as something we would like to add to a new line of products.

However - looking at the exiting patterned helmets, and their wraps, I don't know that the production process is accurate enough to do what we are looking to do, given there is a shrink factor in the wrap plastic, cost considerations etc.

However - even just as an exercise, I think I should try the design, 3d model etc with blender - never heard of it to be honest.

Any tutorial recommendations that would lead me towards accomplishing the above process?

-Mark

Trevor.Dennis
Community Expert
Community Expert
March 6, 2018

I don't know if I am missing something, but you can produce a 3D wrap from a layer.  Hat or sphere perhaps, or make your own hard hat preset.

This is hat.  You'd need to adjust the layer contents for more specific results.

Participant
March 7, 2018

This appears to be the closest to what I am trying to accomplish.

Accuracy to 100% isn't feasible or necessary - I need to get some relatively un-distorted cave graphics to a hard-had.

It's a generic medium sized hard hard 5.25" tall in the center, 7.25" wide, 10.25" length, including a 1.5" bill, 3 ridges in it

To get it PERFECTLY accurate, I know I would need an accurate 3d model.  This is not only not necessary, but not feasible for this project.

BUT - I need to be able to take the image, and NOT to see what it will look like stretched along the helmet - I need to be able to make a flat piece of shrink-wrap that can be... shrunk, or fit to the helmet.

OK so - that's NOT AT ALL realistic with these design goals.

But - I think it should be possible, without getting to pedantic about the exact distortions from each ridge on the helmet, to be able to set up a sheet, just say for example, 4 feet x 4feet.  It is made from [unspecified] semi-heat shrink plastic wrap.  So 1  - I get that without a LOT of specifics, there is a lot of trial and error involved in production.

Can we somehow figure a shrink rate?  OR - I KNOW we could skip that aspect all together, for what the end result will be.

So - back to the 4x4 sheet of plastic.  There's 12 spots on it, that can be cut apart, that each contain enough image to wrap the helmet, and be trimmed on the edges, say.

So - I need to be able to model the image to the helmet, then flatten it out.

Do I have to just finagle the image while it's flat, so the distortions from being wrapped aren't terribly distorted? Like how the cave image goes crazy over the brim of the hat above?

It's all got to be made [per hat] as one image - although the image can be modified so, for example, the brim has it's own section of the image to reduce distortion etc.

The way I am seeing it - I need to use Trevor.Dennis solution, and just sort of... pre-distort the image to compensate for the wrap around the hard-hat.  Seems overly complicated -

IS THERE A BETTER WAY!~

Thanks, All!

rayek.elfin
Legend
March 5, 2018

You MUST have access to a 3d model or some kind of template to make this work. Would you know the exact brand and model of the hard hat you need to fit the design to?

Norman Sanders
Legend
March 5, 2018

Consider Edit > Transform > Warp

JJMack
Community Expert
Community Expert
March 5, 2018
Participant
March 5, 2018

That's getting towards the right ballpark... bad pun intended.

But I really don't need to make a viewable mockup - that's relatively easy even with my rather basic skills.

I essentially need to wrap something, then produce the a flattened image of the wrap.

Kind of like when they do a wrap for a car for advertising, with the plastic shrink material.

JJMack
Community Expert
Community Expert
March 5, 2018

cs6 EXTENDED?

JJMack