

- Home
- Photoshop ecosystem
- Discussions
- Re: Photoshop CS6 Stroke Path Greyed Out
- Re: Photoshop CS6 Stroke Path Greyed Out

Copy link to clipboard
Copied
Hi, I have Photoshop CS6 from the Student Version of CS6 Design and Web Premium package.
Recently, I started trying out various techniques with the pen tool, but there is one major issue I'm having: the Stroke Path option of greyed out, meaning that I can't use it.
I've tried everything I can think of, and not even the solution here: can't select 'stroke path' in photoshop CS6 to taper pen tool edges is doing me any good. On my end, the size jitter is greyed out even when I have the brush as my current tool on hand. The file itself is RGB and 8-bit.
Too add even further insult to injury, I can't simply contact someone at Adobe by phone, because they directed me to the chat instead... only to find that I can't use the chat for something like this.
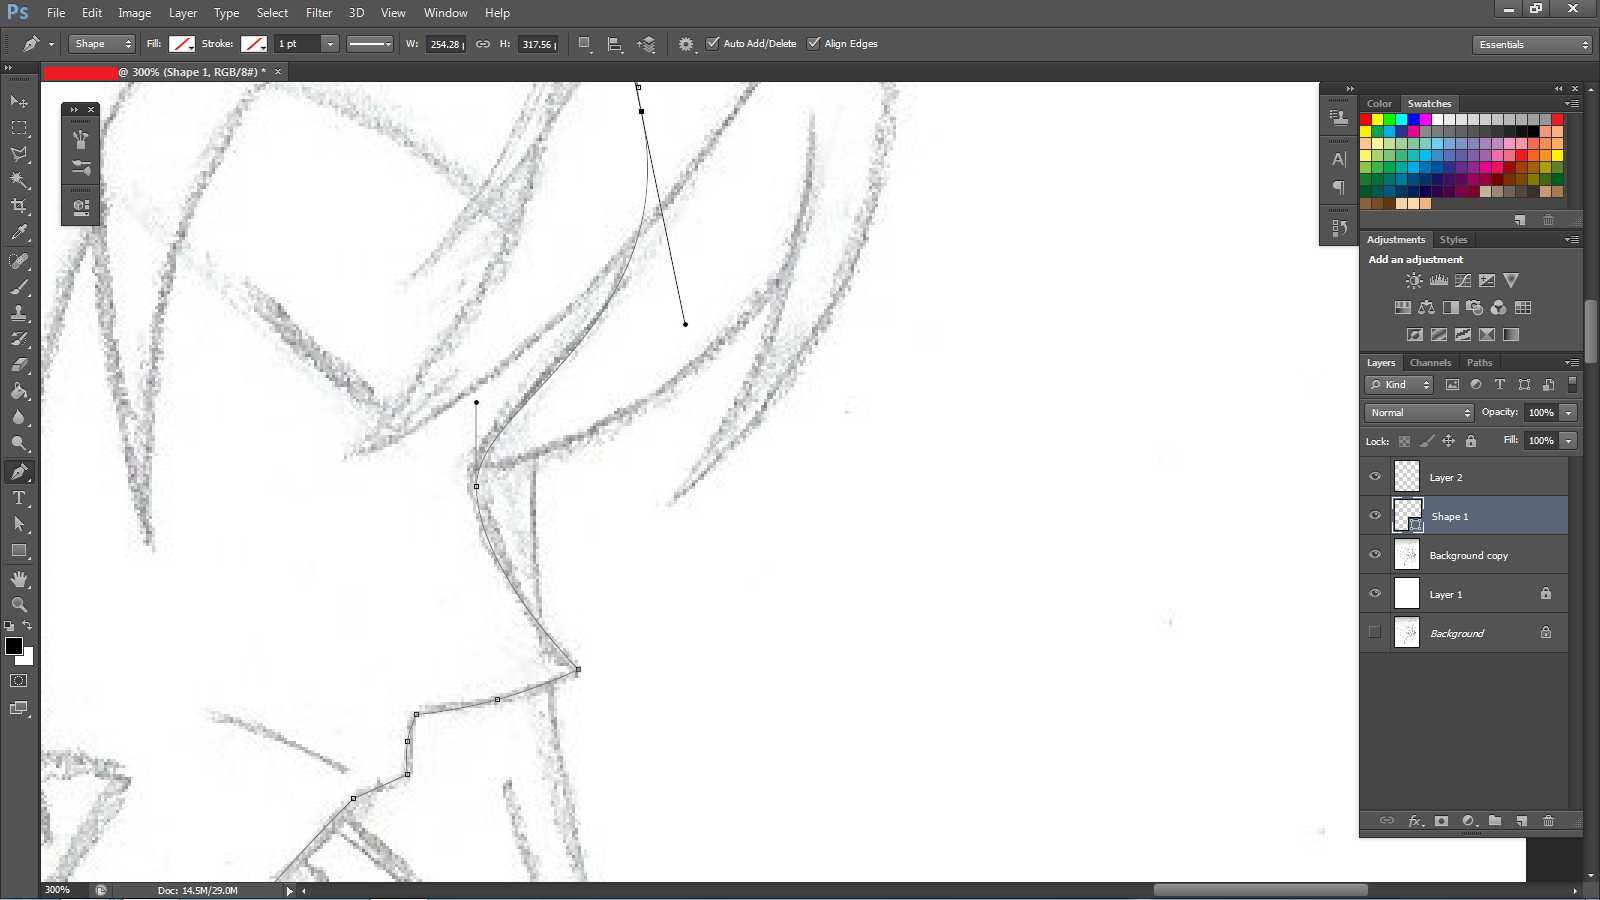
Here's a screenshot of the problem. And before you guys point it out, yes, I know the path layer is selected, and I heard that you need to select an actual layer instead, but every time I do that, then I can't use the path to do squat. I can't even use the "stroke path with brush icon" under the Paths tab (next to Layers) because, again, it's greyed out.
Does anyone have a solution?


 1 Correct answer

Just make a new layer for any stroke, or group of strokes you want to isolate. What I do is make a new layer as soon as I start, and immediately use 'Ctrl (Cmd) a' to select the entire canvas. With the new layer selected, I can practice, and just hit the delete key to clear the layer. This is a real time saver if using brush preset dynamics — especially Fade where it is not always easy to predict how long the stroke will need from full size to nothing. If your stroke takes a winding path acros
...Explore related tutorials & articles
 11
Replies
11
11
Replies
11
Copy link to clipboard
Copied
You have a Shape layer selected. Stroke is a raster operation, and needs a normal layer.
Copy link to clipboard
Copied
...You didn't read the whole post, did you? Look at what I wrote before my screenshot.
I am aware that I have it selected, BUT, every time I try to select a normal layer instead, I still can't use the stroke path. I can't even combine the two. If you can provide me a visual of how it's done, then that would be fantastic.
Copy link to clipboard
Copied
Whoops! Sorry. I look at so many of these in an average day, I am often guilty of skimming. 😞
OK, I'm guessing that the size dynamic is greyed out because you have one of the art brushes selected. If you select any of the first six standard brush presets, the dynamics will be available again. Google John Derry for some cool ideas on art brushes use Tool presets.
Regards not being able to stroke the path, you are not looking at work paths as such when a shape layer is selected. Select your shape layer, and then drag the shape layer's path onto the New Path icon at the bottom of the panel. That will produce a plain vanilla work path from the shape. Now create or select a raster layer, and you'll be able to stroke that path.
Incidentally, with any of the Shape tools selected, you can can change the result between Live Shape, a Path, or pixels from the left of the Options Bar.
Did I get it right this time? 

Copy link to clipboard
Copied
Well... the Shape Dynamics are available again when I selected one of the standard brush sets. But I still can't get the Stroke Path to work.
Here's what I'm trying to do with it: You know how when you draw with an actual pen, you can make tapered lines? A friend of mine has an earlier version of Photoshop (which is 7, I think), and since she doesn't have a graphic tablet, she managed to do her strokes like this.
She leaves the paths and fills empty, and only draws the paths.
Then, she uses the Add Anchor Point to do such, and then moves them to make the path she wants.
Finally, she right clicks on the path, and then selects Stroke Path, and tells it to "Simulate Pressure," which then gives the path a stroke with a tapered line to give it a better look.
I've been trying to replicate it on CS6, but all my options are greyed out, and she doesn't have to worry about it, even with a path later selected.
PS - I also followed Semaphoric's advice, but... it's still not working.

Copy link to clipboard
Copied
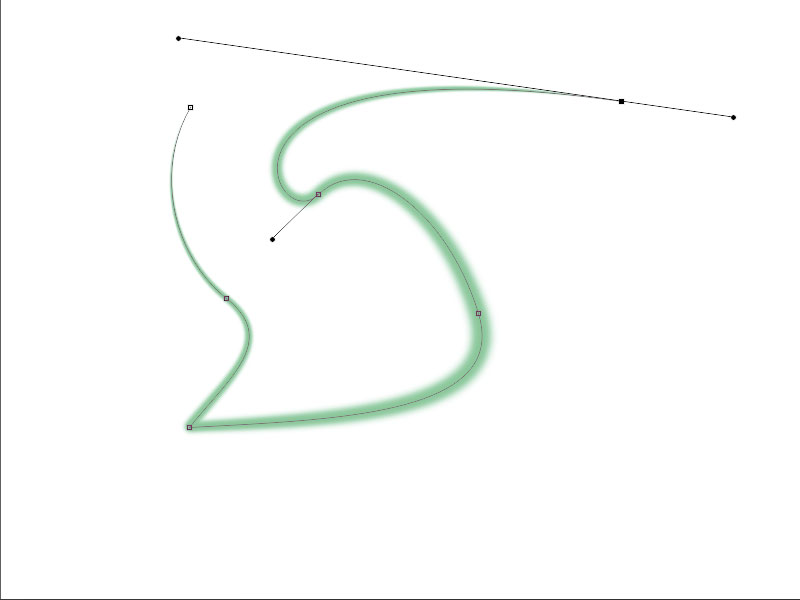
It works here on CS6. I draw a path with the regular Pen tool

With only the Background layer, you can see I have a "Work Path"

Which I right-click on in the Paths panel, and choose Stroke with Simulate Pressure:
Copy link to clipboard
Copied
I sincerely hope this does not offend, so apologies if you already know all this stuff...
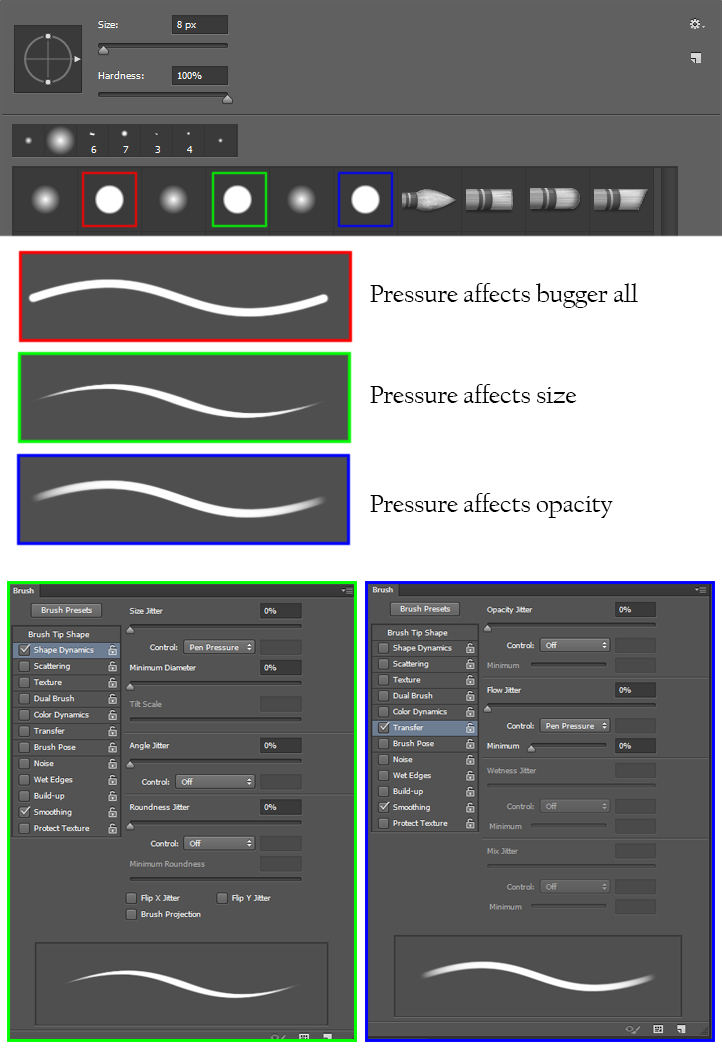
You will probably need to click to open this graphic to be able to read the text in the brush presets at the bottom. If you reset your brushes the top line should look like this (I have large thumbnails set). When you check Simulate pressure when stroking a Path, this shows you what to expect. If yo select my colour coded presets in turn, and look at the Brush panel and the brush dynamics, it become clear how they work, and how you can control them.
Note how Size is set to Pen Pressure for the green outlined brush, as is Transfer > Flow for the blue outlined brush. So Pen Pressure equates to Simulate pressure.
Check out this recent thread for some alternate effects when stroking a path
Copy link to clipboard
Copied
No, it's perfectly fine. I'm actually glad you pointed this out. I've been wanted to know how to do that for a long time. Thank you for that, Trevor.
Also, thanks to Semaphoric's post, I've finally been able to get the Stroke Path to work, but now there is one more problem I need to address...

How do I make the lines separate from the background layer? It'd be kind of pointless for me to even use the Stroke Path if I have to use the eraser tool to take out a pixel one by one...
I am really sorry to be bothering you on this.
Copy link to clipboard
Copied
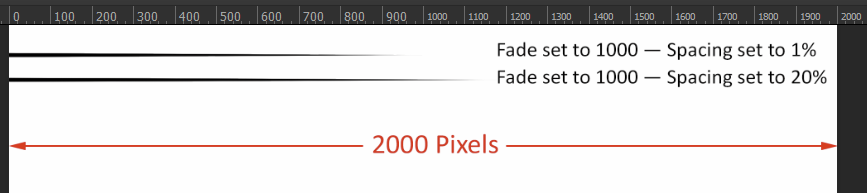
Just make a new layer for any stroke, or group of strokes you want to isolate. What I do is make a new layer as soon as I start, and immediately use 'Ctrl (Cmd) a' to select the entire canvas. With the new layer selected, I can practice, and just hit the delete key to clear the layer. This is a real time saver if using brush preset dynamics — especially Fade where it is not always easy to predict how long the stroke will need from full size to nothing. If your stroke takes a winding path across and around the screen, then it is close to impossible to get the correct value for Fade without practice strokes. As a guide, the Fade seems to equate to pixels when Spacing is set to 1%, and increase directly proportional to the percentage value of brush Spacing
NOTE: Make sure you don't have your work path selected when hitting the delete key, or you will lose it!
Copy link to clipboard
Copied
Sweet! This definitely helps! I'm getting it to work the way I wanted to for now!
Thank you so much for your time to help me on this. I wonder if there's any way I can mark more than one answer correct...
Copy link to clipboard
Copied
NOTE: Make sure you don't have your work path selected when hitting the delete key, or you will lose it!
Best to save the path, so you can stroke it again later, if you decide you'd like a different brush.
Copy link to clipboard
Copied
Your Pen is set to produce a Shape, which has its appearance changed in the Option bar. What you need is an "Ordinary" path:

Then, be sure the path is selected in the Paths panel, and you are stroking on a plain raster layer.

Find more inspiration, events, and resources on the new Adobe Community
Explore Now
 AdChoices