 Adobe Community
- Home
- Photoshop ecosystem
- Discussions
- Please help! Tricky removal of background behind h...
- Please help! Tricky removal of background behind h...
Please help! Tricky removal of background behind hair

Copy link to clipboard
Copied
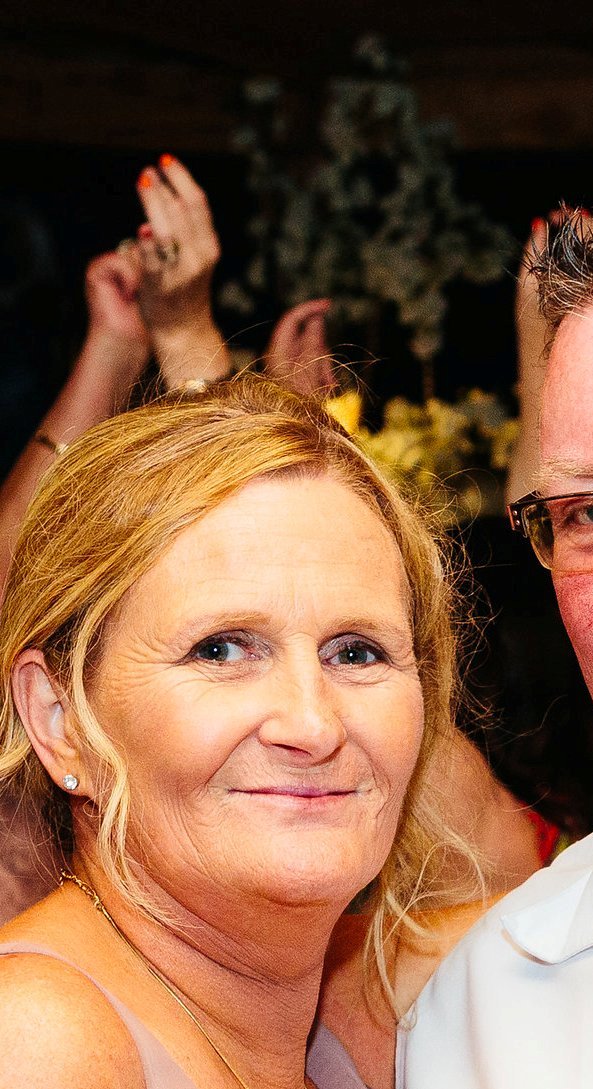
Please help a newbie out! I don't have a lot of experience with Photoshop and only have the CS2 version to work on. I'm trying to buy a friend a charm with an image of her and her recently deceased fiance engraved on to it. Luckily because of the engraving, the photo they're working from doesn't need to be absolutely perfect. Unluckily, I have no idea what I'm doing!
I used the extract tool and did ok around the top of her head but where her hair falls near to her shoulders, there is another person's body in the background which is almost the same colour as my friend's hair and this is where I'm having major issues.
Could someone please advise how to go about this. I'm on a bit of a time crunch as the gift is for her 50th birthday in a couple of weeks and need to get the photo to the jewellery designer. It's going to be a hard birthday for her because her fiance had big plans for it before he dropped dead without warning 4 months ago. You will see that her fiance is also in the photo but a photographer removed the background for that part of the photo as it was used on cards during his funeral so I can just put them together if I can get my friend's image right.
Please help. Thanks in advance.


Explore related tutorials & articles
 8
Replies
8
8
Replies
8

Copy link to clipboard
Copied
It is not always possible to cleanly extract hair.Red hair on a dark background is not one I world try to do. Cut the fly away hair off and paint some in using a hair paint brush.

Copy link to clipboard
Copied
That's about as hard as it gets, and Select & Mask is not going to do a stellar job of it.
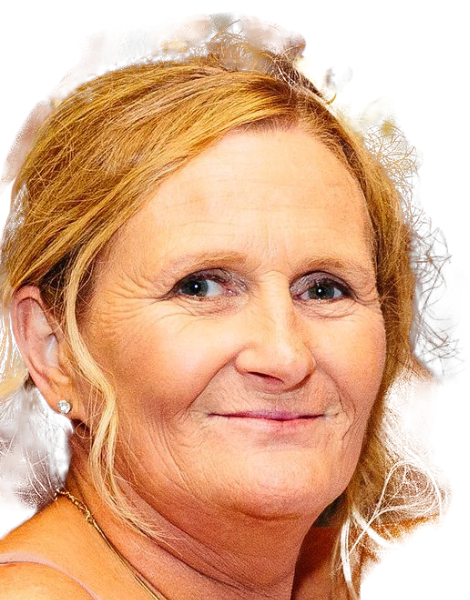
What I do is tidy the bad edge with a semi soft brush in the layer mask, and paint flyaway hair back in
This took a couple of minutes.

Use a full hard 1 pixel brush, and set spacing to 10% and Size Jitter to Fade.
I started with a value of 200, and worked up to 600, but it depends on brush spacing and the resolution of your image
You can also set Opacity Jitter to Fade (using the same value as Size Jitter) in Transfer.

The result will still be too much, so lower the layer opacity for best effect. Mine is set to 70%, but I would go lower than that with dark hair on light backgrounds.
Dave Cross (Who used to be one of Scott Kelby's Photoshop Guys) told us a story at MAX in 2016. He'd made a similar selection and Scott and the lads were marvelling at how good it was. It turned out he'd done exactly the same thing painting in the missing flyaway hair after making the selection.
If you want to get into this, then find the Hair & Skin Textures by Castrochew set. The two hair base presets are excellent. Start laying down darker tones, and build up to lighter tones.
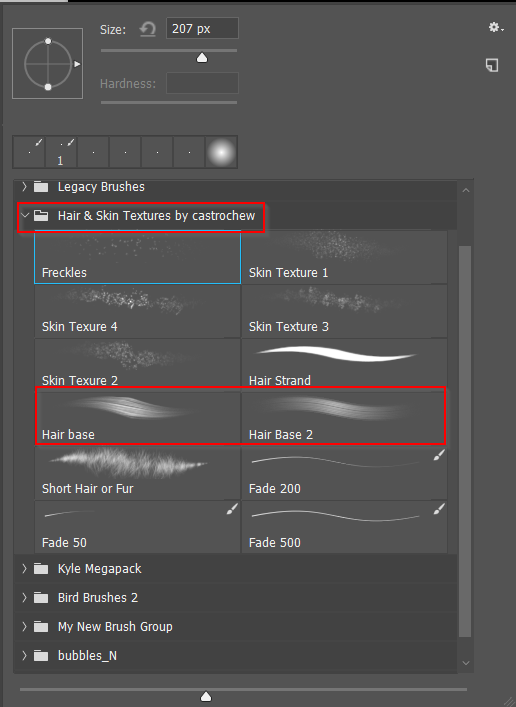
The short hair or Fur preset is fun. It's not unlike the Grass presets. I use it for making beards.
Note, I added the Fade presets to the Castrochew set.


Copy link to clipboard
Copied
Changing the Mode to CMYK, choosing Calculations, working with Cyan and Magenta set to a Blending Mode of Linear Light provides the basis for a mask of the rim of the hair. Curves and a Brush completed the mask. The hair near the chin had to silhouetted out because the black shadow disconnected it from the face and it looked odd. Then back to RGB,
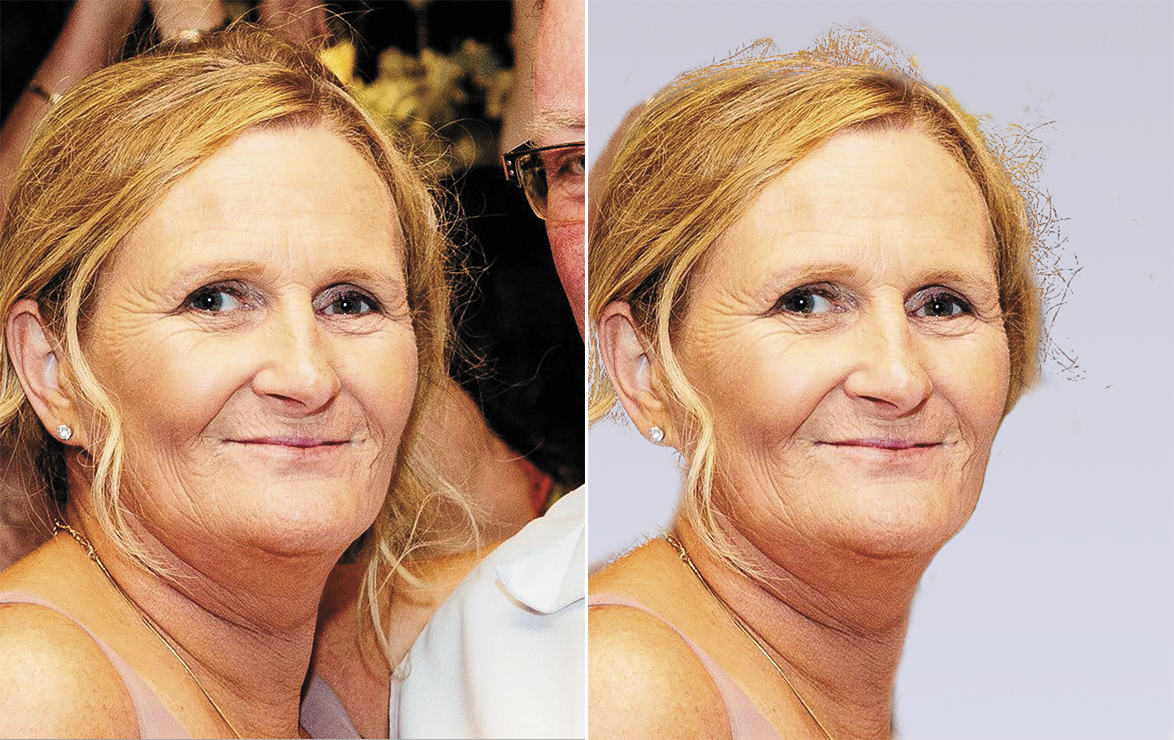
Click to enlarge. The mask held the wisps of hair. Did not correct the neck lines, the blemish at the right corner of the mouth. Nor adjust the flesh tone.

Copy link to clipboard
Copied
Norman, I’m pretty sure that you are referring to creating the mask in a CMYK file, then transferring the mask back to the original RGB image and not changing the original from RGB > CMYK > RGB?
Copy link to clipboard
Copied
It’s a funny thing, back when I was a retoucher for a magazine publisher – one of the key things that art directors often asked for was the removal of “whispies"… not their preservation! Of course, the answer is somewhere in the middle – clean up most of the hairline, but also leave in some strays so that things look natural. I too generally fake the stray hairs by painting with the smudge tool and then filtering, feathering etc., rather than try to perfectly retain the originals (viewers of the image will not know what the original looked like anyway, so as long as the new image looks realistic for the new viewing context all is good). It really depends on how one is performing the removal and if a background is being added in Photoshop or if the file is to be transparent and layered over a background in another program such as InDesign.
Copy link to clipboard
Copied
Stephen_A_Marsh wrote
It’s a funny thing, back when I was a retoucher for a magazine publisher – one of the key things that art directors often asked for was the removal of “whispies"… not their preservation!
I remember that look. Hair selection done with the Pen tool! ISTR Dave Hill made a point of doing the same thing when he went mad with After Effects on his amazing Adventure Series images. I found the video OK, but there was an article back at the time where he says they were quiet at the studio, and spent a month doing the 3D fly though. You can see the hair outlines on a separate plane that gets offset when the camera flies through the scene. This was eight or nine years ago, and I can remember being very impressed at the time. Heck I am still impressed now.
Copy link to clipboard
Copied
Well this was back in the time of Photoshop 6 (not CS6), and drum scanning transparencies and QuarkXpress 3 or 4 for layout ruled!
However I was not referring to the whole headshot being traced out with the pen tool. Generally the pen tool was preferred for smooth and clean selections of the entire person, but regular channel or other based methods were used for the hair and combined into a single raster mask. This could have been for a cover shot where the image was shot against an out of focus studio/portrait backdrop etc. The hair still needed to be cleaned up as per the art directors vision (there may have been no transparency or clipping paths involved). Sometimes the fly away hair was just too distracting.
But it was not just cutouts only with the pen tool, it was always a combination of pen and layer mask methods and many times the page layout vector background was rasterized and merged into the transparent Photoshop layered file and then brought back into the layout, as one could not use raster transparency in the layout.
Copy link to clipboard
Copied
Wow, thanks everyone; looks like I've got some reading to do 
Thanks again for all your help.

 AdChoices