Doc_Pit
Inspiring
January 4, 2019
Answered

Problem stamping with adjustment layers.

  • January 4, 2019
  • 3 replies
  • 2039 views

Greetings, Everyone, and Happy New Year!

I'm encountering a problem stamping layers that include adjustment layers.  The problem only occurs occasionally and is illustrated in this example:

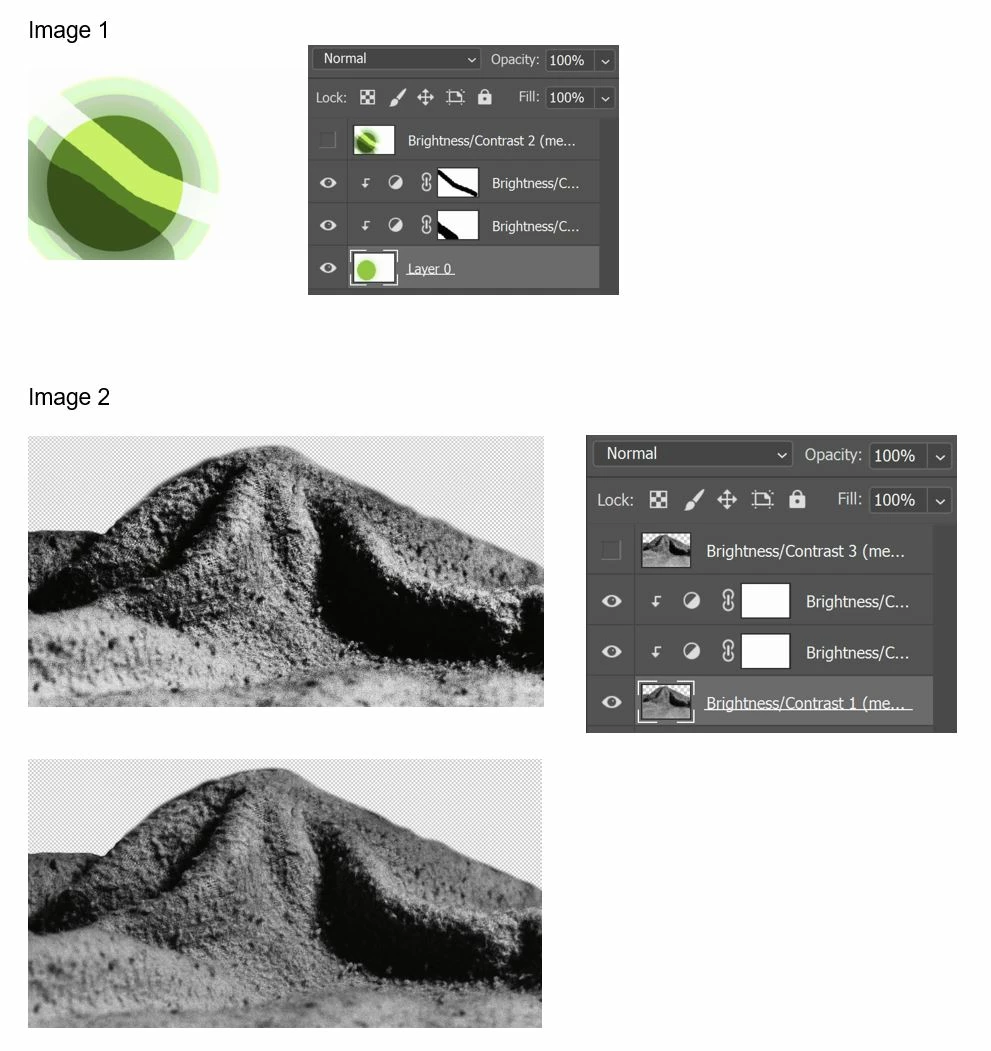
In the first case, I took a base image, applied two adjustment layers, selected all layers, then stamped the three layers (Ctrl+Alt+E).  If I were to make that fourth layer visible, it would accurately show the bottom layer with the adjustments applied.

In the second case, I repeated exactly the same process.  The result of stamping the base layer and the adjustment layers is shown in that last image.  The contrast is much lower because the adjustments are not being applied. 

Can anyone explain to me why the affect of the adjustment layers is applied in the first instance but not in the second?  (Note that Shift+Crtl+Alt+E produces the same result.  The blending mode on all layers is normal.)

    Correct answer D Fosse

    View at 100%!

    Noisy/grainy images, halftone screens, line art - anything that has tonality defined by sharp, pixel-level transitions - must be viewed at 100% for a correct adjustment preview.

    The previews are calculated based on on-screen zoom ratio for performance reasons. Zoomed out, softened and blurred pixel edges introduce intermediate values that aren't really there in the original. So they "disappear" when you commit the adjustment to the full image data.

    In a normal photograph this effect is negligible and not an issue. But in special cases, such as your second example, or e.g. a starry night sky, it makes a difference.

    3 replies

    Participating Frequently
    July 29, 2024

    I'm having a somewhat similar problem but the answer doesn't work. 

    I have a file with multiple layers (including smart, adjustment and regular layers). I want to create a new top layer so I hit [CTRL+ALT+SHIFT+E] and it creates a new layer on top of all the others. However, the image is slightly different from what was on the screen prior to the merge. The same thing happens if I flatten the image. I’m using PS 25.9.1 for Windows. I’m doing the merge from the very top layer (an adjustment layer). Never happened before. I printed the picture twice - once after I created the stamped layer & then after deleting the stamped layer. The pictures matched the

    problem I was seeing on the monitor whereas they should have been identical. A copy of layers panel is attached.


    Participant
    January 6, 2025

    I've had the literal same issue. I want to create a stamp visible so I can  get a layer with all the adjustments layer effects to proceed with other edits. For example after adjustment layers I want to do Frequency separation. After I create  a stamp visible layer I end up getting an image layer that doesn't look like the way does after adjustment layers. I've tried to create a copy of all the layers then merge the copy and keep the unmerged visibility toggled off - this sometimes work and other times doesn't . So teh other fix I found that always works is I save a copy as a new file - and on this one flatten layers then continue to do other edits. I keep the original file so if I need to revert it modify I could do so 

    D Fosse
    Community Expert
    D FosseCommunity ExpertCorrect answer
    Community Expert
    January 4, 2019

    View at 100%!

    Noisy/grainy images, halftone screens, line art - anything that has tonality defined by sharp, pixel-level transitions - must be viewed at 100% for a correct adjustment preview.

    The previews are calculated based on on-screen zoom ratio for performance reasons. Zoomed out, softened and blurred pixel edges introduce intermediate values that aren't really there in the original. So they "disappear" when you commit the adjustment to the full image data.

    In a normal photograph this effect is negligible and not an issue. But in special cases, such as your second example, or e.g. a starry night sky, it makes a difference.

    Doc_Pit
    Doc_PitAuthor
    Inspiring
    January 4, 2019

    D Fosse, Yes!  Thank you.

    The pic was shot indoors just to create a test image.  ISO was 12,800, so, very grainy.  Once the stamped image is viewed at 100%, it shows the effects of the adjustment layers.

    Daniel E Lane
    Inspiring
    January 4, 2019

    One thing to try, Don't select all of your layers when you go to stamp. Just select the top layer you want in the stamp. So in the case of what you are showing there, Just select the top Brightness/Contrast layer. If it is still giving you a bit of grief, there is another option I can think of. Instead of clipping the adjustment layer(s) to the image layer you want to effect, Grab the adjustments and the image layer and group them together in a folder. Then select that folder and stamp from there.

    Doc_Pit
    Doc_PitAuthor
    Inspiring
    January 4, 2019

    Daniel, thanks very much for your response.

    I don't really follow your suggestion: Just select the top layer you want in the stamp. Selecting one layer and using Ctrl+Alt+E produces no result.  My understanding is that the objective in stamping is to select a group of layers and produce a merged copy of those layers while leaving the individual layers intact.  So, multiple layers must be selected, no?

    I did try the second suggestion.  NG.

    I have experienced this problem when the layers selected included more than one blend mode.  But, here, all blend modes are normal.

    The exasperating part is that most of the time it works fine.  Again, thanks.

    Daniel E Lane
    Inspiring
    January 4, 2019

    Stamp is Shift+Ctrl+Alt+E, looks like you are missing a key there. Unless you modified it. If not, Try it with the extra key.