Exit
  • Global community
    • Language:
      • Deutsch
      • English
      • Español
      • Français
      • Português
  • 日本語コミュニティ
  • 한국 커뮤니티
0

Problem with CMD+OPT+SHIFT+T (copy and repeat translation)

New Here ,
Jul 17, 2019 Jul 17, 2019

Hi I've been struggling for 3 weeks on this and I can't see what's going on. I've watched videos and read blogs.

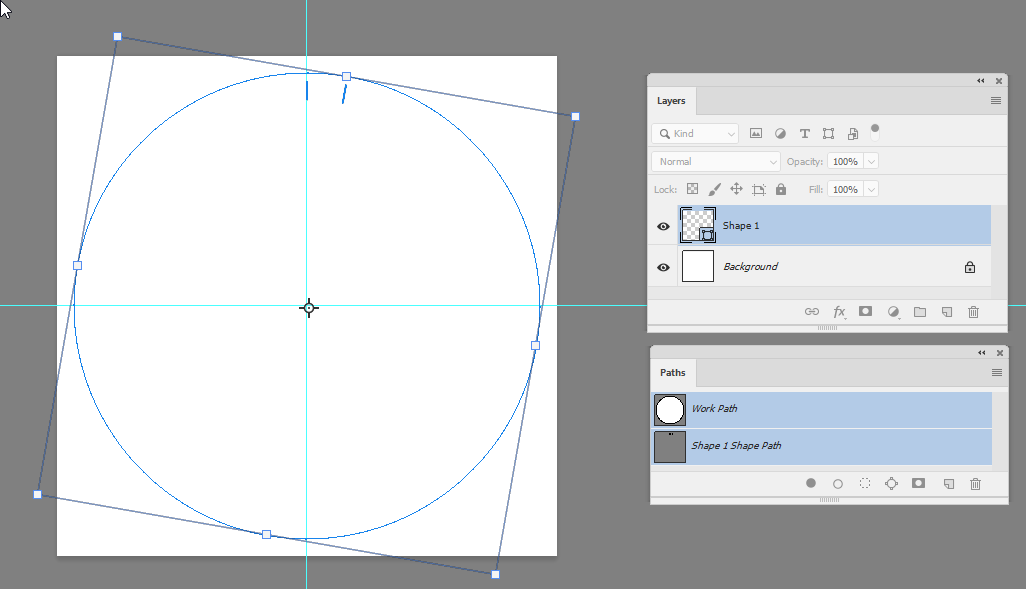
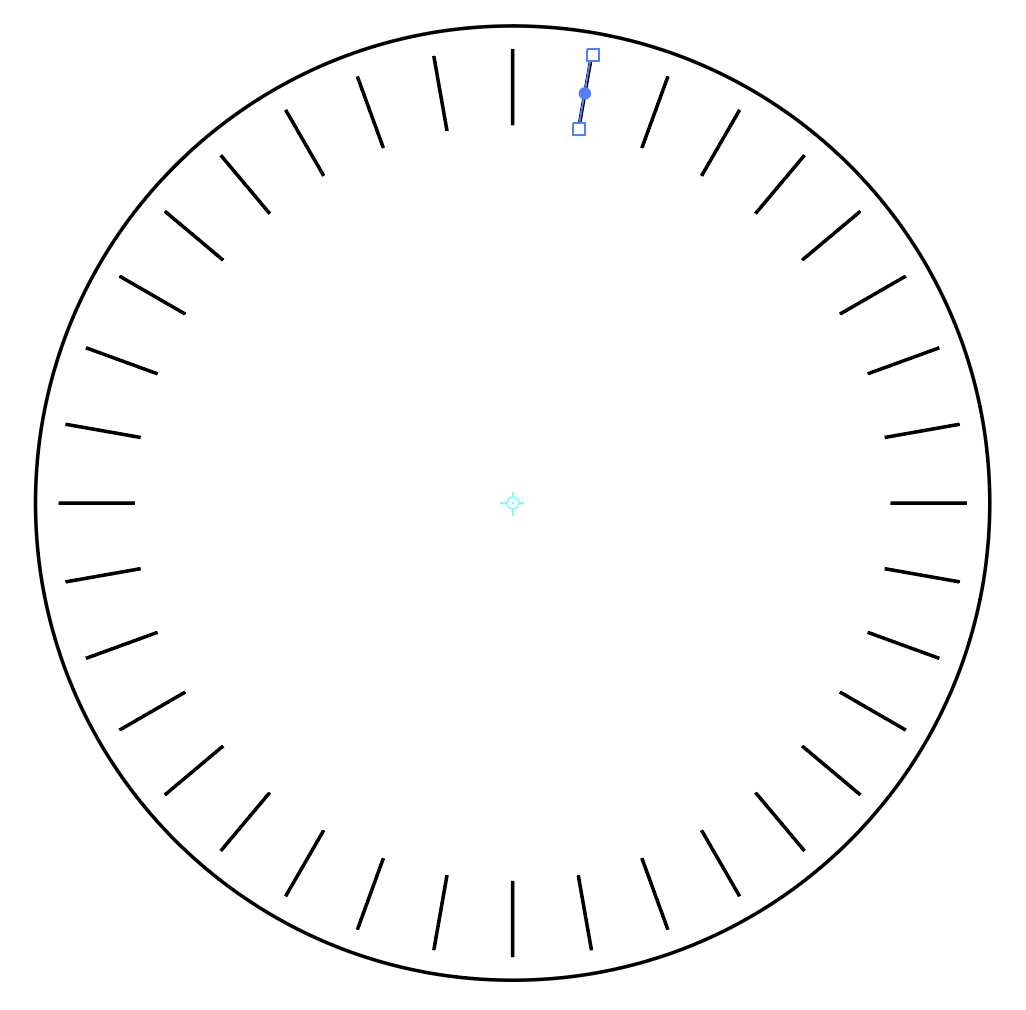
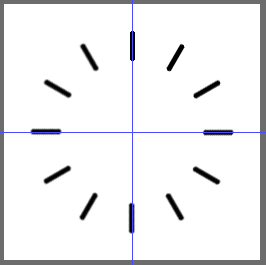
I'm trying to create a circular slide rule, as such I need to create 'tick marks' around a circle at exact degrees.

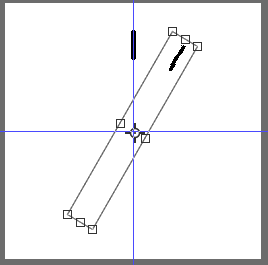
I have managed (read struggled) so far by drawing a single line at 0, then dragging the anchor to the centre of the document (why oh why can't it snap to the guides!?!?) and then specifying the angle of rotation in the transform box at the top of the document.

I know that CMD+OPT+SHIFT+T is supposed to copy and repeat the last transform but EVERY single time I use this I end up with an ever increasing spiral moving outwards from the centre with each copy.

Now I KNOW that it repeats the last transform, so if you moved it immediately prior to doing the initial copy with CMD+OPT+T, then it will 'bake' that translation in. But I've closed Photoshop, re-opened it, had my 'tick' mark line vertical at zero degrees around my circle, then used CMD+OPT+T to duplicate it, then drag the anchor back down to the centre of the screen (setting it at exactly 1024.0 by 1024.0 = my image is 2048 by 2048) and then typing in the rotation angle I want, and then clicking the Tick to confirm the transform. And the press CMD+OPT+SHIFT+T without EVER changing the transform in-between, and it STILL spirals away from the centre!

Please, can anyone help me? I've literally spent days of my life making these damn tick marks line by line.

And if anyone can tell me if photoshop can lock or snap the anchor point (for rotation) to the guides, please tell me.

Thank you for reading, I hope my explanation was clear.

1.5K
Translate
Report
Community guidelines
Be kind and respectful, give credit to the original source of content, and search for duplicates before posting. Learn more
community guidelines
Adobe
Community Expert ,
Jul 17, 2019 Jul 17, 2019

You did not post meaningful screenshots.

I expect the problem can be solved by not creating one line on a Layer, but the two opposing lines on one Layer, thus making the Layer’s center the rotation center.

Translate
Report
Community guidelines
Be kind and respectful, give credit to the original source of content, and search for duplicates before posting. Learn more
community guidelines
Community Expert ,
Jul 18, 2019 Jul 18, 2019

Hi

This is better done in Illustrator, but if you must use Photoshop then try this

Make the tick mark shape ( I used the line tool)

Make a circular path centred on the document centre

In the paths panel select the shape path with the line and shift select the circular work path

Ctrl+Alt+T and type in the rotation in the options bar ( I used 10 degrees) - both will transform and be centered on the circle centre

Press Enter then Shift+Ctrl+Alt+T as many times as you need

You can now delete the circular path and your shape layer will have the transformed tick marks

Dave

Translate
Report
Community guidelines
Be kind and respectful, give credit to the original source of content, and search for duplicates before posting. Learn more
community guidelines
Community Expert ,
Jul 18, 2019 Jul 18, 2019

davescm  wrote

This is better done in Illustrator, but if you must use Photoshop then try this

Hi Janice,

I agree with Dave that this is easier in Illustrator if you have access to it. Here's how:

  1. Draw the circle and the tick mark (ellipse and line tools). Keep the line selected and choose the Rotate tool "R".
  2. To change the center of rotation from the center of the line to the center of the circle, hold down Option (Alt on Windows) and click in the center of the circle. This dialog comes up. Turn on Preview.
  3. I entered 10 for the angle of rotation like Dave, but -10 would go in his direction.
    You can also let Illustrator calculate the angle from the number of tick marks you have. You didn't say what angle you need. Just type 360 divided by how many objects you need and they will be equally spaced.


  4. Then use the keyboard shortcut to Transform Again.
    (Yes, I know what Cmd+D means in PS. And in InDesign it means File > Place!)

It can also be done as a blend on the circle, then expanded, but this method will give you the precise angles.

~ Jane

Translate
Report
Community guidelines
Be kind and respectful, give credit to the original source of content, and search for duplicates before posting. Learn more
community guidelines
Community Expert ,
Jul 18, 2019 Jul 18, 2019

Even in IIllustrator I would recommend making a group of the two opposing lines.

Effect > Distort & Transform > Transform can be used to make the copies quickly and editing the original elements will carry over on them.

Screen Shot 2019-07-18 at 11.32.38.png

Translate
Report
Community guidelines
Be kind and respectful, give credit to the original source of content, and search for duplicates before posting. Learn more
community guidelines
Community Expert ,
Jul 18, 2019 Jul 18, 2019

c.pfaffenbichler  wrote

Effect > Distort & Transform > Transform can be used to make the copies quickly

Good idea!

~ Jane

Translate
Report
Community guidelines
Be kind and respectful, give credit to the original source of content, and search for duplicates before posting. Learn more
community guidelines
Community Expert ,
Jul 18, 2019 Jul 18, 2019

And by stacking the transforms one can create alternating elements, too.

clockFaceScr.png

Translate
Report
Community guidelines
Be kind and respectful, give credit to the original source of content, and search for duplicates before posting. Learn more
community guidelines
Community Expert ,
Jul 18, 2019 Jul 18, 2019

I agree with all the recommendations to use vectors, but you can do this with rasters:

With vertical and horizontal guides set up, and a tick mark along one of them, on its own layer, Option+Drag out a marquee from the center to enclose the tick:


Command+Option+T to rotate:


Then repeatedly press Option+Command+T to complete the circle:


Note, though, since you're transforming a copy of a transformed copy of a transformed copy of a . . . ,  each copy is progressively degraded.

Translate
Report
Community guidelines
Be kind and respectful, give credit to the original source of content, and search for duplicates before posting. Learn more
community guidelines
Community Expert ,
Jul 18, 2019 Jul 18, 2019

I would also suspect in AI you can also script your own custom rotate tool like you can in Photoshop.   A Photoshop custom Rotate Tool.

Capture.jpg

JJMack
Translate
Report
Community guidelines
Be kind and respectful, give credit to the original source of content, and search for duplicates before posting. Learn more
community guidelines
Community Expert ,
Jul 18, 2019 Jul 18, 2019
LATEST

Janice, Hold down the Shift key to ensure a vertical drag of the center (pivot) mark below your 12 o'clock first mark. That will avoid the spiral of marks as you add them.,  

Translate
Report
Community guidelines
Be kind and respectful, give credit to the original source of content, and search for duplicates before posting. Learn more
community guidelines