

- Home
- Photoshop ecosystem
- Discussions
- PS 2015.5 - Refine Edge tool? Missing?
- PS 2015.5 - Refine Edge tool? Missing?

Copy link to clipboard
Copied
Hi,
With the new update of Photoshop it appears that the Refine Edge tool has been removed or changed into something else?
Anyone shed some light on this? Its a tool that I would always use to quickly adjust my selections when editing photography.
Closest tool I can see that looks the same and is in the same location as the Refine Edge tool is Select and Mask. This is under the right click of the selection.
Cheers,
Adam.
EG Design


 1 Correct answer
Yes it has been retired , just when I learned how to use it  Seriously I'm not up to speed with the new release yet, but Jesus Ramirez has posted a set of videos on the new features
How To Use The Select And Mask Workspace In Photoshop - YouTube
or to see many of the important ones
Photoshop CC 2015.5 Tutorials - YouTube
I think there are also links in Jeff Tranberry's post above to a number of videos by Jule Anne Kost who is always worth watching.
Explore related tutorials & articles
 206
Replies
206
206
Replies
206
Copy link to clipboard
Copied
it is an over generalization to say everyone hates the S&M feature. As with most things in Photoshop people with a problem will post here whereas those getting the results they want will not feel the need. I'm not going to pretend its problem free but its a better masking tool than what went before it. It is noticeable that the images that give the problems are the ones that are traditionally considered most difficult to do like hair and fur and S&M doesn't suddenly make masking those complex edges easy. People here often say they get amazing results with the old Refine Edge , but whenever you ask them to post examples there usually is an excuse not to show those results for some reason. The reality is that complex masks require channel pulling techniques combined with advanced dodging and burning. It is not a five minute operation and can take hours to get right but there is not a single tool on the market at any price that makes that makes the process easy. I'm afraid to make really great masks you have to really put in the time. Having said that anyone with an AMD graphics card is at a serious disadvantage as driver problems cause in some cases S&M to be unusable, but that's not a problem Adobe can address its up to AMD to get their act together. A clue must lie in the fact that turning OpenCL off will often give better results. For most masking tasks Select and Mask is excellent , you just need to know what the outer bounds of its performance envelope is.

Copy link to clipboard
Copied
I don't have much time to create examples to show which is why I haven't done it, but I'm sure the following can show you a little bit of what people are frustrated about. I had my coworker time me on these. This is the original image I started with:
The following shows how the refine edge tool in Photoshop CC 2015 was able to mask the hair and edges of the person and clothing:

I spent not even 5 minutes on this one and for as quickly as I was able to do it, I'd say that's pretty darn close to finished.
Next you will see what the select and mask tool from Photoshop CC 2015.5 did in about 10 minutes. I don't have anymore time in my day to spend on this, so I stopped. Keep in mind that this is a very simple background which is why I think I did so well using the new select and mask tool. Select and mask has more problems and is much more time consuming to use when the background is more complex. I don't know if this really helps, but at least it shows a good comparison AND what we the people on this feed are complaining about.

Copy link to clipboard
Copied
Hi Katie,
your refine edge image is very good so I tried to create the same thing using Select and Mask with the same time frame. Actually I allowed 4 minutes. It's not as nice as the refine edge version, but I ran out of time. The hair on the left needed some attention, but I just painted over it-mistake. This is just the result of using Quick Select without touching the refine edge brush but given 10 minutes could be a lot better. With your image try duplicating the layer and setting the blend mode as multiply, then try S&M .

Copy link to clipboard
Copied
I decided to give this a try, and recorded a video demo below. Elapsed time, 3 minutes.
It definitely needs a few more touch-ups, especially around the waist, but I wanted to show how far you can get in 3 minutes with Select and Mask, including handling most of the wispy hairs.
While I don’t do professional retouching for a living, I’ve noticed a few things about Select and Mask that seem to make a big difference. Mostly it’s about using each tool in a very specific way. If a tool is used in the wrong way, the mask can quickly go off the rails. I haven't seen Select and Mask covered this way in some of the tutorials out there, and I wonder if it might be behind some of the difficulties. Try these tips, and see if they help:
- Use the Quick Selection tool (in Add mode) only inside the content area. Never drag it over an edge to the area you want outside the masked area; if it happens undo immediately or it will confuse the tool. This is how Quick Selection has always worked.
- It’s often just as important to tell Quick Selection what you don’t want, by dragging it in Subtract mode (Alt/Option-drag) outside the content. I learned this one from a Russell Brown video when Quick Selection first came out, and it really makes Quick Selection work better.
- Use the Refine Edge Brush tool only over the edges too difficult for the Pen/Brush tools. Do not drag it over areas that should be fully white or black in the mask. I believe that doing so creates the “holes” in content that should be solid, seen in some of the examples.
- Use the Brush/Lasso tools only when you want a hard mask edge. Usually after using the Quick Selection and Refine Edge Brush, not before.
Note: Video has no sound.
I'm just as curious to hear "that doesn't help" as "that helps," because I'm still learning this tool too...

Copy link to clipboard
Copied
This is really great Conrad, thank you for creating this helpful video on using the Select and mask tools.
All of your Do's and Don't's tips are perfect and I hope they help others use this tool better.
I am very curious on other's thoughts of Select&Mask's results after having watched your tutorial and read your tips.
Regards
Pete
Copy link to clipboard
Copied
Thanks Pete, glad you liked it. There are still problems with Select and Mask; for example, when trying to resolve the area under the left armpit, as I switch the Quick Selection tool between Add and Subtract it keeps restoring areas I tried to exclude and vice versa instead of finding the real edge, even though the edge between her and the gray background is obvious to the eye. That's happened in other regions of light areas close in value in other images, such as the right side of her waist where Select and Mask can't seem to work out a nice clean edge when it should be easy. I think that aspect of it used to work better before.
But overall, I think I'm able to work a little faster with Select and Mask than I did with Refine Edge, and both of those are usually better than the multi-step channel gymnastics that used to be required.

Copy link to clipboard
Copied
Pete thank you your response on here. I've watched the Conrad's video but I wasn't satisfied with the result what he did. I've tried it using same image and got better result with in 2-3 minutes but still not satisfied. The edges are not sharp and accurate. The overall image looks messy and pixelated edges. And I don't have so much control over the image, I fix one part but the other part get mess. I've made my selection using pen tool but when I work on hair It changed my pen tool selection on body too. I've kept the hair in a different layer worked just on hair then I merged hair layer with the body layer. It was ok with this image but I don't think that it will work on more complicated images. By the way, in less than a minute I get more accurate results with Refine Edge. My overall point is S&M function makes cropping more messy, some part pixelated some part blurred and we don't have so much control on overall image. However, I'm not complaining on anything. I support the idea of S&M function. This is just a feedback for your future improvements.
Copy link to clipboard
Copied
could you please post the result you got with Refine edge in 1 minute with this image, I would be very interested to see it? I also had a go with your image but the left side is always going to be problematic as there is so little contrast. It's not the greatest composite ever but would pass in the commercial world.

Copy link to clipboard
Copied
Terri so sorry for the late reply but I was working on a project.
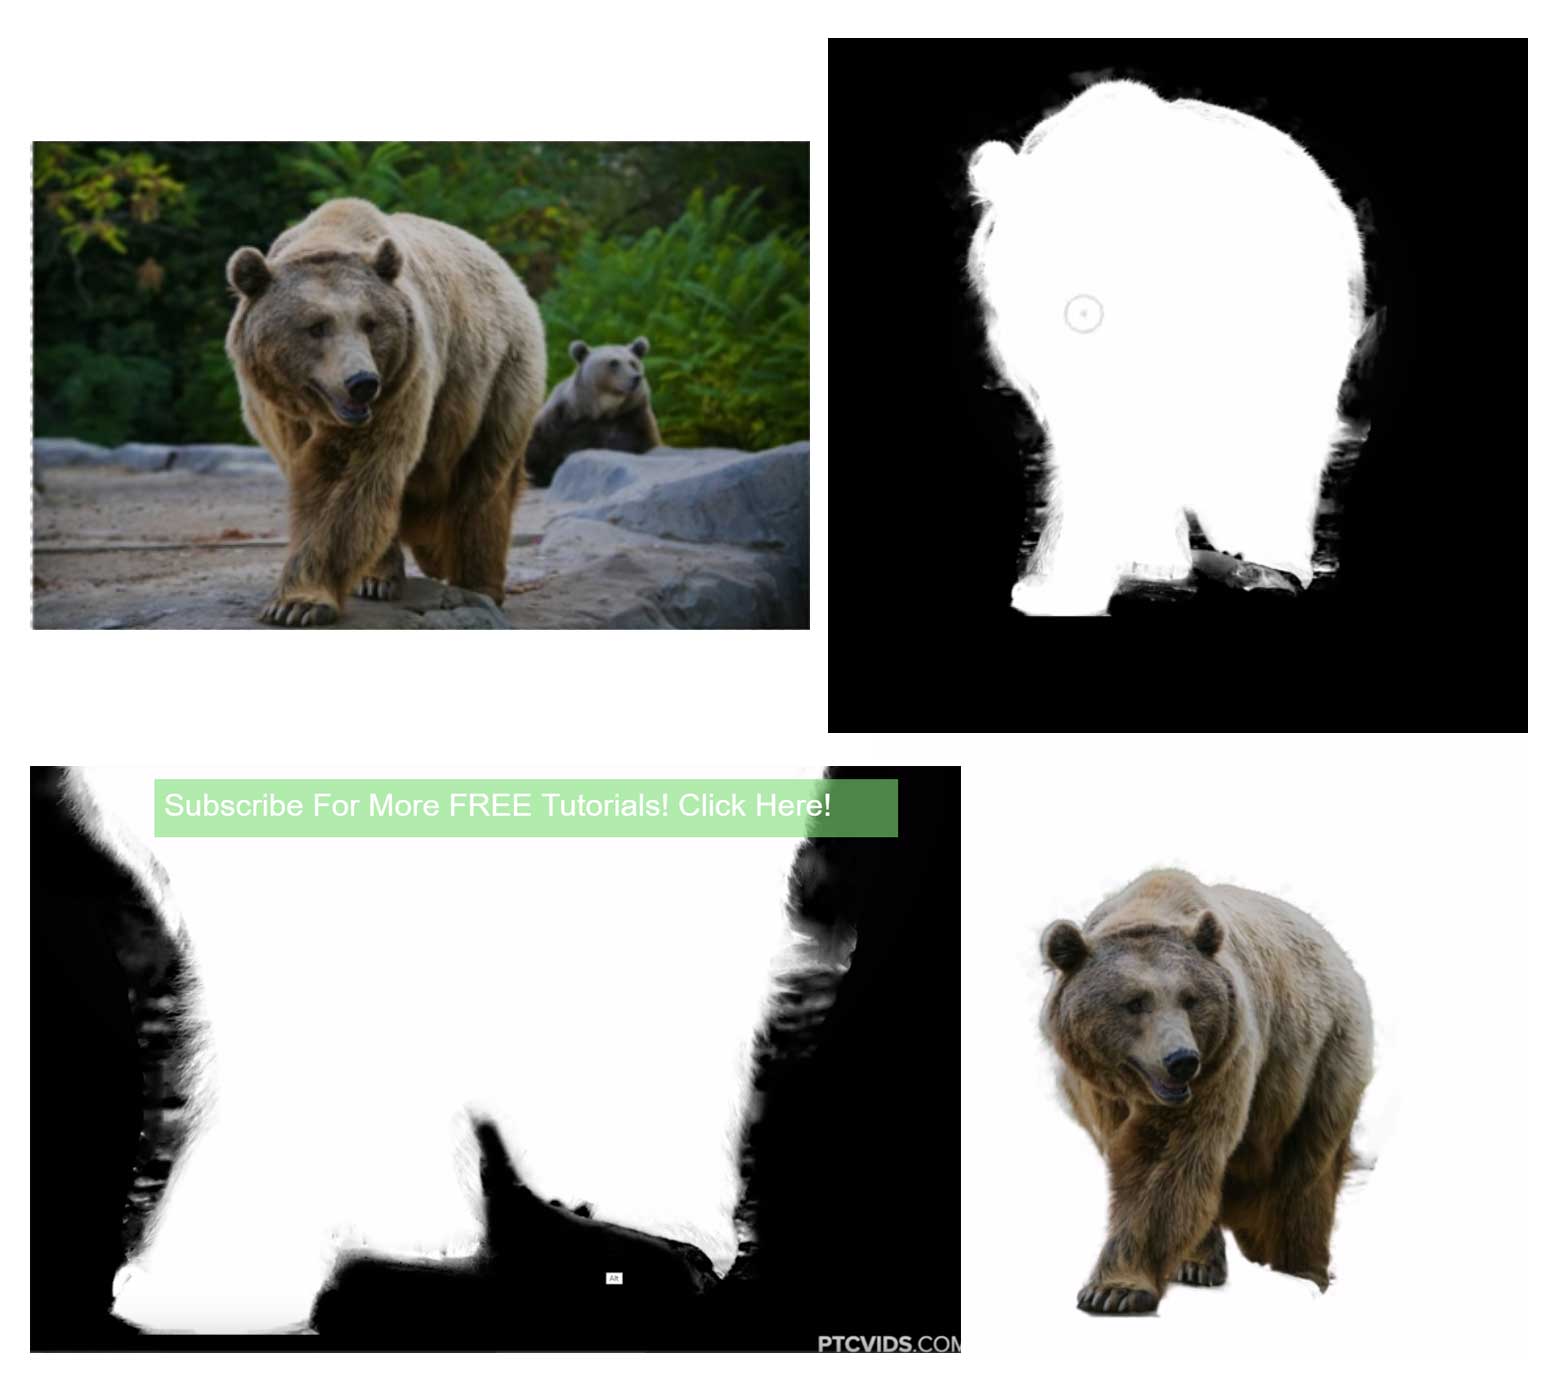
On my comment I was talking about the images that katielinville547 shared. Below you can find what I did in less than a minute with refine edge. I've masked the body with pen tool and just work on hair by using Refine Edge Tool. What I love in Refine Edge Tool is that, it effects only the are that we work not the whole body. Even it is not do its task perfectly and need improvements, It's pixel differentiation is better than Refine Edge Brush Tool in S&M.

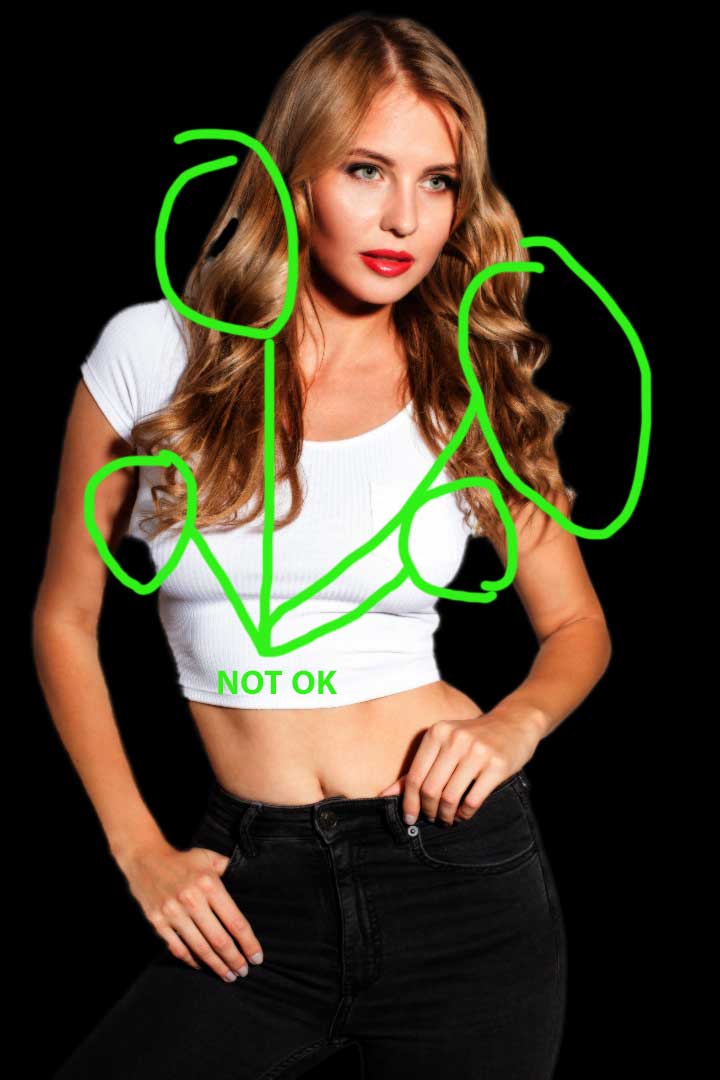
Lets look at your mask using S&M You lost the hair, and edges looks messy. This kind of masking is not ok in professional life.
But I know you did it just to show us and didn't spent too much time on details.
Below image is the screenshot from Conrad's video on same image and I've tried to explain what I mean and why that video did not satisfied me.

Lets focus on the other Conrad's video

We cant use this messy looks on graphical or solid backgrounds. Not appropriate masking in professional life. But again he did it quickly even he is not supposed to do, so lets look at the image what Adobe Advertised
This masking is a mess for me too... Can anybody use this on NatGeo Magazine with yellow background?
Anyway below images are the screenshots from the best videos about S&M I've ever watched. However, their images were so good in resolution and contrast.
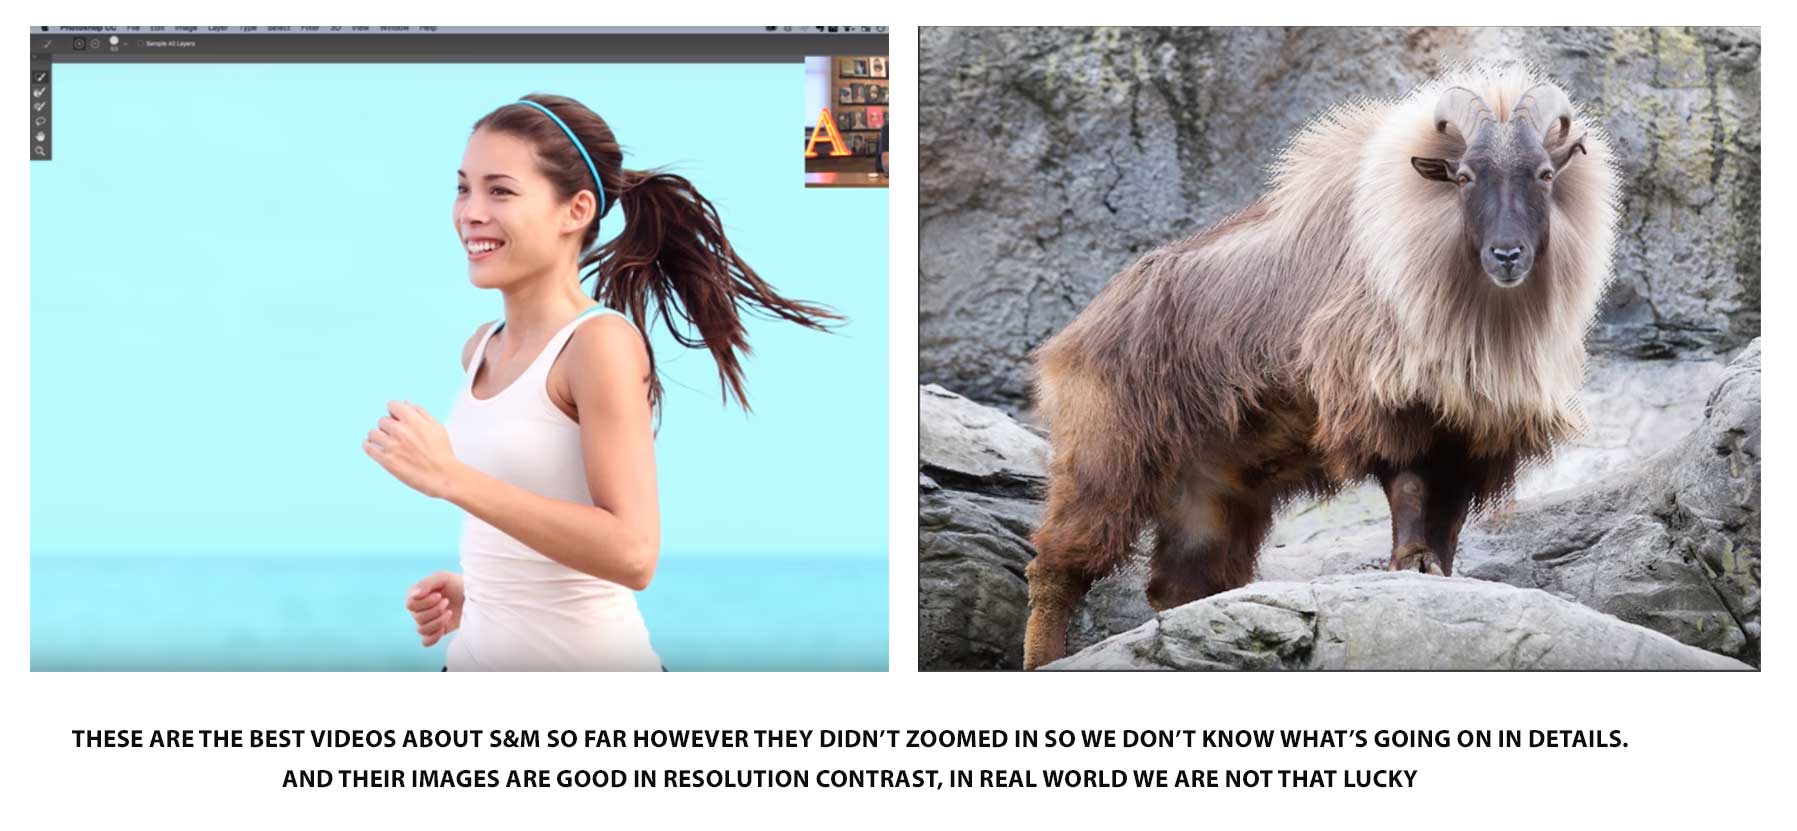
Below are the examples of how masking should be
Now lets look at the image that I sent on other forum and how you masked it. 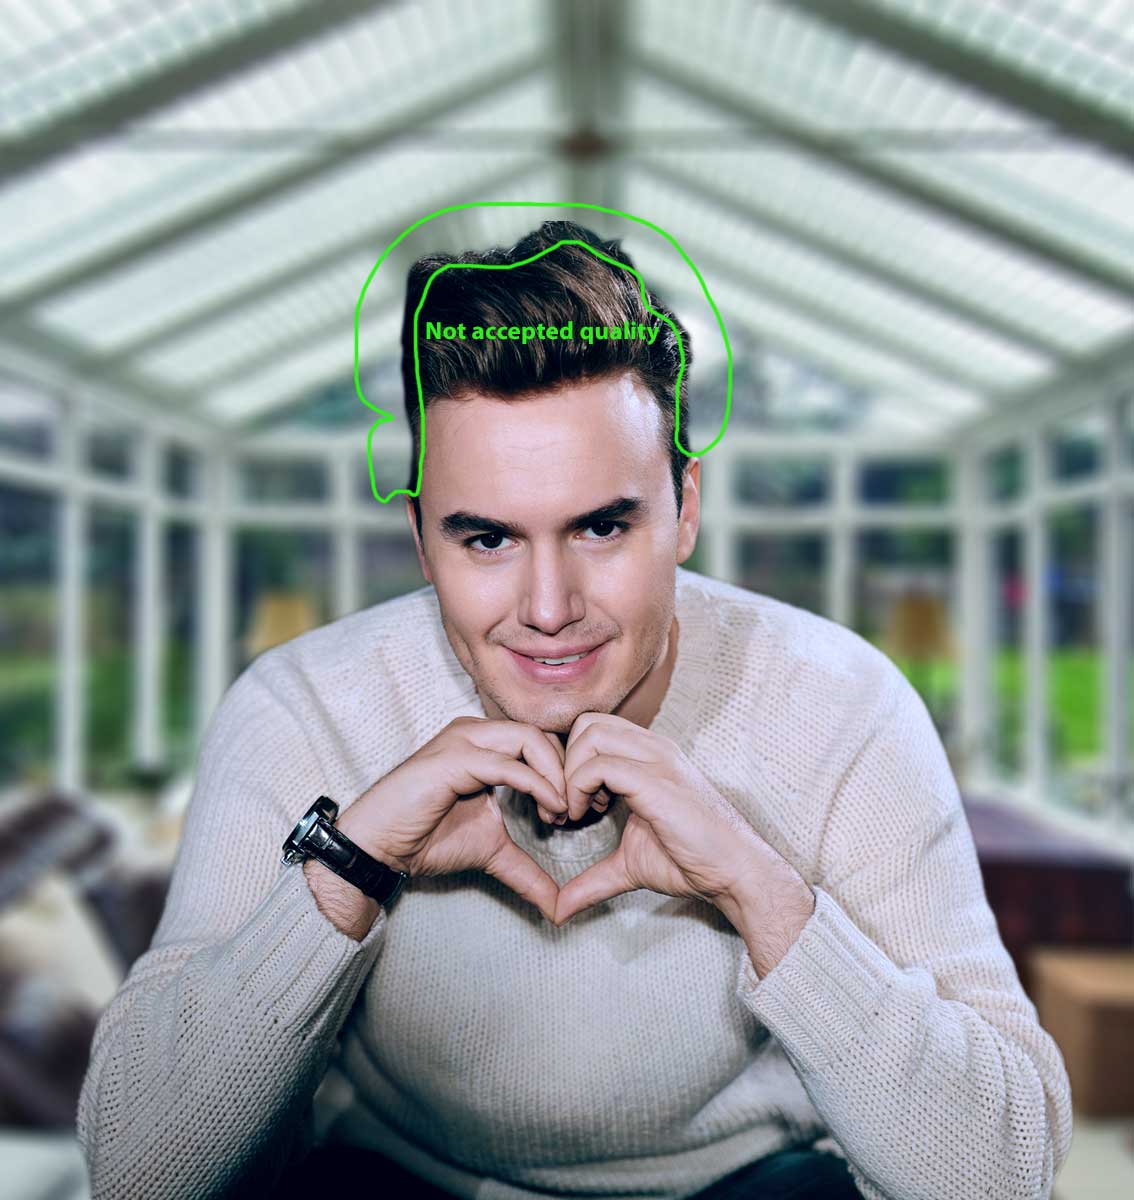
First of all thank you for masking it. I really appreciate your effort. What I think is the hair does not look like a hair. It looks like the edges erased using brush. Also there is a trick here, you used unfocused background so we can't see how is his pullover masked. Will it still look good on solid background?
Here is what I masked using S&M and how pain in the ass it was even on good contrast.
Now lets see how I masked using refine edge


I'm not saying S&M is bad, get rid of it and bring refine edge back. I personally love working on a new dialog mask, and I love all the ideas about S&M. I totally support Adobe for that. But my Problem is Refine Edge Brush tool in S&M is not working efficiently for now, not even close to Refine Edge Capabilities. It is just not yet ready to be released. We need pen tool precision, we need to have control just to work on specific areas... like that...
Thank you for time and reply 
Copy link to clipboard
Copied
I'm not saying S&M is bad, get rid of it and bring refine edge back. I personally love working on a new dialog mask, and I love all the ideas about S&M. I totally support Adobe for that. But my Problem is Refine Edge Brush tool in S&M is not working efficiently for now, not even close to Refine Edge Capabilities. It is just not yet ready to be released. We need pen tool precision, we need to have control just to work on specific areas... like that...
I agree with you about the inconsistent messiness of the Select and Mask edges. After your comments I went back and tried my own image in different versions of Photoshop with Refine Edge and Select and Mask. After doing that, it seems necessary to say that what my videos show is how to understand the tools in Select and Mask and approach an image, but the videos certainly don't prove that Select and Mask is better or faster. The reason I did the first video (based on katielinville547's image) is because I saw problems that should not be happening like unresolved hair transitions, and especially holes over interior areas that should be solid (seen also in Klizzama's first cat picture). What I showed was both how to use the tools to avoid those basic problems, and how to do katielinville547's image in less time than was stated.
But my improved time was only using Select and Mask, not compared to Refine Edge, and I obviously ran into the same issues with Select and Mask not finding edges properly and therefore requiring manual rework. Some of the parts you circled, like under the armpits, were areas I commented on in my reply to Adobe's Pete.Green...the Quick Selection tool in Select and Mask seemed to get "lost" and not finding edges that were visually obvious, and those required manual cleanup that the video didn't cover.
Your examples, especially the later ones, are helpful and I hope Adobe takes a look at them.
Copy link to clipboard
Copied
Thanks Conrad. What you comment is what I am trying to explain. I totally understand what was your point by shooting those tutorials. And as I said before, I loved everything about S&M. It's just not doing what its aimed to do properly.
Copy link to clipboard
Copied
Thanks Conrad, this is pretty much how I would handle this photo. When you use this workflow it is not that different from the old situation, at least when you used to start selecting with the Quick Selection tool.
It seems a bit faster though because you work in a special workspace and you don't have to switch between tools.
Did you try an even smaller brush for the area under the left armpit? This used to do the trick, it would be strange if this did not work on this particular area now..
Anyway, I really like your video and helpful tips, think I'll use them with my students!
Copy link to clipboard
Copied
Marja de Klerk wrote:
Did you try an even smaller brush for the area under the left armpit? This used to do the trick, it would be strange if this did not work on this particular area now..
Anyway, I really like your video and helpful tips, think I'll use them with my students!
Thanks! Yes, I actually did try a smaller brush under the left armpit, but it didn't seem to help much and I was puzzled by that. But as I said, I've seen that oddness in other images. If I was to complete cleaning up the hard edges and I think I've reached the limits of what Quick Selection and Refine Edge Brush can do, at this point I might turn to a small Brush tool.
About using this specific video...I don't intend to use it outside of this thread in case there might be issues with reusing that specific image. I plan to record the video again, using a different image, for general viewing.
Copy link to clipboard
Copied
Yes, I understand the limitations of this video. I was thinking about the workflow and the tips. But if you record the video again with a different picture I will welcome it!

Copy link to clipboard
Copied
Great - if you do, I'd love to have it somehow where I can pin it along with some of your explanation (if the video is to be silent). This isn't my primary role either and I had just settled into a work flow with Refine Edge when The.Change happened. I'd rather figure out how to make this work if possible. You may laugh, but I save things like this in Pinterest since I don't use them on a daily basis. 
Copy link to clipboard
Copied
OK everybody, below is a more general video demo with one of my own photos, so it's OK to embed/link/show this video freely to students and others. To get it out quickly (there were other things to do today), I avoided recording and editing audio, so again it's silent with captions. But if you click through to the actual YouTube video, I wrote out my reasoning in the description below the video. The next home for that text will be in a blog post, when I get some time for it.
Thank you to those who had comments so far. That convinces me even more that the secret to Select and Mask is using each tool in it for a specific job…drag each tool in the right places for the right reasons. The Quick Selection and Refine Edge Mask tools in particular are for "teaching" Photoshop how to look at the image, so using them inconsistently will "confuse" Photoshop and produce a bad mask. The Brush and Lasso tools are "literal" tools that don't attempt to guess or interpret the image, so they're useful for straight mask painting and touch-up, but you wouldn't want to mask an entire outline with them.
Copy link to clipboard
Copied
Thanks Conrad! This is a really helpful video, although I do prefer the short version of 3 minutes  .
.
I see that in this last video you first use the Refine Edge tool and then the Brush tool, instead of the other way around. This seems a good change in the workflow. I suppose these tools are designed to use from top to bottom.
Copy link to clipboard
Copied
I'm so sorry but this is a really bad masking and this video is a total demonstration of how we can't mask using S&M.
Copy link to clipboard
Copied
Hi Conrad,
I've commented on many threads about Select and Mask and usually find myself in the minority in liking the new tool, but in your video you have demonstrated once and for all that the tool works and works well and I very much appreciate you taking the time to give a demonstration of how a professional uses Select and Mask.
The image Katie provided is the kind people in the real world mask and the sort a photographer thinking out their project in advance will take when intending to make a composite later. Far too often people here are trying to mask images with shallow depth of field with blurry edges or giant visible checkerboard patterns from the over compression or near zero contrast between background and foreground and then wondering why they get poor results.
Your workflow is pretty much the same as mine, you use every tool available to you and in particular the 'refine edge' brush sparingly. I often find there is no need even to use the refine edge brush now Adobe has improved the Quick Select brush tools edge detection. It is much more natural to paint on a selection than to see marching ants. I hope in particular that people note you did all of this within Select and Mask and didn't make a selection and opt to refine it using S&M as that would suggest S&M is just a refinement tool which is not its purpose- It's a completely self contained masking program and not an elaborate new version of refine edge.
Your completely right to get good results you have to use both the '+'and the '-' versions of the brushes and cycle through the views. If you showed someone 5 years ago how easy it now is to mask something as complex as Katie's image they would be astounded and to do it in 3 minutes makes it even more impressive. I have seen Aaron Nace , Jesus Ramirez and Colin Smith in live video streams use Select and Mask while teaching where they couldn't afford to have things go wrong with a buggy tool. Those sort of guys convinced me that S&M was worth the trouble to learn and once you master it you get good results like you have demonstrated here. I for one wouldn't go back to the primitive refine edge now and I very much hope Adobe don't cave in to the criticism from those who find Select and Mask hard to use. I'd have no objection to them putting the option of legacy 'refine edge' into an upcoming build but S&M is the future and refine edge the past. I do feel for others who are experiencing problems due to video card issues as they are missing out, but that is not something Adobe developers can fix only the programmers at AMD(mostly) and maybe Apple, Nvidia doesn't seem to have too many issues disabling 'openCl' doesn't cure.
The forum should post your video somewhere for reference purposes as its the biggest contribution to the Select and Mask discussion I've seen in the two months since S&M came out. Thanks again Conrad.

Copy link to clipboard
Copied
Sure, fair enough - people who DON'T like it will post. I, for one, am seeing the same issues as katielinville54posted. Even if the new tool can be learned and proven to be superior, the problem is getting stuff like that sprung on you when you are right in the middle of something.
I reiterate my desire for a "soft rollout" of new tools. That is to say, move the old tool into an "Obsolete" section that will remain for 1 build. At least then our workflows don't get wrecked when we're under a deadline.
Copy link to clipboard
Copied
can't say I disagree with anything you have said here StepRock. I guess Adobe will say that they make provision for people to use the old tools by allowing the previous versions of the program to co-exist on a system with the latest builds, but having to stop ,save, close then open an older version of Photoshop is hardly convenient. I have never understood why Adobe insist on allowing just one instance of Photoshop to run at a given time? It would be very convenient to have CC2015.5.1 open and also CC2015.1.2 with refine edge open simultaneously and then to drag and drop an image from one build to another. There must be more involved than just changing a process name as both use photoshop.exe, but it would be convenient when a feature causes problems none the less

Copy link to clipboard
Copied
I believe the reason might be system resources. Although in windows 10 it is possible to run both versions of ps at the same time using the new virtual desktop feature. I tried it once and it worked but ate up resources quickly, but that's on my system.

Copy link to clipboard
Copied
It's a good addition for complex (hair, fur) objects, but for simple straight-forward tasks its over kill... having the option to choose how to go about a task - whether to break out the big guns or the BB guns would be very helpful for most of our workflows...REFINE EDGES was like what a Mastercard is to to an AMEX card -- "priceless"

Copy link to clipboard
Copied
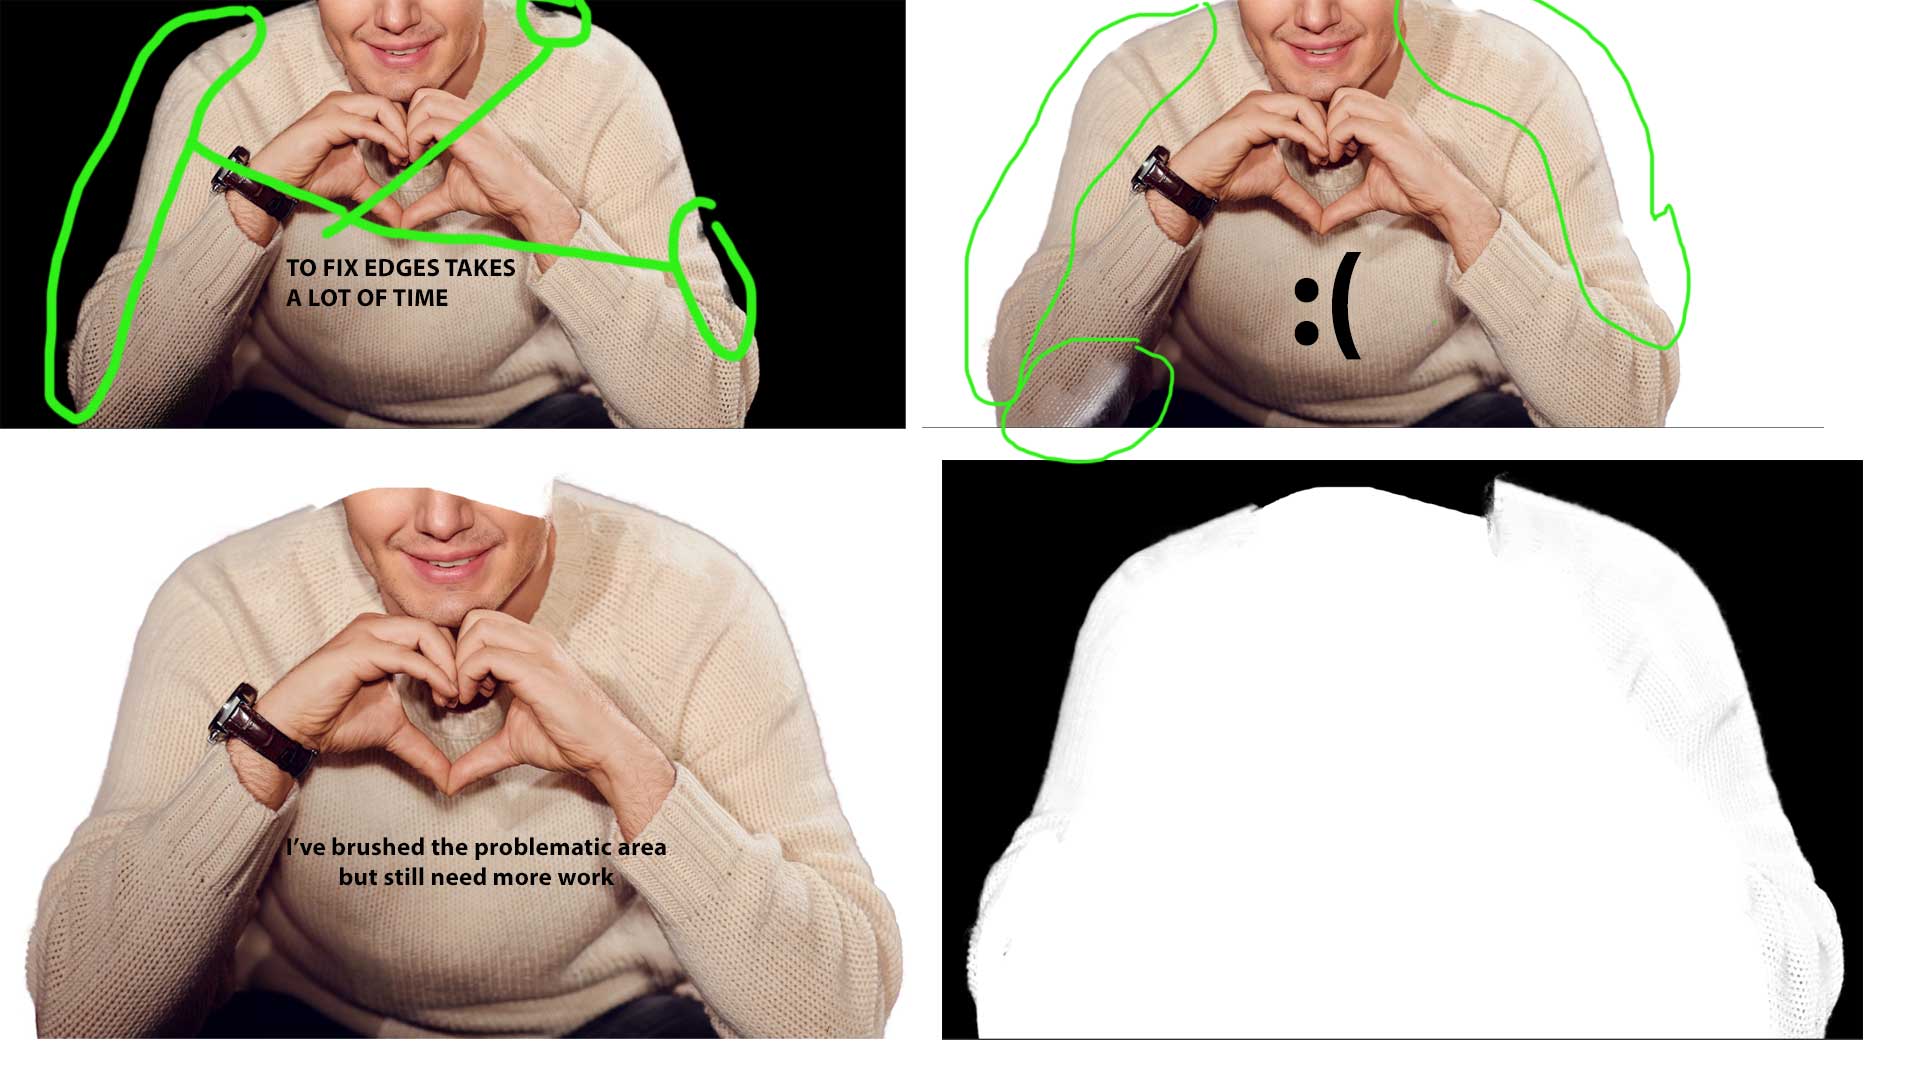
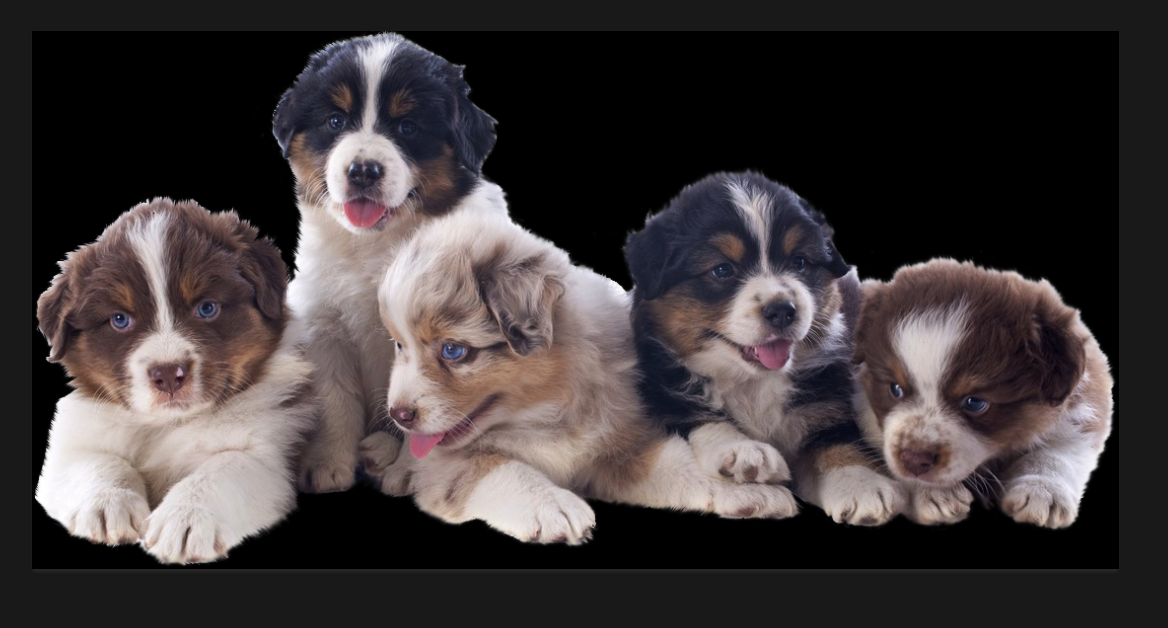
I understand the tool was improved in some way, but, for tasks like mine, where I need hand control over what gets refined, please let me know when a fix for this will be available. I work mostly with pet hairs, most of the times, the isolated stock images are in a white background, therefore the need to have more "manual" control over the edges is essential for my jobs. These images go into all kinds of dark, clear or light backgrounds and it really produces an unacceptable quality of work. Please see samples.


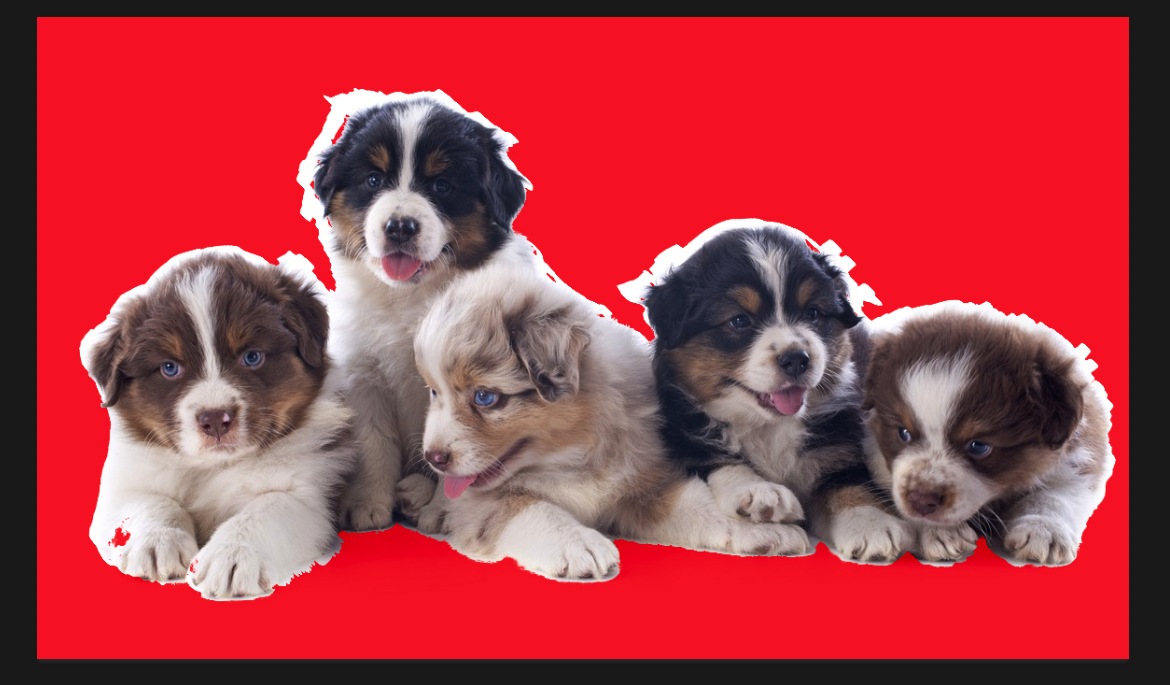
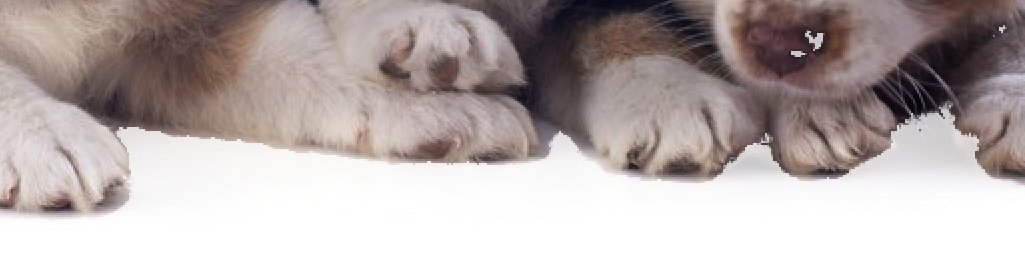
Acting proactively, in my case, I can still use some handy-dandy hair and fur brushes, as the final result shows, but that translates into more manual work, that is not really following the original edge, but more guided toward hand painting if you will. It becomes a more lengthy and difficult task than it should and it still does not produce the same results. Please, please! add a feature that allows more control.

Copy link to clipboard
Copied
IN THE MEANTIME. For all CC users, I just found out there is a way to keep both versions of cc 2014/2015 and 2015.5. It will probably require to revert to the 2014/2015 by looking for previous versions in the Cloud menu, and then updating again to 2015.5 (June update) but using the advanced options. See link for instructions. I will try this. I remember the refine edge was in that version. I have not tried it yet, since I need to contact my company's IT to do it (permissions.) So, hopefully it works as a temporary solution. I know it means two versions of the same program, but I'd rather do that than spend too much time on the same task and still not present a good quality work. Crossing fingers for it to work!
Install a previous version of any Creative Cloud application

Find more inspiration, events, and resources on the new Adobe Community
Explore Now
 AdChoices