 Adobe Community
- Home
- Photoshop ecosystem
- Discussions
- RAW images open in Photoshop too bright?
- RAW images open in Photoshop too bright?
RAW images open in Photoshop too bright?
Copy link to clipboard
Copied
I am using Photoshop CC 2018 release 19.1.5 and Windows 10 on an HP laptop.
I usually take my jewelry photographs in RAW formats, then open them in Photoshop to make any adjustment like exposure, white balance, then finally crop/add watermarks in Photoshop and save. This has worked pretty well for months, until a few weeks ago I noticed that photos that looked good on my Nikon camera all opened in Photoshop looking too bright.
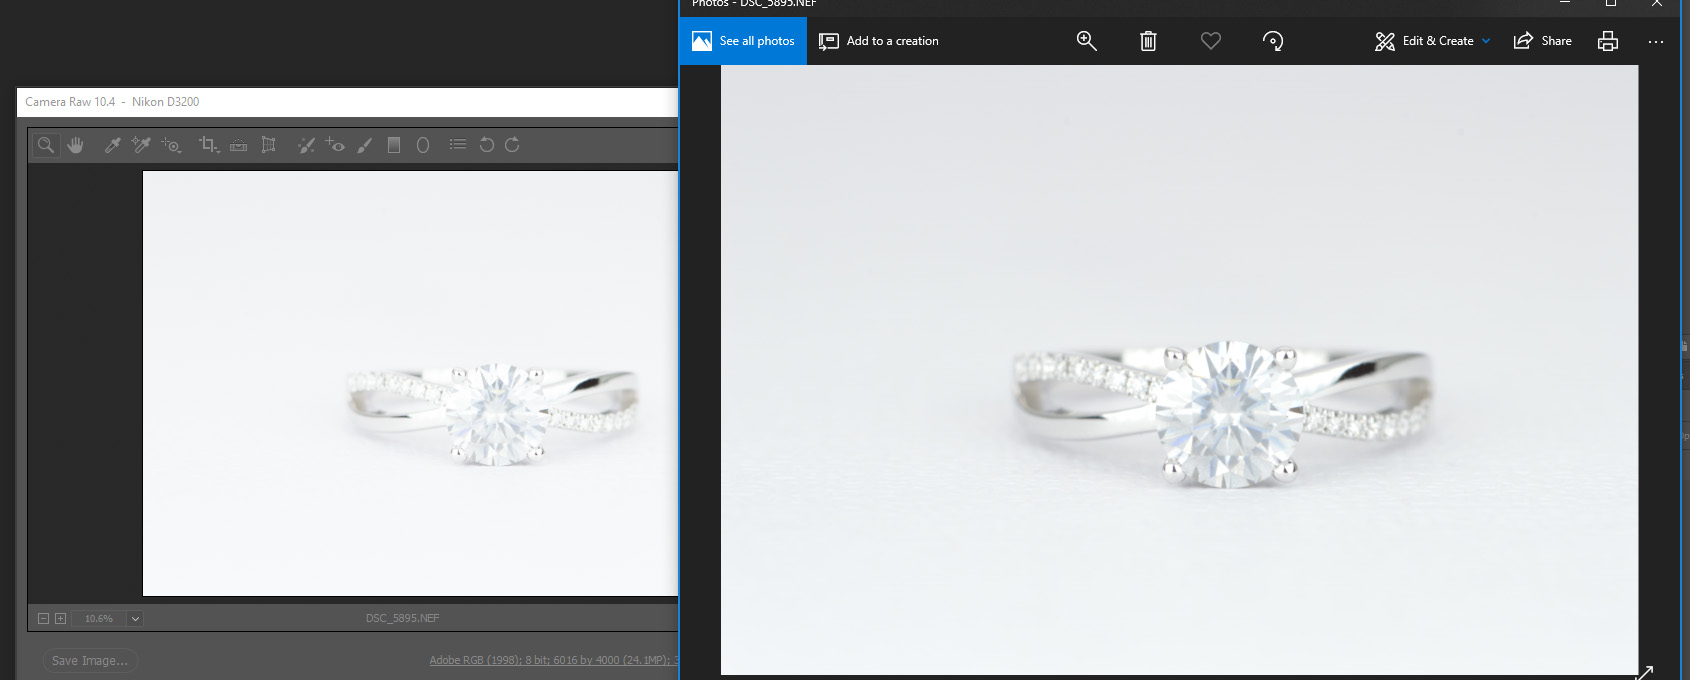
For example, below is a comparison of the same picture opened in Windows' native Photos app (right) versus opened in Photoshop 2018 (left):

This is the same image, same monitor. The picture always looks too bright when opened in Photoshop. I have to reduce the exposure by -0.2 or so to bring the photo to my liking. I shot the piece in the perfect brightness. I would like to be able to keep the same brightness as I shot it on my Nikon camera. Now I have to spend a lot of extra time adjusting brightness for each photo. This is really mind boggling.
I have calibrated my monitors using Windows' native color calibration app. I am not sure what else could have gone wrong. Please help!
Explore related tutorials & articles
Copy link to clipboard
Copied
The Photos app cannot render raw files, so it displays the raw file's embedded jpg preview, which is also what you see on the back of your camera. Most camera settings, like Picture styles, Active D-lighting, saturation, sharpness, etc, affect the embedded jpg, but the Camera Raw plugin in Photoshop doesn't understand these proprietary settings, and ignores them.
I suggest that you set Picture styles to Neutral (or similar), turn off Active D-lighting, and set other settings to 0 (neutral).
This should make the embedded jpg display much closer to the raw file.
Also bear in mind that there is no "correct" way of rendering a raw file – Camera Raw provides you with a starting point – other raw converters may provide you with a different starting point. Raw files are open to interpretation.
Copy link to clipboard
Copied
Thank you for your response! Question on "set Picture styles to Neutral (or similar), turn off Active D-lighting, and set other settings to 0 (neutral)", are these settings in Photoshop?
My current pain point is that previously the photos did not look different in Photoshop than from the camera. Previously, however I took the photo from the camera (as I intended) would look like that in Photoshop, so it's easier for me to edit it in Photoshop and save into images to be used on the web. Now I have to spend a lot of extra clicks adjusting the exposure. I'd really like to avoid that.
Copy link to clipboard
Copied
are these settings in Photoshop?
These are camera settings, found in the Shooting menu.
Previously, however I took the photo from the camera (as I intended) would look like that in Photoshop
Then something has changed since then, maybe the Windows native calibration, which is probably not very accurate.
To see a correct rendering of the image, use a hardware calibrator like I mentioned earlier, which will also create a new monitor profile that describes the monitor accurately. Then you can try to adjust the camera settings to match what you see in Photoshop.
Personally, I don't care so much about how the image looks on the back of the camera – the screen is too small to properly evaluate the image. But I always check the histogram for highlight clipping, and to see that the image is properly exposed.
So I'm not expecting the image to look exactly the same on my computer, and I don't mind editing it.
Copy link to clipboard
Copied
I have calibrated my monitors using Windows' native color calibration app. I am not sure what else could have gone wrong. Please help!
For best results, you should use a hardware calibrator to calibrate your monitor. (Spyder, X-Rite, etc)
Also, the Photos app is not color managed, and can not be trusted to display images correctly.
This is especially true if you have a wide gamut monitor.