Pris_H
Participant
May 21, 2018
Answered

Restoring Sun-Damaged Photo

  • May 21, 2018
  • 3 replies
  • 3725 views

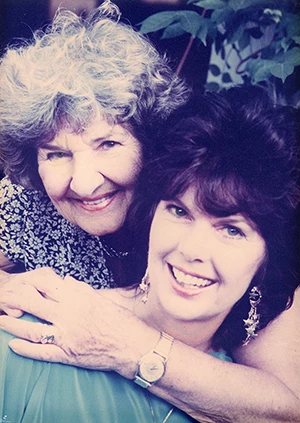
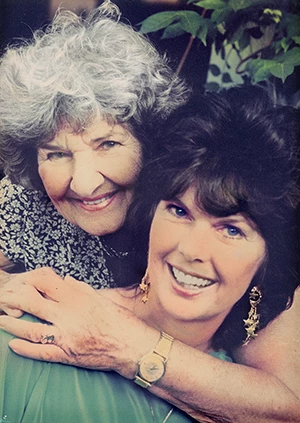
This image is damaged by old age and sunlight - and I can't seem to make it look natural. The older woman is the matriarch of a family, and it is important to me to get it right. I can't seem to get detail into the faces and correct the color without it looking too dark for the daughter. Any help will be most appreciated.

This topic has been closed for replies.
Correct answer davescm

Hi

Try using local adjustment brushes in camera raw so that you can alter the tone, saturation and exposure for each part of the image separately

Dave

3 replies

davescm
Community Expert
davescmCommunity ExpertCorrect answer
Community Expert
May 21, 2018

Hi

Try using local adjustment brushes in camera raw so that you can alter the tone, saturation and exposure for each part of the image separately

Dave

Aenigmaticus
Participant
May 21, 2018

I recommend starting with Lightroom due to its none-destructive editing. That said, almost everything in Lightroom can be done in Photoshop.

First off, I would adjust its Exposure value - you can restore a reasonable amount of contrast in the seemingly blown-out section. I suggest '-1.5'.

The sunbleaching also caused a bluish tint; I would approximate a new White-Balance -> Color Temperature to a warmer value. I suggest '+16'. I also adjusted Tint to '+8'.

You will need to adjust its tones (accounting for the underexposure): boost Highlights significantly, boost Shadows slightly, moderately boost Whites, and reduce Dark slightly.

I boosted the Clarity and Dehaze values to +50 with decent results.

You will need to adjust its tone curve: darken the Shadows, reduce the Light, and boost the Highlights.

Now it's time for Photoshop - with layers, I would add brush tinting in areas like the white hair, watch, eyes, skin tone, shirt color, etc. Layer -> Mode -> Hue seems the most useful for applying tints rather then solid colors.

-----

Note - to apply the changes made in Lightroom for an image viewer to see it, you need to Export the image. The difference will be commit to the file; I'd suggest using multiple files to prevent loss of prior work and to be able to go back. You do not need to Export for Photoshop to work with Lightroom's settings - they complement each other well.

-----

Much of this is depending on the overall look-and-feel you are trying to achieve - you will need to experiment and play around. Just remember, it is easier to work with the image-wide issues first and then work on isolated sections then it is to mix the two or in reverse order. Have fun, and good luck with your work!

-----

Edit 1:

The overall method follows a HSL model: Hue (Color Wheel), Saturation (How strong the Hue is), and Luminance (How bright it is). For Lightroom, I adjusted the overall Luminance and Saturation, and the Hue adjustments in Photoshop.

c.pfaffenbichler
Community Expert
Community Expert
May 21, 2018

As it is there seems to really very little contrast in the areas (cheeks in particular) that appear blown out.

Maybe a 16bit scan might provide a tad more to work with?