Copy link to clipboard
Copied
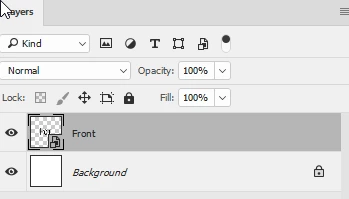
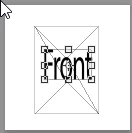
Hi guys, I'm hoping somebody can shed a little light on how to create a rotating animation of 2 images (front side and back side) which uses perspective.
I want it to work just like this animation below:
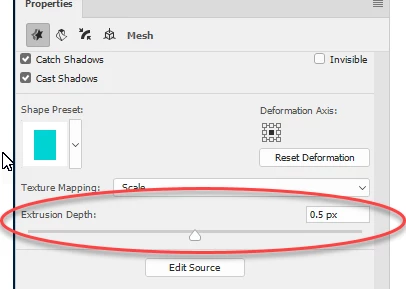
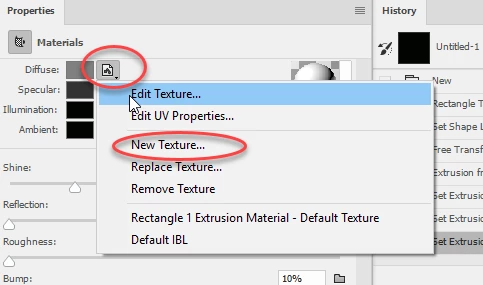
I'm guessing the solution is pretty simple using the 3D workspace in Photoshop however, i'm finding it difficult to find a flat-style like above, they are normally extruded etc.
I would appreciate your suggestions so much!
1 Correct answer
Hi
Try this
1. Draw a white rectangle using the rectangle shape tool
2. Make a 3D extrusion from the rectangle and in Properties reduce the Extrusion depth to 0.5px
3. Click on the front inflation material and then in properties - Diffuse on "New Texture"
Add your text or design as a smart object in that texture - I have just used the text word "Front"
Save the texture and close it.
4. Repeat step 3 for the Back inflation material. Note you will need to flip the smart object to reverse the lettering wh
...Explore related tutorials & articles
Copy link to clipboard
Copied
Nothing stops you from setting the extrusion to an infinitessimal amount. Likewise, there's nothing wrong with creating two flat planes with an equally tiny offset and texturing them individually. the rest is just a matter of the material settings to avoid any visible shading gradients.
Mylenium
Copy link to clipboard
Copied
You could do this by hand, with a number of duplicate layers. and two elliptical guidelines. Transform each duplicate by a different width using the Sine function in a calculator or spreadsheet, and before committing the transform, Control+Shift drag the corners to the ellipses, like so:
You'd do similar for the other side. The "On edge" frame would just be a blank layer.
Once all the layers are set up, make the animation as usual.
Copy link to clipboard
Copied
Hi
Try this
1. Draw a white rectangle using the rectangle shape tool
2. Make a 3D extrusion from the rectangle and in Properties reduce the Extrusion depth to 0.5px
3. Click on the front inflation material and then in properties - Diffuse on "New Texture"
Add your text or design as a smart object in that texture - I have just used the text word "Front"
Save the texture and close it.
4. Repeat step 3 for the Back inflation material. Note you will need to flip the smart object to reverse the lettering when working on the back material
5. Open the timeline and create a video timeline
Add keyframes under 3D meshes for the rectangle
Five keyframes should suffice 1 at each 90 turn and the last the same as the first
6. Render the video. I have just used a Open GL render below for quickness rather than quality then exported as a GIF
I hope that helps you
Dave
Copy link to clipboard
Copied
Thank you a bunch Dave. This is exactly what I wanted and it worked perfectly. Cheers!
Copy link to clipboard
Copied
You're welcome
Dave

