Copy link to clipboard
Copied
I was hoping someone could offer advice advice on selecting the translucent parts of a cloud in a photo.
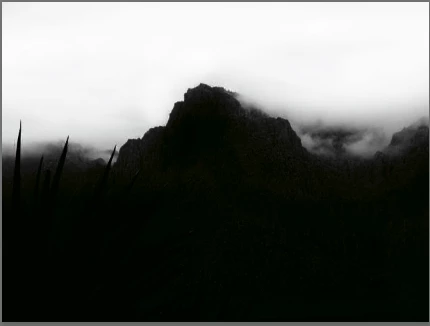
I took this picture in the Valley of Fire near Las Vegas:
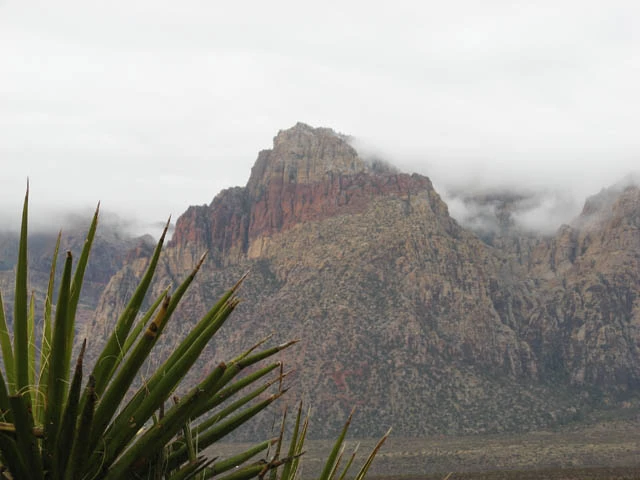
I think this picture has potential. I like the clouds hovering above the mountain and the slight haziness of the mountain in the distance. My ideas are to increase the contrast in the clouds so that the sky has some texture, increase the saturation of the mountain and perhaps layer some more haze over it, and brighten the plant in the foreground. (I am uncertain of my aesthetic taste, so if you think I'm misguided, feel free to tell me. But that's not why I'm posting.)
My first challenge, which I hope you can advise me on, is selecting the clouds. This might be a bit of a newbie question, but my difficulty is where the mountain is partially visible through the clouds. How can I select the cloud, select the whiteness of where the mountain shows through (i.e. I'll want to increase the contrast of the white cloud without increasing the contrast of the mountain that is partially visible through it), and avoid any sharp edges in the selection?
Thank you,
Bob
1 Correct answer
Hi
I would probably tackle that pic in camera raw with the Dehaze Filter pointed out by Trevor and local gradients and adjustments. ( I have not tried it here as the very low res pic you posted just brings out jpeg artifacts if you try and tackle the sky.
To answer your original question - how to select the sky. For this pic I would do that pic with calculations. The principle is you use the image to mask itself.
1. Go to the channels panel and select the blue channel
2. Go to Image - Calculations a
...Explore related tutorials & articles
Copy link to clipboard
Copied
Camera RAW > fx > DeHaze, is my first thought
Copy link to clipboard
Copied
Hello Bob,
First of all, very lovely picture you have there!
Now, Photoshop offers several ways to select the clouds in this picture, but my safe bet is to work with the "color range" in the "selection" application menù.
When you work with this tool you can easily
1) sample the color you want to select using the color sampler in the color range window
2) decide to add more of a color using the eyedropper tool with the plus icon at the bottom (and simply drag over your clouds)
3) confine the selection to only the portions of the image that you want to select by ticking the option "localized color cluster" and play with both the range slider (how far from the sampled point you want to expand) and the "fuziness" slider (how much of that color you want to include)
As you can see from my first picture, you 'll get a nice selection that includes semitransparent areas of the clouds. Remember, white is what is selected, black is what is not-selected..everything in between =semi trasparent areas!
If you want to further refine your selection, you can proceed to the "select and mask" area, either by using the following keyboard shortcut : CMD+ALT+R / CTRL+ALT+R , or, by going in the "SELECT" application menù and choose "select and mask". In this area you can cycle through many different view modes by pressing the "F" key. Pick the visualization you prefer and start refining the semi transparent areas of your clouds with the "refine edge brush tool". A few strokes on those areas and you will have a nice selection.
Copy link to clipboard
Copied
Hi
I would probably tackle that pic in camera raw with the Dehaze Filter pointed out by Trevor and local gradients and adjustments. ( I have not tried it here as the very low res pic you posted just brings out jpeg artifacts if you try and tackle the sky.
To answer your original question - how to select the sky. For this pic I would do that pic with calculations. The principle is you use the image to mask itself.
1. Go to the channels panel and select the blue channel
2. Go to Image - Calculations and set it up to multiply the blue channel by itself and output to a new channel
This will add an Alpha channel
3. Repeat the calculation this time on the new Alpha channel
This will give you an new channel - Alpha 2
4. With the Alpha 2 Channel selected - get a soft brush set to "Overlay " and opacity 50%
Load it with White and paint on the white areas
Load it with black and paint on the black
Leave the soft borders alone
Result is a nice black and white channel with a soft transition
You can load it in as a selection by clicking in the channels panel and invert it if you want to mask the sky and treat the foreground
I hope that helps
Dave
Copy link to clipboard
Copied
davescm wrote:
Hi
I would probably tackle that pic in camera raw with the Dehaze Filter pointed out by Trevor and local gradients and adjustments. ( I have not tried it here as the very low res pic you posted just brings out jpeg artifacts if you try and tackle the sky.
Dave
LOL, I was eating my breakfast typing with one hand, or I'd have mentioned it should be done with the RAW file. I was only able to nudge DeHaze a tiny bit with the supplied image, before it turned to (green) custard!
I'd love to see a full size version of the image because it has such strong strata running through the mountain. How about it Rea? And also tell us were it was taken please?
Copy link to clipboard
Copied
It was taken in Valley of Fire near Las Vegas, NV. There's no RAW image - I was on a family vacation, traveling light, so I only had a point-and-shoot.You can see the full size image at IMG_2464 | Valley of Fire, NV | Bob Alexander | Flickr
I'm not sure I want to de-haze it. I was thinking of adding fog to make the mountain a little more mysterious (while also increasing its saturation). But as I said before, I don't have a lot of confidence in my aesthetic sense, so I might be wrong about that.
- Bob
Copy link to clipboard
Copied
Hi
You could use a fog brush to add some effects : Fog Free Brushes - (79 Free Downloads) on a new layer.
Pierre
Copy link to clipboard
Copied
Hi Bob
Thanks for posting the higher res pic.
There are no rights and wrongs when deciding which way to go. Once possible way is to use the Camera Raw Filter to bring out some of the detail.
I used a gradient set to a bluer colour temp on the sky which brought out some detail in the white area. Plus varying amounts of clarity and de-haze in local brushes on the mountain (and clarity set to a negative value in the sky to cover up any jpeg artifacts which appeared when bringing out some cloud detail).
Hope that helps give you some ideas
Dave

