

- Home
- Photoshop ecosystem
- Discussions
- A script tutorial for multi-task is needed!
- A script tutorial for multi-task is needed!

Copy link to clipboard
Copied
Hi! I am currently editing a 2D game - i am resizing images like this:

Here is what i do: i extract PCX format animation images of 450X400 pixels from a so called DEF file. One DEF conaints 60 PCX images on average. Upon extraction PCX is converted into BMP. The images are 8 bit. I open Adobe Photoshop CS2 and do this:
1) remove cyan background, by replacing color with paint bucket tool

2) resize the image to my needs, but keep the original canvas size

3) fill the image with cyan and save it

So this is not too difficult, but this way i have to convert about 60 images per one file, and there are about 100 files, meaning i have to resize over 6000 images...
Now, i need a script that would execute all the xx images of a single file. The script has to do:
1) remove cyan from all xx images
2) resize all xx images
3) restore canvas size to all xx images
4) fill all the xx images back with cyan
5) save all xx images
I need a very detailed tutorial how to do it - i prefer images with words, not just words. If someone could help me out here please!
Imagine you need to do the same - show how you do it!


 1 Correct answer

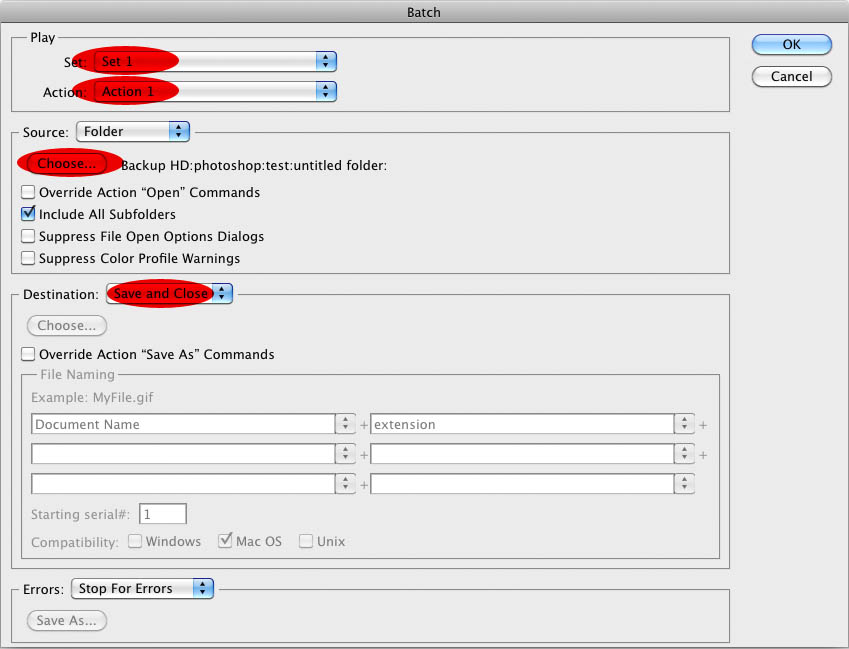
The one screenshot showed the Actions Panel.
Windows > Actions
The icons at the bottom are fairly self-explanatory – (edit: create a new action – second button from the right,) hit the record button (second from the left) and pertform the operations on your topmost image, then hit the stop button (leftmost) and close the image you have edited or revert it.
Then use
File > Automate > Batch (the other screenshot)
Under Source you can choose a Folder or the Opened Files.
Explore related tutorials & articles
 10
Replies
10
10
Replies
10
Copy link to clipboard
Copied
The jpg-comression makes it difficult to judge if the images were hard-edged against the 0/255/255-background or if the edges were anti-aliased, which might make it necessary to set a specific Image Interpolation (resampleMethod).
Anyway, why do you want to remove the cyan before rescaling if it has to be restored previous to saving again?
If the images are currently layers in psd-files are they supposed to stay as such or will they have to be exported as individual files of a specific format?
Copy link to clipboard
Copied
I was trying to upload the image, but this forum does not show bmp...
But anyway, you don't need to see how they look. I mean, everything works for me! You are asking the wrong questions - all i need is a script that executes all the picutres of a single folder the way i wrote per single operation.
Can you show me how to make that script?

Copy link to clipboard
Copied
Artas1984 wrote:
I was trying to upload the image, but this forum does not show bmp...
sorry I can not resist
Stupid here is a BMP image of me
![[ jjmacks ]](http://www.mouseprints.net/old/dpr/jjmacks.bmp)
Actually we are trying to help you.... There are thing we do not understand. Your Photoshop knowledge does not seem very extensive. If a def file contains PCX images how do you extract these what the format of a def file. Also Photoshop supports PCX files which I beleive supports transparency where BMP files do not why are you changing these image to a file format that does not support transparency. Also why are you changing cyan to some other color only to change that other color back to cyan. Help us understand. Give us a link to one of your DEF file. There is more then likely more then one format of .def files in existance.
Detailed information for file extension DEF:
Other applications associated with file type DEF:
- ADS (Source Code) by Autodesk, Inc.
- AniSprite by CompuPhase
- ArcView (Defaults File) by ESRIODB Format (North Arrows, Layout Templates, etc) Related links: GIS Info
- Bert's Dinosaurs File
- C++ Definition
- Data Entry/Review Module by DATAIR Employee Benefit Systems, Inc.Defines Data Entry forms.
- DbForm (Document Definiton) by Version One LtdDbForm is an enterprise-wide white-paper printing solution, which automatically prints high quality business documents directly from core business applications onto plain paper on laser printers. This file is a script describing the creation of a PCL document.
Copy link to clipboard
Copied
But anyway, you don't need to see how they look.
It may make a significant difference, because if 0/255/255 is used as a chroma key the edges being sharp or anti-aliased may be important for the settings one has to use for Selection and ResampleMethod or cause fringes in the final images.
Now I still don’t see the use of removing the cyan only to introduce it again later, but here is a version for testing.
This operates on one file, but one could always record the Script into an Action and use File > Automate > Batch to process multiple files.
// select cyan, clear it, scale image, bring back to original measurements, fill behind with cyan;
// 2011, use iat at your own risk;
#target photoshop
if (app.documents.length > 0) {
var myDocument = app.activeDocument;
var theWidth = myDocument.width;
var theHeight = myDocument.height;
var theLayers = collectNormalLayers(myDocument);
// define the color for the subsequent fill;
var theColor = new RGBColor;
theColor.red = 0;
theColor.green = 255;
theColor.blue = 255;
// set the scale percentage;
var theScale = new UnitValue (50, "%");
// iterate through the layers;
for (var m = 0; m < theLayers.length; m++) {
var theLayer = theLayers
; theLayer.visible = true;
myDocument.activeLayer = theLayer;
selectColorRange(0, 255, 255, 150);
myDocument.selection.clear();
myDocument.selection.deselect();
};
// resize document;
myDocument.resizeImage(theScale, theScale, undefined, ResampleMethod.BICUBIC);
// back to original dimensions;
myDocument.resizeCanvas(theWidth, theHeight);
// fill the Layers;
myDocument.selection.selectAll();
for (var n = 0; n < theLayers.length; n++) {
var theLayer = theLayers
; myDocument.activeLayer = theLayer;
myDocument.selection.fill(theColor, ColorBlendMode.BEHIND, 100, false);
};
myDocument.selection.deselect();
};
////////////////////////////////////
////// select color range //////
function selectColorRange (theR, theG, theB, fuzziness) {
// =======================================================
var idClrR = charIDToTypeID( "ClrR" );
var desc4 = new ActionDescriptor();
var idFzns = charIDToTypeID( "Fzns" );
desc4.putInteger( idFzns, fuzziness );
var idMnm = charIDToTypeID( "Mnm " );
var desc5 = new ActionDescriptor();
var idR = charIDToTypeID( "Rd " );
desc5.putDouble( idR, theR );
var idG = charIDToTypeID( "Grn " );
desc5.putDouble( idG, theG );
var idB = charIDToTypeID( "Bl " );
desc5.putDouble( idB, theB );
var idRGCl = charIDToTypeID( "RGBC" );
desc4.putObject( idMnm, idRGCl, desc5 );
var idMxm = charIDToTypeID( "Mxm " );
var desc6 = new ActionDescriptor();
var idR = charIDToTypeID( "Rd " );
desc6.putDouble( idR, theR );
var idG = charIDToTypeID( "Grn " );
desc6.putDouble( idG, theG );
var idB = charIDToTypeID( "Bl " );
desc6.putDouble( idB, theB );
var idRGCl = charIDToTypeID( "RGBC" );
desc4.putObject( idMxm, idRGCl, desc6 );
var idcolorModel = stringIDToTypeID( "colorModel" );
desc4.putInteger( idcolorModel, 0 );
executeAction( idClrR, desc4, DialogModes.NO );
};////// function collect all layers //////
function collectNormalLayers (theParent) {
if (!allLayers) {
var allLayers = new Array}
else {};
for (var m = theParent.layers.length - 1; m >= 0;m--) {
var theLayer = theParent.layers
; // apply the function to layersets;
if (theLayer.typename == "ArtLayer" && theLayer.kind == LayerKind.NORMAL) {
allLayers.push(theLayer)
}
else {
allLayers = allLayers.concat(collectNormalLayers(theLayer))
// this line includes the layer groups;
// allLayers.push(theLayer);
}
};
return allLayers
};
Edited
And I don’t care for unnecessary private messages.
Copy link to clipboard
Copied
Here is the deal: when i extract pcx images from def catalog, the program that extracts those pcx images automatically converts them into bmp!
And that is good, because after resizing the images, i can only return them into the def catalog as bmp - the program then automatically converts them to pcx again!
So the files that i resize are 8 bit bmp images. Now, before i resize the image, i have to remove the cyan background, and the shadow of the creature, because this is how it works - in order to resize, first one must remove shadow and cyan, then resize, and only then return cyan (in Photoshop), and add new shadow (in another program). This is not how i want, this is how the game program accepts the image - don't question this pattern of actions.
So, can someone show me here in pictures how to create a script that would resize 60 images at once according to the plan i wrote in the begining?
Copy link to clipboard
Copied
Sorry, I had misunderstood »but this way i have to convert about 60 images per one file« to mean the images would be layers in one psd-file.
If you have to remove the shadows that might necessitate manual corrections as the color range selection or paintbucket-results may not be good enough.
And that, of course, would mean you have to split the automation.
Anyway if you are certain the Paintbucket suffices for your needs this could probably pretty much be done with Actions and File > Automate > Batch – no proper Scripts necessary.
Just record it on one file (set foreground color, paintbucket-application, Image > Image Size, Image > Canvas Size, paintbucket-application), the saving and closing can be done from Batch.
The problem with the Paintbucket Tool being that it records a position, so if there are images where the pixel selected in the recording does contain the subject of the image this would foul up the thing.
Therefore I recommend converting the background layer to a regular layer, using Select > Color Range to create an inverted Layer Mask and after the scaling create a cyan layer and move that to the background.

Copy link to clipboard
Copied
"The problem with the Paintbucket Tool being that it records a position, so if there are images where the pixel selected in the recording does contain the subject of the image this would foul up the thing.
Therefore I recommend converting the background layer to a regular layer, using Select > Color Range to create an inverted Layer Mask and after the scaling create a cyan layer and move that to the background"
Yes, understandable, but i will not happen, because i will mark the picture with paint bucket tool far from the actual creature image.
The table you posted here - it's a tutorial on what you wrote about replacing layers - great, but not what i need.
Here is how my Photoshop CS2 table looks:

Now imagine you have the same - your task is to use the paintbucket tool on the picture, resize image, resize canvas, return cyan, save - nothing more.
I do these steps manually for each picture. So how must one do this for all the pictures here per single operation in a script?
This is what i need.
Copy link to clipboard
Copied
The one screenshot showed the Actions Panel.
Windows > Actions
The icons at the bottom are fairly self-explanatory – (edit: create a new action – second button from the right,) hit the record button (second from the left) and pertform the operations on your topmost image, then hit the stop button (leftmost) and close the image you have edited or revert it.
Then use
File > Automate > Batch (the other screenshot)
Under Source you can choose a Folder or the Opened Files.
Copy link to clipboard
Copied
Yes, it worked!
But i still have converted over 1500 imagess manually before i started to use the batch.. Well, at least i was listening to some new music while doing that, so the time did not go to nothing!
Thank you c.pfaffenbichler (you could have created a more easy user name)!
Copy link to clipboard
Copied
Now was that so hard. We now know you use three programs beside Photoshop in your process two of which work on your def file one that exports BMP files and one the imports BMP files. The exported BMP file contain animation cells of a character on a cyan background and has a character shadow of the character in the cyan background. You want to remove the shadow and resize the character by some unknown amount while retaining the images canvas size. Then you use a program on these resized character BMP files that generate new shadows in the cyan background. Then you use the BMP importer to convert the new shadow enhances BMP images into PCX images and replace the existing PCX images that are in the DEF file. Most likely the file names must be consistent throughout this process.
The hard part is removing the shadow without removing part of the character. If this shadow has some cyan cast and there is no cyan in the character it may be possible to automate the shadow removal using a color range selection. Example BMP files would be most helpful as would information about the resize you want to do. Are all files resized by the same percentage and is the percentage the same for all DEF files on does the percentage need to be calculated or need to be a setting. It is very hard to help when we do not know what you doing.
Ya I know your song
"Papa Don't Preach"
<<Copyrighted Lyrics Removed>>

Get ready! An upgraded Adobe Community experience is coming in January.
Learn more
 AdChoices