Doc_Pit
Inspiring
August 20, 2018
Answered

Another question about perspective

  • August 20, 2018
  • 2 replies
  • 3126 views

I’ve asked several questions about perspective.  Hope it’s OK if I ask another.

This little graphic representation (https://www.youtube.com/watch?v=lKbFQb8zDm8) illustrates that when we tilt our camera up, the horizon line goes lower; and when we tilt it down, the horizon line goes higher.  This is further explained as follows (from https://www.bhphotovideo.com/explora/photography/tips-and-solutions/perspective-distortion-photographic-composition ) If you are photographing a vertical structure (building, home, factory, statue, etc.) and you tilt the camera up to capture the top, you will see the structure decidedly narrow as it extends higher in the frame—this effect is called “keystoning.” Similarly, if the camera is angled right or left off the perpendicular from the building, you will get the same distortion on the horizontal axis.

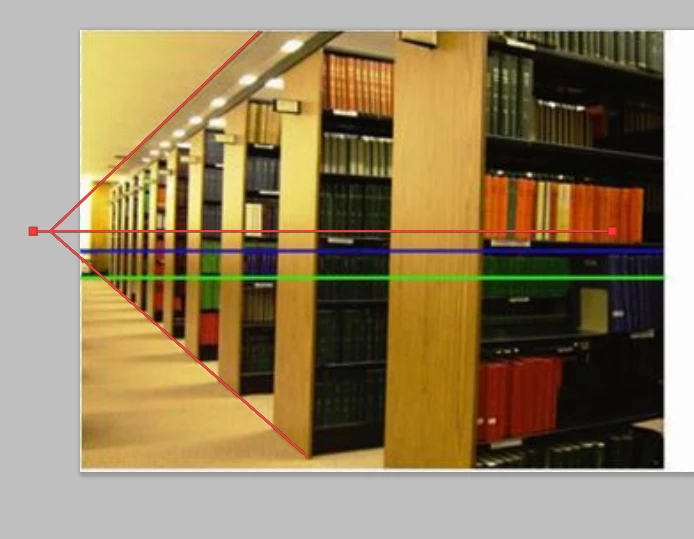
From Google Images, I grabbed an example of keystoning and drew center lines and horizon lines, as indicated below:

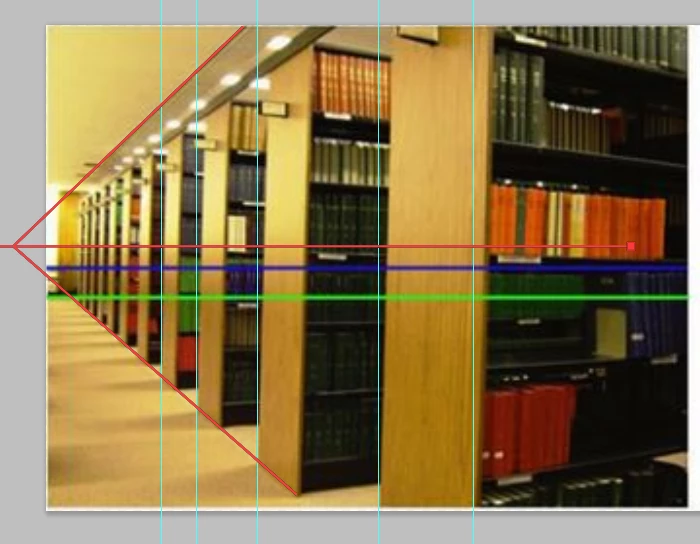
I’m at a loss to explain why the keystone example (camera tilted up) shows the horizon line above the center line. I expected it would drop lower. I see the same in this outdoor example:

The photo at R appears to be shot from a lower angle; however, the horizon appears to be slightly higher.

    This topic has been closed for replies.
    Correct answer Trevor.Dennis

    Doc, you are still not getting it.     An image's  centre line has no  relationship  to the horizon or any vanishing points, even if the camera was perfectly vertical.  What if the image has been cropped for instance?

    It looks like the library shelves on the right have been distorted using Photoshop FT > Perspective, so they are now useless as an aid.  The image on the left looks untouched however, and we can work out the horizon and vanishing point as shown by my red paths.

    This is not single point perspective, as evidenced  by the end of the shelves not being vertical.  If the camera had been pointed on a line exactly parallel to the end of the shelves, then the  ends would have been vertical, and the shelves horizontal.  That's a fact of single point perspective.

    It's  useful  to  practice drawing this sort of perspective, whether you plan to make a drawing from scratch, or add to an existing photograph.  This took me about ten minutes, for  instance.  Photoshop's FT > Perspective is very useful for this exercise because it doesn't just make the lines converge.  It also, and much more importantly elongates the near field end, and squashes the far end, which is how perspective works.   So to make the shelves I arranged eight identical rectangles and used Move > Align to space them  equally.  Then merged the layers and used FT > perspective.

    I did the same thing with the wood texture using Render Fibres.  Can you see how the texture scales down with distance?

    It's an interesting subject, and crucial for drawing and compositing.  So please keep  asking specific questions.    Go back to the old threads, and watch the linked videos (Students online, or something like that).

    2 replies

    Trevor.Dennis
    Community Expert
    Trevor.DennisCommunity ExpertCorrect answer
    Community Expert
    August 20, 2018

    Doc, you are still not getting it.     An image's  centre line has no  relationship  to the horizon or any vanishing points, even if the camera was perfectly vertical.  What if the image has been cropped for instance?

    It looks like the library shelves on the right have been distorted using Photoshop FT > Perspective, so they are now useless as an aid.  The image on the left looks untouched however, and we can work out the horizon and vanishing point as shown by my red paths.

    This is not single point perspective, as evidenced  by the end of the shelves not being vertical.  If the camera had been pointed on a line exactly parallel to the end of the shelves, then the  ends would have been vertical, and the shelves horizontal.  That's a fact of single point perspective.

    It's  useful  to  practice drawing this sort of perspective, whether you plan to make a drawing from scratch, or add to an existing photograph.  This took me about ten minutes, for  instance.  Photoshop's FT > Perspective is very useful for this exercise because it doesn't just make the lines converge.  It also, and much more importantly elongates the near field end, and squashes the far end, which is how perspective works.   So to make the shelves I arranged eight identical rectangles and used Move > Align to space them  equally.  Then merged the layers and used FT > perspective.

    I did the same thing with the wood texture using Render Fibres.  Can you see how the texture scales down with distance?

    It's an interesting subject, and crucial for drawing and compositing.  So please keep  asking specific questions.    Go back to the old threads, and watch the linked videos (Students online, or something like that).

    davescm
    Community Expert
    Community Expert
    August 20, 2018

    See examples below using Photoshop 3D which may help :

    1. Camera level at exactly half height of the cube. The camera is pointing parallel to the ground so the horizon is half way up image. There is no keystoning :

    2. The camera is still parallel with the ground but is moved up to a higher position. The horizon line does not change (as there is no tilt). The model (still on the ground) looks lower in the viewfinder :

    3. The camera is moved down closer to, but still parallel to, the ground. The horizon remains in the centre of the viewfinder (no tilt), but the model looks higher in the viewfinder :

    4. This time the camera back in its original position (as in first example) but tilted up by 10 degrees
    Now the horizon has moved down in the viewfinder and some keystoning is introduced in the model

    5. Keeping the 10 degree tilt I have moved the camera down toward the ground.The horizon remains in the same place as the last image (due to the 10 degree tilt being the same) but the new viewpoint shows the whole model cube and again the keystoning effect

    I hope this helps

    Dave

    Doc_Pit
    Doc_PitAuthor
    Inspiring
    August 21, 2018

    Super helpful.  Thanks.

    davescm
    Community Expert
    Community Expert
    August 20, 2018

    It looks like the viewpoint has changed in both examples. So it not just a camera tilt comparison.

    As I mentioned in the previous thread, I would recommend you create a simple cube in Photoshop 3D and with the groundplane grid switched on move the 3D camera around up and down and also tilt it. You will quickly see the effect of tilting, and different viewpoints, on the subject and horizon.

    Dave

    Doc_Pit
    Doc_PitAuthor
    Inspiring
    August 21, 2018

    Dave, I'm doing just that, and it's very helpful.  When I do that, I confirm what I see in that little graphical tutorial I referenced.  But I'm still interested in probing my understanding by analyzing photos and addressing situations like this one that I can't explain.