Exit
  • Global community
    • Language:
      • Deutsch
      • English
      • Español
      • Français
      • Português
  • 日本語コミュニティ
  • 한국 커뮤니티
0

Color replacement tool doesnt match swatch color

Community Beginner ,
May 18, 2018 May 18, 2018

Im trying to match the paint color of a wall that was half painted. I use the eyedropper on the color i want and begin painting with the color replacement tool. The color is not even close. Its way too bright. The same happens when i paint with a regular brush on a layer set to color blending mode.

Screen Shot 2018-05-18 at 1.53.21 PM.png

8.0K
Translate
Report
Community guidelines
Be kind and respectful, give credit to the original source of content, and search for duplicates before posting. Learn more
community guidelines
Adobe
Community Expert ,
May 18, 2018 May 18, 2018

Hi

A couple of things to look at :

1.If you are using multiple layers (including adjustment layers) your eyedropper tool may be selecting the wrong layer. Select the eyedropper tool and go to the options bar. Under Sample there is a drop down box to select from

If using multiple layers (think composite) with adjustment layers above it - Use "Current and below"

2. Colour replacement usually works in Colour mode. In that mode it paints the Hue and Saturation of the brush color but leaves the luminosity of the color it is replacing intact. The viewed colour can therefor look lighter or darker depending on that previous luminosity

Dave

Translate
Report
Community guidelines
Be kind and respectful, give credit to the original source of content, and search for duplicates before posting. Learn more
community guidelines
Community Beginner ,
May 19, 2018 May 19, 2018

I only have one layer. How then do i get it the match?

Translate
Report
Community guidelines
Be kind and respectful, give credit to the original source of content, and search for duplicates before posting. Learn more
community guidelines
Community Expert ,
May 20, 2018 May 20, 2018

What color do you want the wall to match? The top the middle or the bottom?

Dave

Translate
Report
Community guidelines
Be kind and respectful, give credit to the original source of content, and search for duplicates before posting. Learn more
community guidelines
Community Beginner ,
May 20, 2018 May 20, 2018

The top is what im trying to match. The middle is the color that showed up as i started painting. The forground swatch color matches perfectly. If i draw with a normal brush the color matches, but i loose the texture, of course. This is all on one layer. If i create a new layer and draw on that layer with a normal brush, the color matches, but as soon as i change the blending mode to Color to preserve the texture, the same thing happens as when i use the color replacement tool. It turns really bright.

Translate
Report
Community guidelines
Be kind and respectful, give credit to the original source of content, and search for duplicates before posting. Learn more
community guidelines
Community Expert ,
May 20, 2018 May 20, 2018

I use the eyedropper on the color

Have you tried a larger Sample Size when you select the Eyedropper tool? If you are using Point Size you might be picking up an outlier pixel—Dave has his set to 31 by 31.

Translate
Report
Community guidelines
Be kind and respectful, give credit to the original source of content, and search for duplicates before posting. Learn more
community guidelines
Community Beginner ,
May 20, 2018 May 20, 2018

Thanks, but that has nothing to do with it. The swatch color is correct. When i paint, its nowhere near the swatch color.

Screen Shot 2018-05-20 at 12.05.52 PM.pngScreen Shot 2018-05-20 at 12.05.57 PM.png

As you can see, the swatch color matches what i sampled. That's not the problem. When i paint, the luminosity or something is not matching. The color i painted, as you see is beige, not the olive brown that i sampled.

Translate
Report
Community guidelines
Be kind and respectful, give credit to the original source of content, and search for duplicates before posting. Learn more
community guidelines
Community Expert ,
May 20, 2018 May 20, 2018

Hi

You may need to try a different method. Do you have a higher resolution sample image? If so frequency separation may work.

I am out of the office at present but will have a go when I get back later. If you do have a higher resolution image please post it.

Dave

Translate
Report
Community guidelines
Be kind and respectful, give credit to the original source of content, and search for duplicates before posting. Learn more
community guidelines
Community Expert ,
May 20, 2018 May 20, 2018

Switch to Lab Color confirms that the only significant shift is in Luminosity.

Fig_.png1.png

The elephant in the room is the out of focus image and abbreviated tonal range. While the range is easy to adjust, creating a suitable mask for the wall area will not be. Once the mask is made the next step is an L channel Curve adjustment (vertical move of the Color Sampler point with the Info Panel as a guide).

Translate
Report
Community guidelines
Be kind and respectful, give credit to the original source of content, and search for duplicates before posting. Learn more
community guidelines
Community Expert ,
May 20, 2018 May 20, 2018
LATEST

Hi

This will work better on a higher resolution image but you can try the following.

1. Go to the Blue channel and use Duplicate Channel to make a copy of it

2. With just that channel selected use Image Adjustment Curves to bring up the contrast on that channel

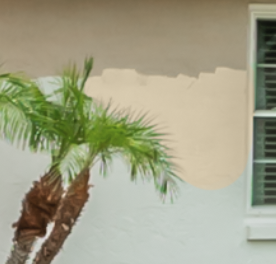
3. Make a selection round the window and fill that area of the channel with black and the same on the door frame

4. Deselect and switch back to the RGB channels

5. With the image layer selected use Ctrl+J twice two make two copies of your image layer
6.  Name the upper copy HF and the lower copy LF

7. Select the LF layer and use Filter Blur - how much depends on your image I used 2.7px on the low res copy - if you have a higher resolution then somewhere around 6 should work

8. Select the HF layer

9 Go to Image >Apply Image and set the dialogue as shown:

10 Set the blending mode of the HF layer to Linear Light

You will now have a greyscale layer with the detail (HF layer) and a color layer with the blurred color. The idea is to make changes to detail on the HF layer and to general shade and colour on the LF layer

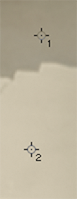
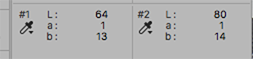
11 Select the LF layer and with a soft brush Alt click on the wanted colour. Don't worry too much about the edges - you will use the blue channel copy as a mask later

12 Switch to the HF layer and use the clone tool (set to sample current layer)  to clone out the join from your previous painting

13 Put the HF and LF layers in a group

14 Ctrl Click on the Blue copy channel to load it as a selection then in the layers panel click on add mask
If there is any fringing then Paint it out on the HF channel

Like I said, this will work much better on a higher resolution image but hopefully you get the idea

Dave

Translate
Report
Community guidelines
Be kind and respectful, give credit to the original source of content, and search for duplicates before posting. Learn more
community guidelines