 Adobe Community
- Home
- Photoshop ecosystem
- Discussions
- Could not use the gray point tool because...
- Could not use the gray point tool because...
Could not use the gray point tool because...
Copy link to clipboard
Copied
Hello, this question refers to Photoshop CC 2019 on a Windows 10 PC
When trying to set a black, gray and white point on a photo, I consistently get the error message: "Could not use the gray point tool because the settings in the file are invalid" What does that mean and how can I correct it?
Thank you.
Explore related tutorials & articles
Copy link to clipboard
Copied
Hi!
Can you tell us what color mode you're working in? Are you in something other than RGB?
Michelle
Copy link to clipboard
Copied
One more question--what tool are you using to set your black, white and gray point?
Michelle
Copy link to clipboard
Copied
Michelle, thanks for getting back to me.
I am working in the Adobe RGB colour space. The tools I was using were the Eyedropper tools in the Curves layer.
Copy link to clipboard
Copied
Could you please post a screenshot with the pertinent Panels (Layers, Channels, Properties, Options Bar, …) visible?
Copy link to clipboard
Copied

Copy link to clipboard
Copied
What are the image’s Color Mode and bit depth?
Copy link to clipboard
Copied
The problem seems to be that the blue channel inverts (the original 0 value is now higher than the original 255 value).
Copy link to clipboard
Copied
Thanks for posting the shot! In looking at the Curves panel, we can see that the curve for the Blue channel is way out of whack. Was it like this when you opened the image, or did using the Eyedropper tool create this?
One suggestion you can try in this Adjustment Layer is to Select the Blue drop down menu and move the end points back to their respective top right and bottom left corners.
Since this is an Adjustment Layer, I would suggest throwing away that layer and adding a new one. Make sure that you are in the RGB channel and try using the Gray Eyedropper tool again--and let us know what happens.
Michelle
Copy link to clipboard
Copied
Hi Michelle
I am having the same problem with every image I use. For some reason it seems that when I use the White eye dropper tool from the curves Layer, it throws everything out of whack. If I use the Gray eye dropper tool first, it will accept the gray point but if I use it after setting the White point then I receive the error message. No matter what order I use, the white eye dropper tool seems to be the problem.
Appreciate your help.
Thank you.
Copy link to clipboard
Copied
Please post meaningful screenshots including all pertinent Panels and dialog windows.
Copy link to clipboard
Copied
Are you inverting (or trying to invert) one or more Channels?
Copy link to clipboard
Copied
When answering the question (Post 14) asked by c.pfaffenbichlerplease remember that inverting a curve in the Curves panel is equivalent to inverting the Channel.
Copy link to clipboard
Copied
Hi Pat!
Can you post a screenshot of your image and workspace with the Curves panel open so we can take a look at what you see? It would help us be able to help you more effectively. It would also help if you could pinpoint the area on the image that you are clicking on with the White Eyedropper tool.
Looking forward to hearing from you!
Michelle
Copy link to clipboard
Copied
Hi Michelle and others
I have attached the examples as required. Image (shot at 16 Bit Adobe RGB) was converted to 8 Bit sRGB in Photoshop. No adjustments in Ps other than basic adjustments in Lightroom. 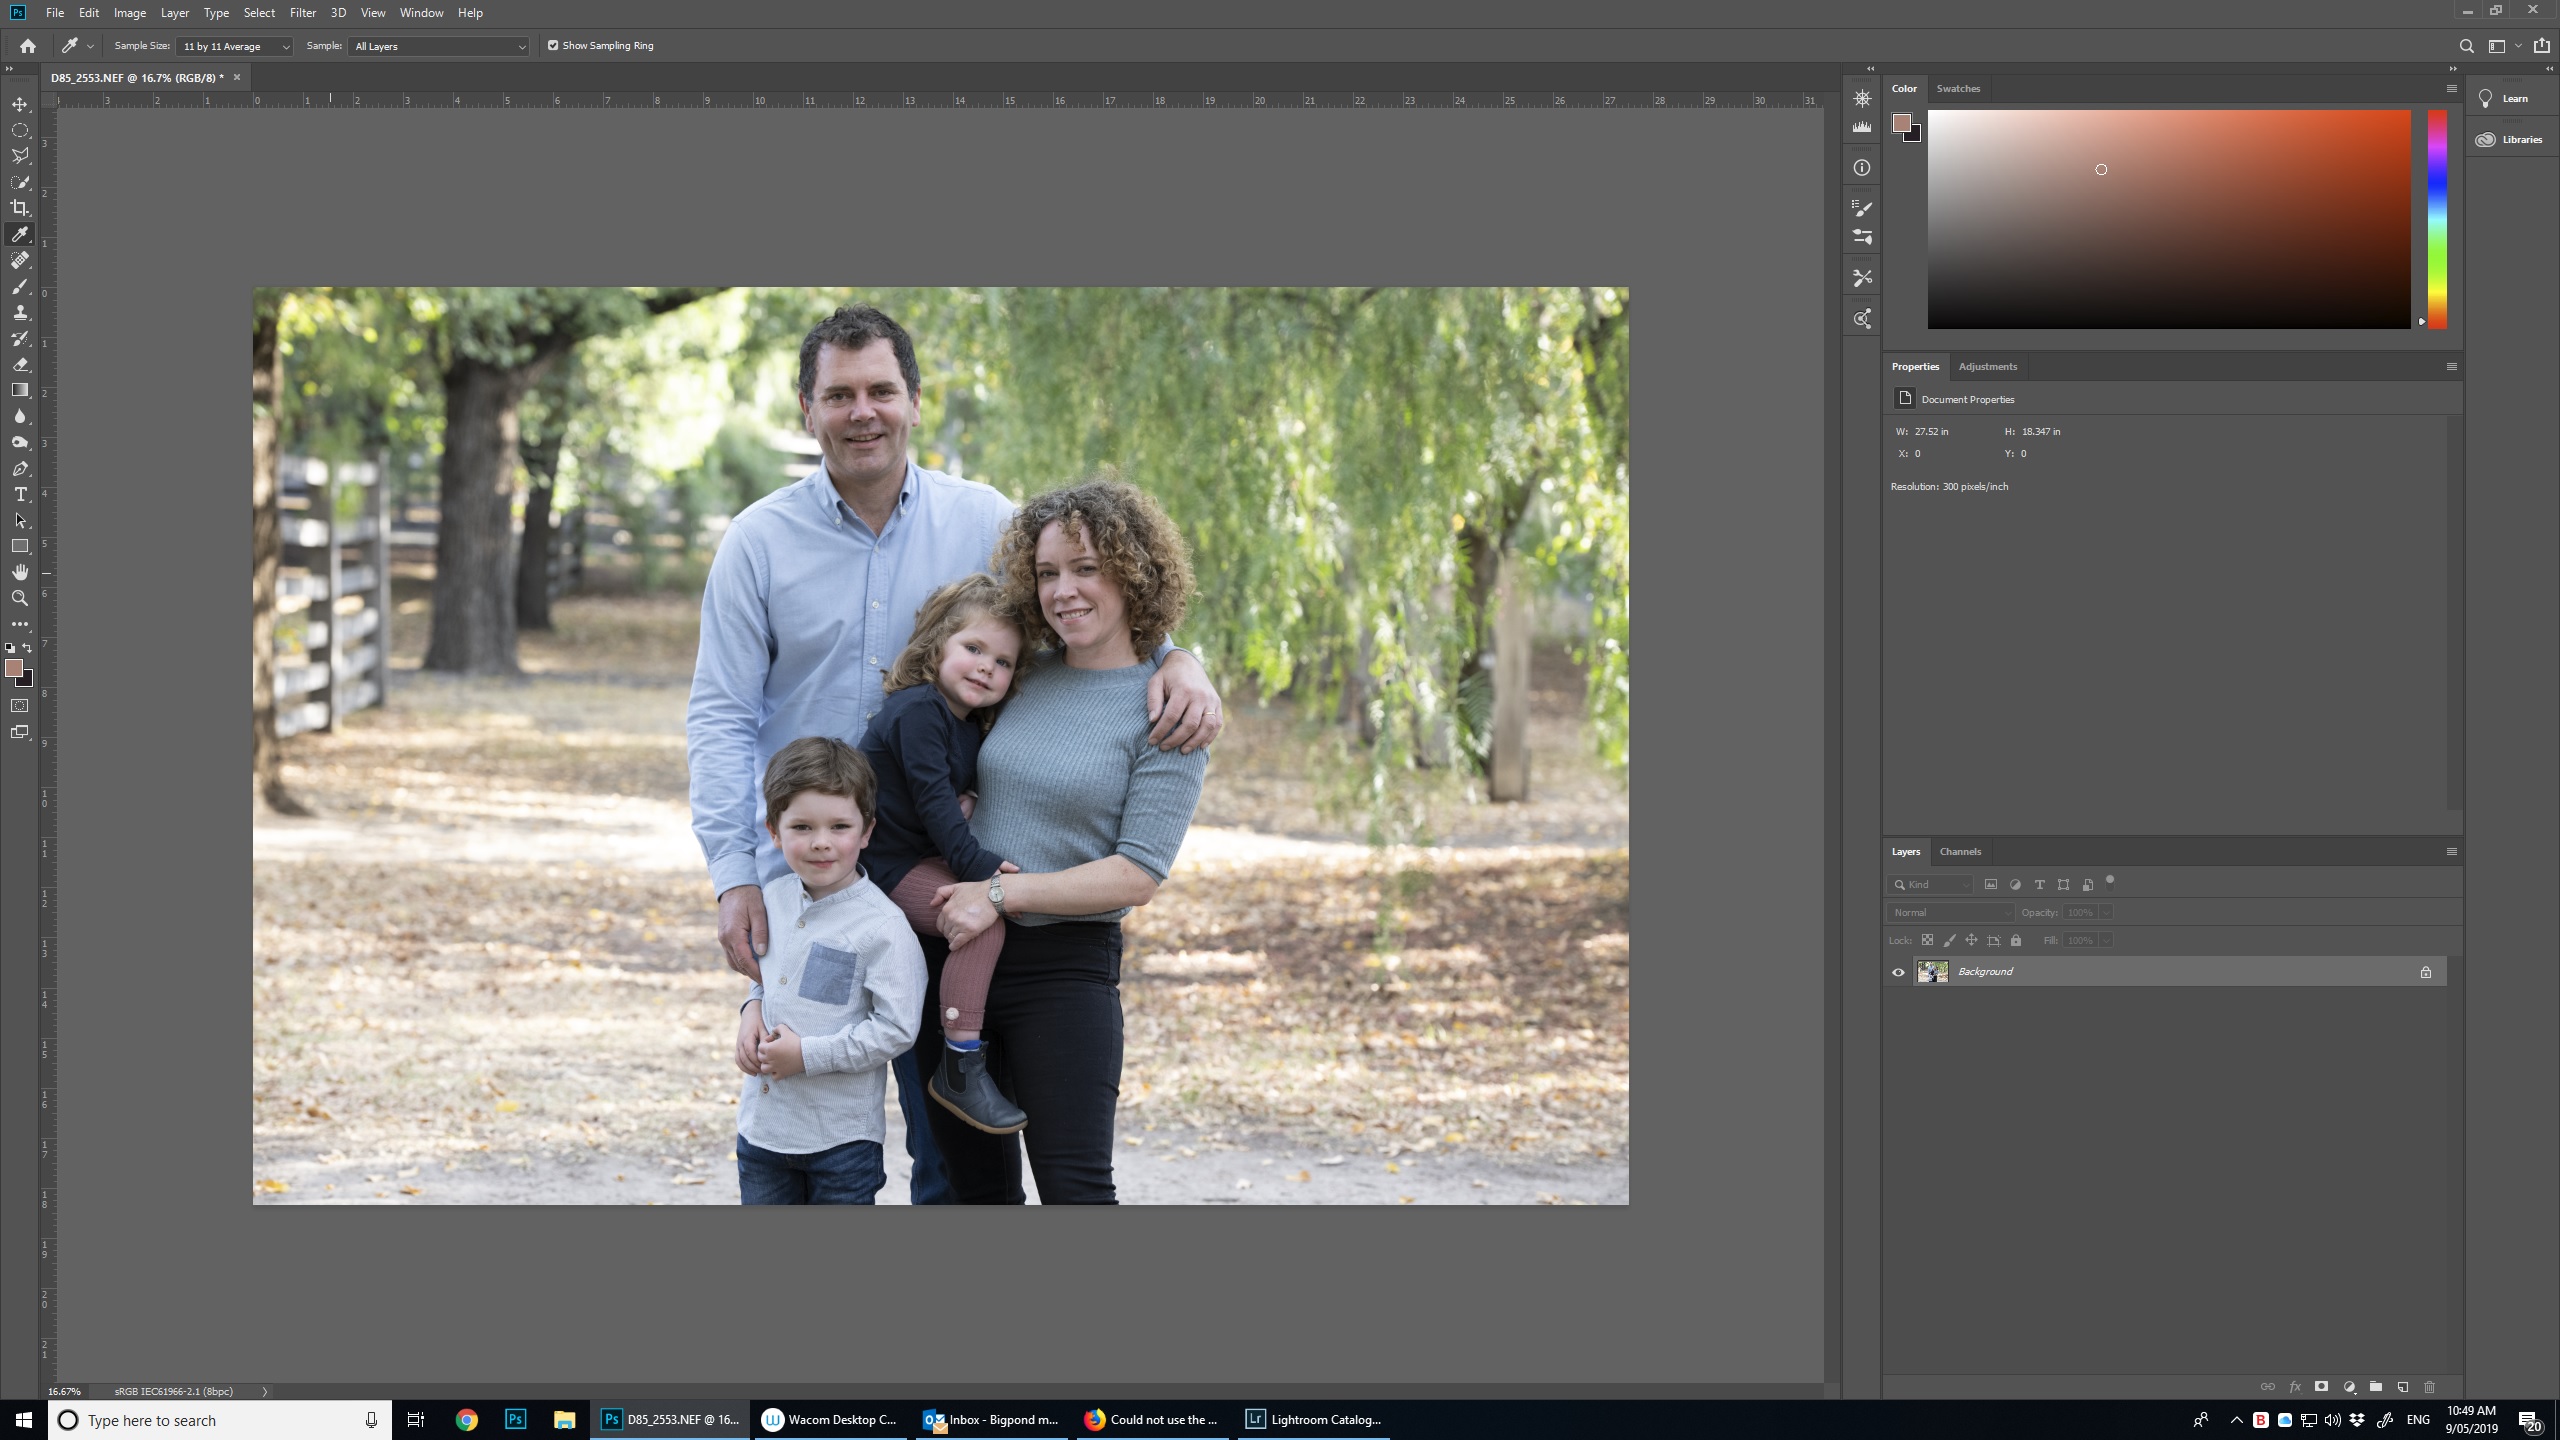
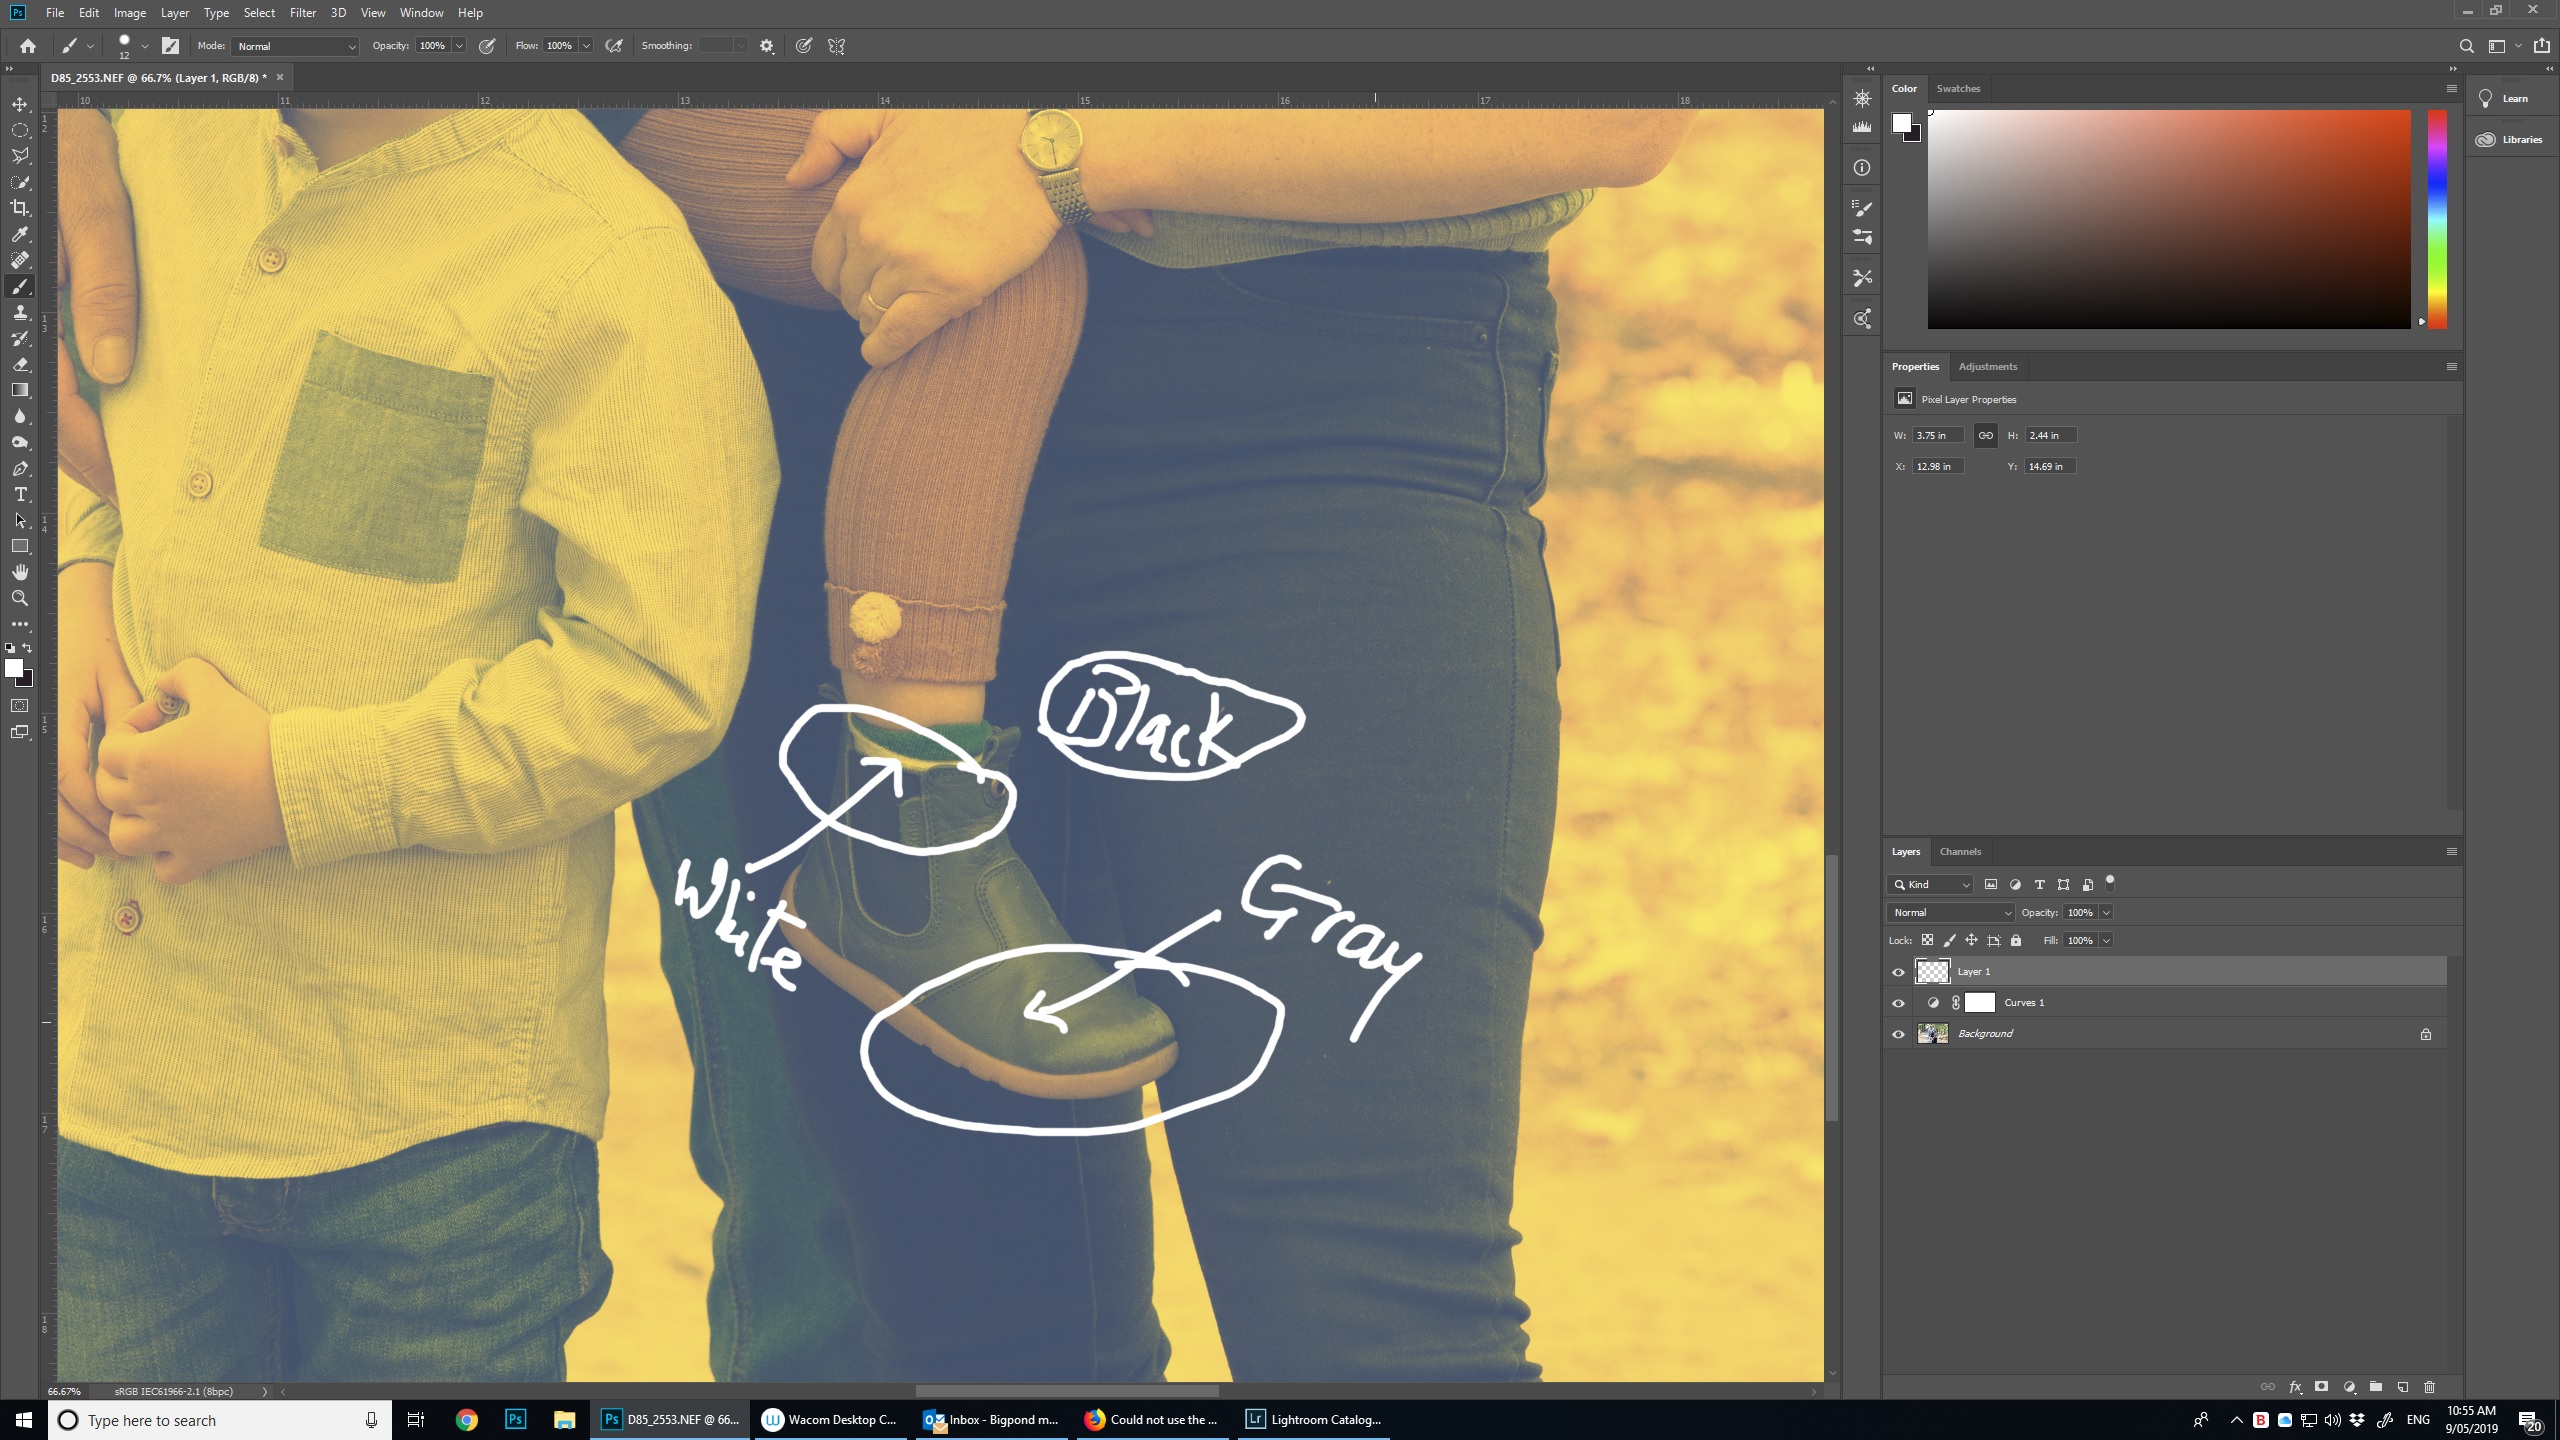
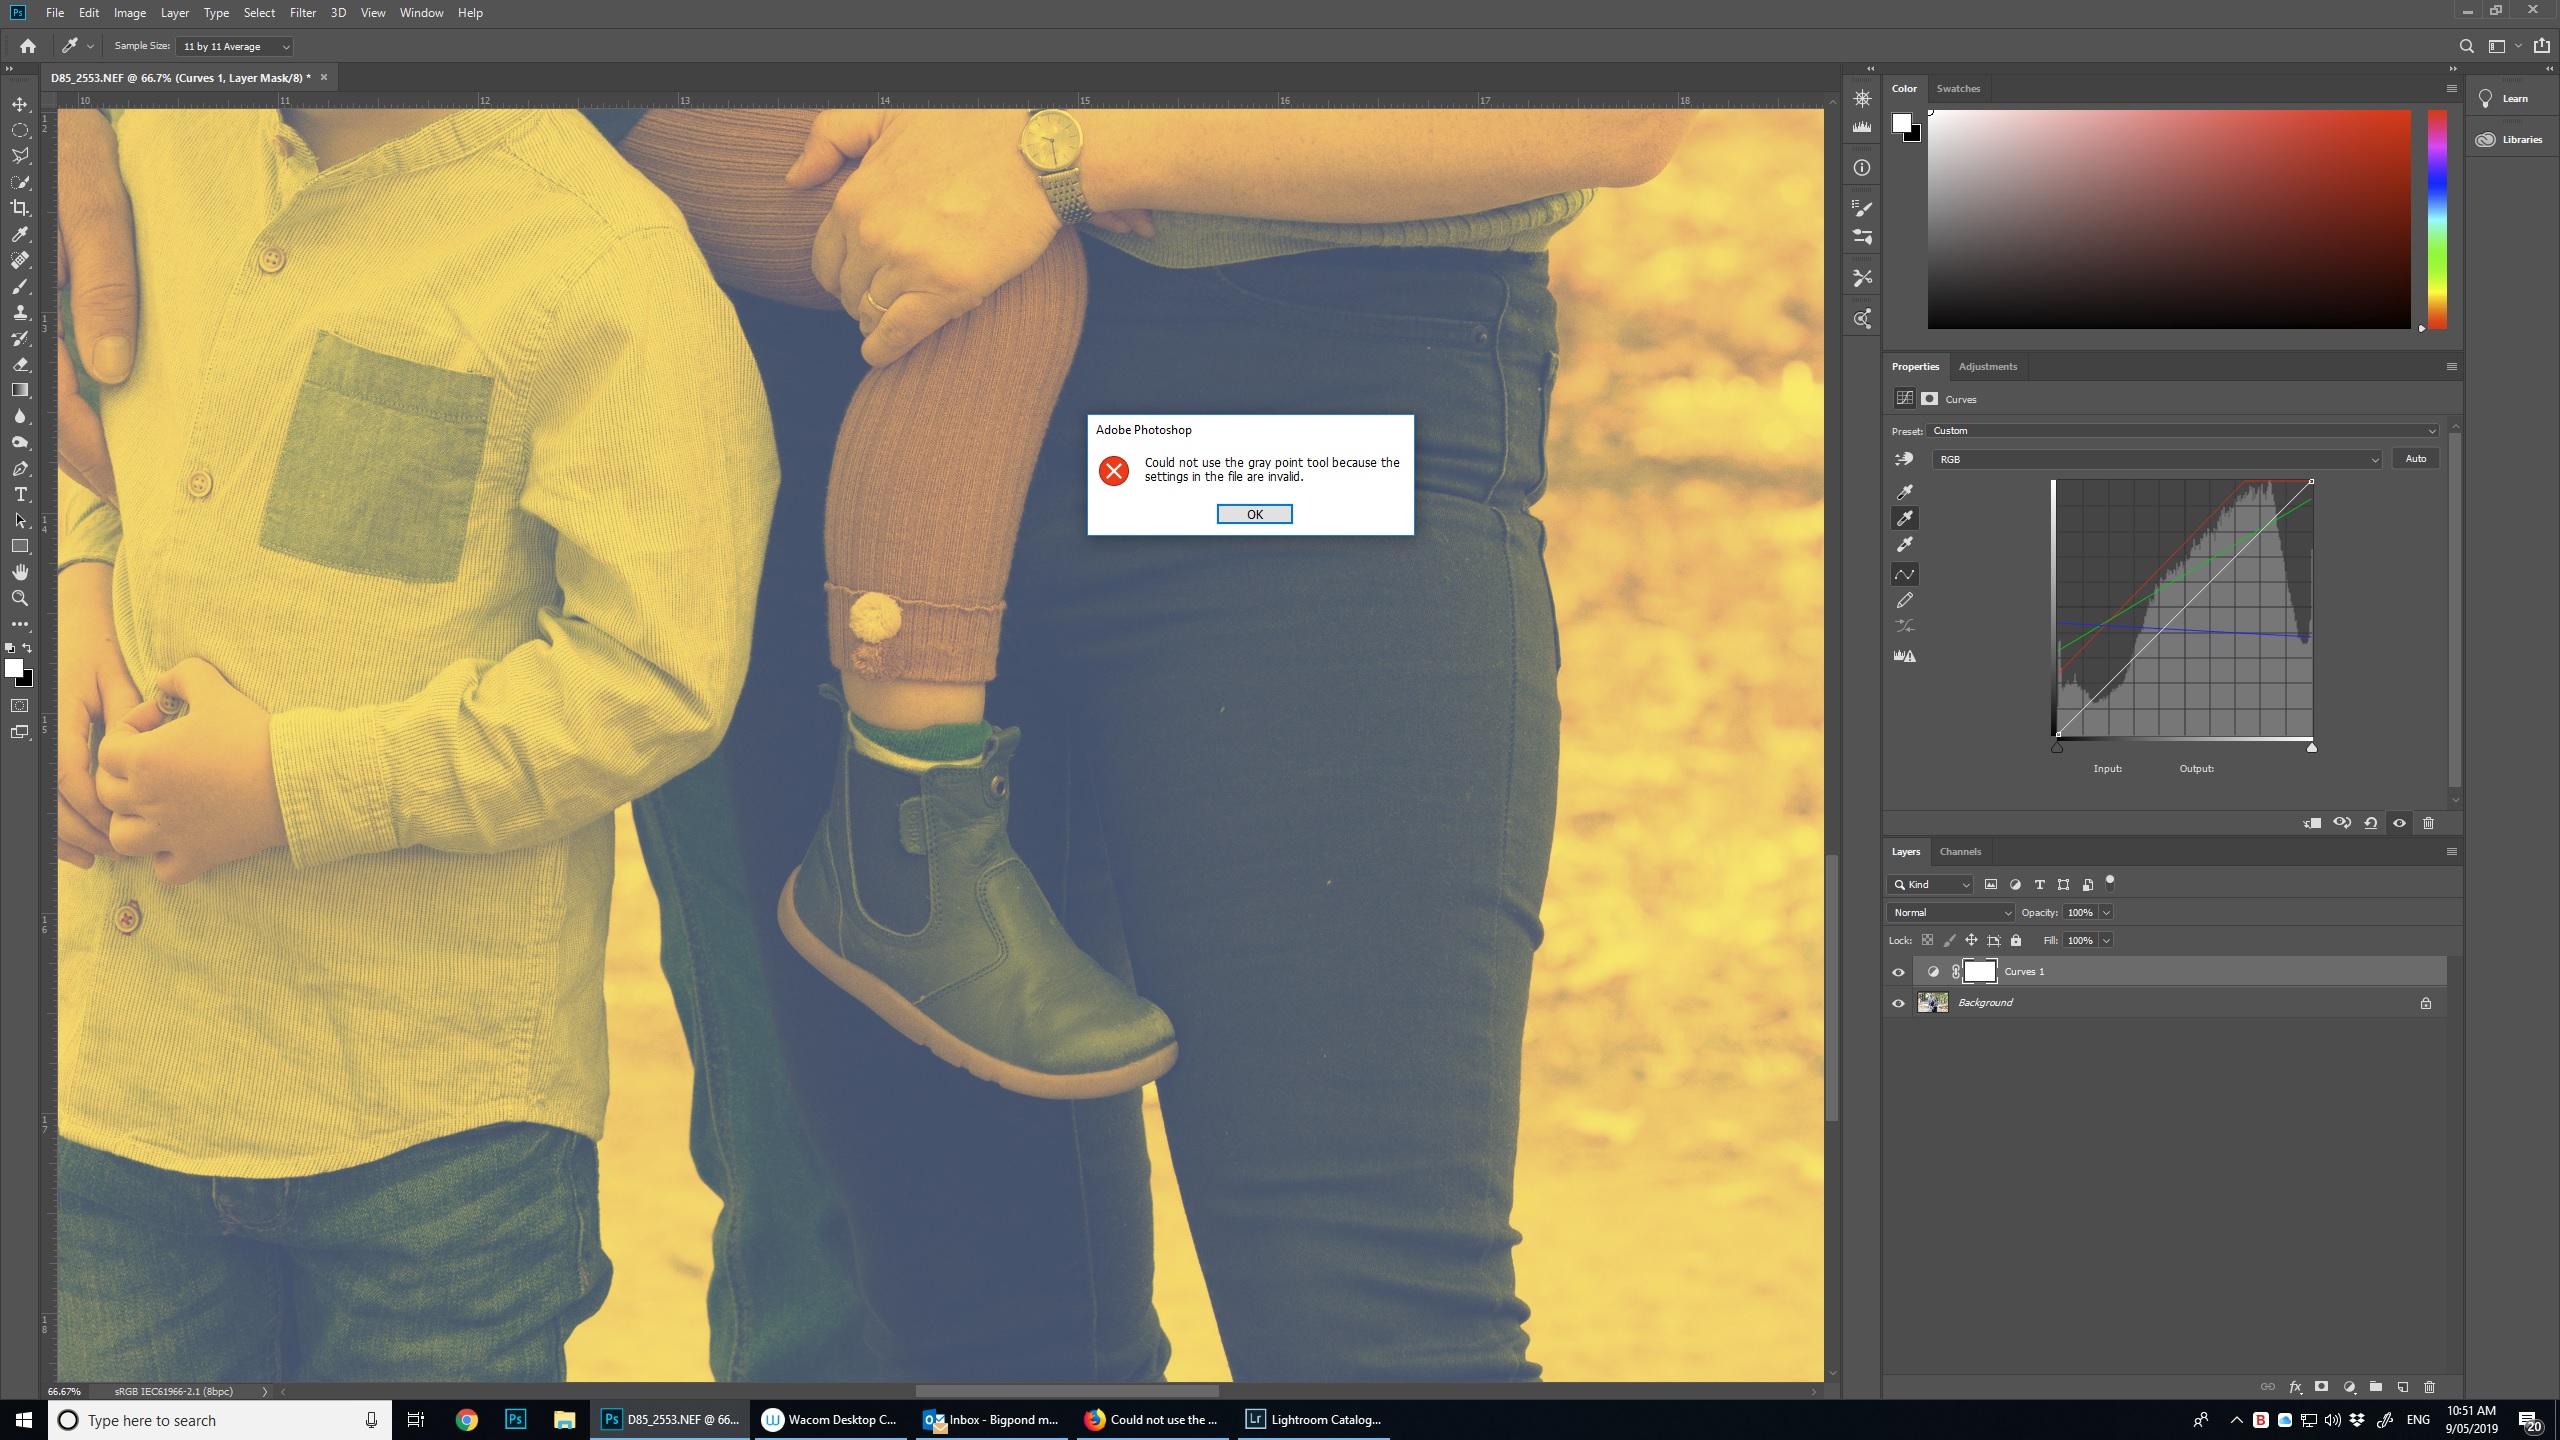
Hope this helps.
Thank you.
Copy link to clipboard
Copied
Hi Pat!
Thank you--this really helps.
This may be basic, but I wanted to mention a few things regarding the Eyedropper in the Adjustment tools. When you use the White point, you want to find the lightest part of the image. The area that you have selected is more around the 20-25% range and if you clicked there, then any part of the image lighter than that will be clipped to white.
When you have the Curves dialog open, if you place your cursor (do not select any of the eyedropper tools) in the image on the area you chose and then hold down the Opt or Alt key, you will notice that the value you're hovering over shows up as a little circle on the Curve right around a quarter of the way down from the top right. So if you clicked there to set the white point, everything from that point up would be pushed to white.
With your image open, in the Curves panel, select the white eyedropper and hold down Opt or Alt key -- and the image will turn black. This will show you only the areas that are the whitest part of the image--which in this case is the area just to the left of the man's arm. If you click in that area, you will set it to become the whitest values in the image.
Do the same for the darkest part and you will find that under her arm is the darkest part of the image.
The Gray point eyedropper is used to set the neutral value in the image. You want to find something in the image that is closest to a neutral value, which in this case is actually the watch on her arm. If you use that to set the Gray eyedropper, you will eliminate the color cast. The Gray eyedropper tool works best on images that don't need a big adjustment and have an easily identifiable neutral area. You might need to click once or twice to get the hang of it. If you don't like the result, hold down the Opt/Alt key and the Cancel button in the dialog box will turn to Reset and you can start over again.
I have attached a link just below to give you some information on how to effectively use the Eyedropper tools in your adjustments--I find this to be really helpful.
Adjust color and tone in Photoshop
I find that if you use the White eyedropper first, the Black eyedropper second, and then follow up with the Gray that I get better results.
The image on the left is before and the image on the right is after. The change is subtle, but you can see in the curves panel on the right how the curve was adjusted.

By the way, have you tried using Camera Raw?
Try this workflow out and see if it fixes the problem you were having with setting your Gray balance.
Let us know if that helps!
Michelle
Copy link to clipboard
Copied
Thanks Michelle, this is really good information.
I will give it a go as you suggest and report back.
Copy link to clipboard
Copied
Image (shot at 16 Bit Adobe RGB) was converted to 8 Bit sRGB in Photoshop
Why are you doing your color corrections in the smaller Color Space and in 8bit to boot?
Copy link to clipboard
Copied
Because I think I read in the notes that the image had to be in the sRGB color space. I only converted to 8bit (smaller file size) because this was simply a test for this discussion. Does it matter what color space it's in?
Copy link to clipboard
Copied
Does it matter what color space it's in?
If it didn't why would you change it?
If the image is for web only then sRGB naturally makes sense, but if there is a possibility of use in print it might be beneficial to edit in AdobeRGB or eciRGB v2 or another »larger« RGB Space and save the sRGB copies off of that file.
Copy link to clipboard
Copied
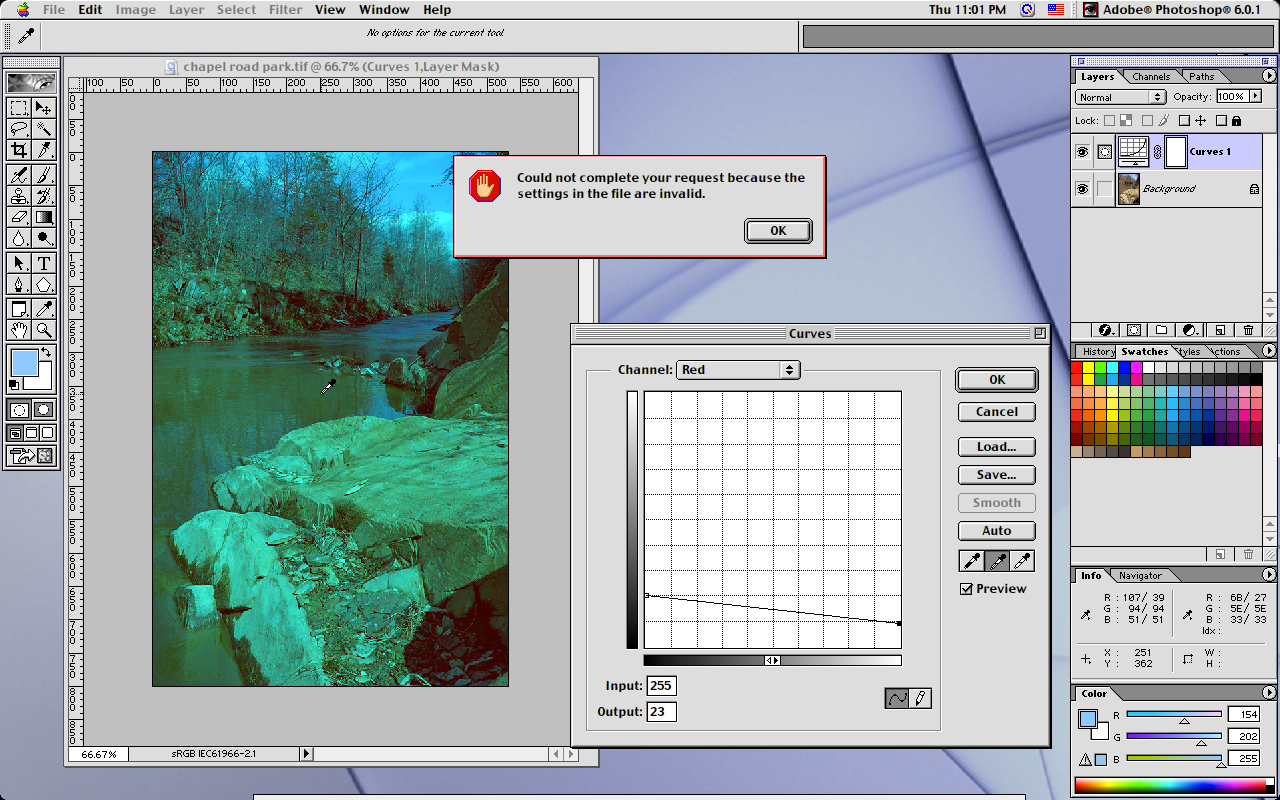
I can easily replicate this all the way back to photoshop 6.0.1 running on mac os 9.
Cannot so far replicate on photoshop versions older than photoshop 6.
Just draw a curve in any of the channels similar to below and then try to use the Graypoint eyedropper.
You should report this over here where adobe wants users to report potential bugs.
Photoshop Family Customer Community
Copy link to clipboard
Copied
Why is the Preset in the Curves panel set to Custom?
Please post the Color Picker popup menu when you double click on the middle eyedropper.
Copy link to clipboard
Copied
Although this post does not relate to solving the OP's problem, it was fun to toy with it.
c.pfaffenbichler nailed it. Something wrong with the Blue channel. Looking closely it seemed the color was transposed but not its tonal scale, suggesting a Lab correction for starters where tonal scale is discrete from color. The b channel was transposed, followed by curve adjustments in all three channels. Lab is not the mode for tweaks so the mode was returned to RGB for further curve correction.
It needs more work, perhaps with a mask take down the magenta cast in the area surrounding the car clear to the horizon line since it would also help the greens, too. But for this exercise only Curves were used. Trickier than it looks. Give it a try.

Copy link to clipboard
Copied
Appears to have been fixed in the just released photoshop 2021 (ps version 22.0)


