rajeshu64974241
Participating Frequently
December 21, 2015
Answered

Data-driven grahics

  • December 21, 2015
  • 2 replies
  • 5569 views

Hi friends,

I am in the process of creating multiple designs from a template. I want to automate the whole process as there are around 7000 designs I need to create from the main template. I checked the Creating data-driven graphics in Photoshop article but it creates without resizing (the variable here is text so the "Pixel Replacement" option is not there). And I dont want to open all the files for resizing them. Any workaround for this?

Thanks,

Rajesh

This topic has been closed for replies.
Correct answer Stephen Marsh

You would probably need to perform a “save as” to see that maximum compatibility message again as once it is “on” it is remembered by future saves. This can also be changed via Prefernces/File Handling/File Compatibility/Maximize….(Ask/Always/Never).

I have changed your text layers to use “centred” aligned text, not left and then aligned the text objects to the centre of the canvas. This is because the script that resizes to a preset pixel dimension will resize from the centre of the targeted layer. You will hopefully see what I mean when you compare the template that I will shortly upload to your original template.

At the moment, all of your artwork could potentially benefit from being produced via text/vectors, so I would also recommend creating the yellow bar out of a vector shape layer using the vector rectangle tool (U):

I am 100% certain that the advantages of working in 8 bit/channel for this project would far outweigh any perceived “losses”. In other words, I personally can’t see any benefit to using 16 bpc data for such a variable data project that is basically text/vector based. The benefit would be that the 8 bpc file held in RAM would be half the size of the 16 bpc version. This may or may not make a difference when batch producing your 7000 exports to PSD. My opinion is that you may potentially be better served at final output by having a document set to 600 ppi + 8 bpc rather than 300 ppi + 16 bpc (however this would create an 88Mb file, as opposed to the 44Mb or 22Mb versions being discussed). Anyway, my action and script has been created around the file’s current pixel dimensions based on the 300 ppi.

I will shortly upload a script and action set to my DropBox, as well as a revised PSD template etc.


I have uploaded a .zip archive:

https://www.dropbox.com/s/bejqr2p2g3rdrk2/ps-variable-demo.zip

Contents:

* dataset.csv = simple test data source file

* demo-test.psd = Photoshop file for test export

* Resize layer to 2277px.jsx = Script to resize targeted layer content to 2277px wide

* Variable-Resize-Demo.atn = Action file that references the script with other steps

There are also two folders:

* Export to Datasets = Original export of data sets x2 .psd files

* Action Output = Batch action output resize results x2 .psd files

STEP 1 - INSTALLATION:

1) Install the script in the Photoshop scripts folder (CS6 used as example):

Mac - /Applications/Adobe Photoshop CS6/Presets/Scripts

Win - C:\Program Files\Adobe\Adobe Photoshop CS6\Presets\Scripts

(Exit and restart Photoshop)

Double check that you can see the “Resize layer to 2277px.jsx” script when you go to File/Scripts/

2) Install the action in Photoshop:

Window/Actions/Load Actions… (from the upper right options menu in the action window)

The “Variable-Resize-Demo.atn” file can be loaded from any location, unlike scripts they do not need to be in a specific folder

STEP 2 - EDIT THE ACTION:

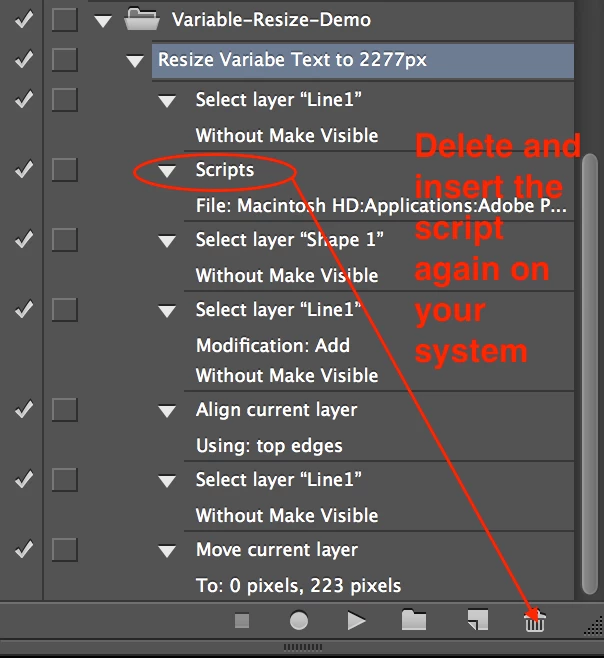
1) As the action has the install location of the script on my system, you will need to delete the action step “Scripts” and insert the action into the script using your scripts installed location.

After dragging the ”scripts” action step to the trash icon in the actions window, use the actions window’s options menu to “insert menu item”, then select the file menu/scripts/Resize layer to 2277px

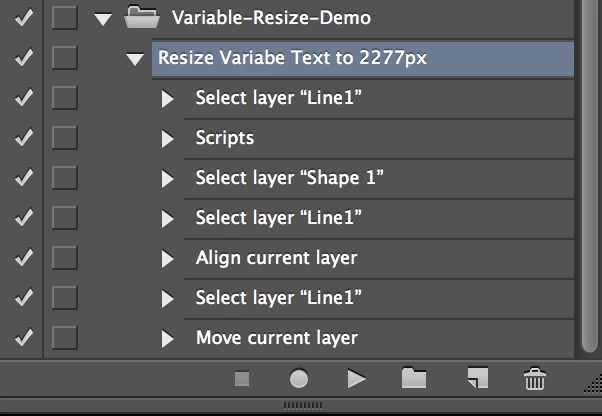
Ensure that the script steps appear in the same order as the image in my previous post.

STEP 3 - TEST THE VARIABLES:

Open the file “demo-test.psd” and go to image/variables/data sets and make sure that it is still linked to the demo “dataset.csv” file and that you can cycle through the two data sets using the data set navigation arrows.

IMPORTANT: Note that I made the text font size smaller in the “Line1” layer, this is critical as the longest variable character line should be smaller in width than the yellow bar “Shape 1”, so that the action can resize the text to the correct width. Also note that the variable text layer is set using “centre” alignment and is centred on the canvas.

STEP 4 - EXPORT DATA SETS:

1) Use File/Export/Data Sets as Files… to export out the data sets to PSD files.

STEP 5 - BATCH ACTION TEST ON THE EXPORTED DATA SET FILES:

1) Setup a File/Automate/Batch similar to the image in my previous post.

If everything is setup correctly, then you should find that the results of the data set export have been resized to match the width of the yellow graphic.

You will need to edit or create separate actions to handle different variable text layers, this sample only targets the specific text layer “Line1”.

Good luck and please post back for advice if you get stuck, you have a lot to learn for a new user of Photoshop, variables and automation via actions/scripts is a bit more advanced than many would first attempt!

2 replies

Stephen Marsh
Community Expert
Community Expert
December 21, 2015

It is as yet unknown if you will need a script or not, actions may or may not suffice. At this point I have more questions than answers.

So to clarify…

* You will have a .CSV file containing around 7000 rows, with each row being text.

* Your Photoshop template will have a layer set to text replacement. Your template file will contain placeholder variable text, for example the text may be 72pt sized.

* Will the resulting text always be too large or too small or a mix of both?

* How will you need the text to be resized?

* You mention the pixel replacement option and that this is not an option. Do you require it to be?

Can you post screen captures to the forum of your file and layer setup?

Can you post a link to a file sharing site such as DropBox with a small sample data set (say 5 records) and your template?

rajeshu64974241
Participating Frequently
December 22, 2015

@Stephen_A_Marsh please check my response below:

* You will have a .CSV file containing around 7000 rows, with each row being text. yes

* Your Photoshop template will have a layer set to text replacement. Your template file will contain placeholder variable text, for example the text may be 72pt sized.yes

* Will the resulting text always be too large or too small or a mix of both? it will be mix of large/small

* How will you need the text to be resized? I want it be aligned in the same as template. So if its 8 alphabets I want it to be resized as the original 5 alphabet text. If its 12 alphabets I want it to resize to cover the same as original 5 alphabet placeholder.

* You mention the pixel replacement option and that this is not an option. Do you require it to be? I can use it but since the texts are of different aplhabets so I think it will not be possible

Can you post screen captures to the forum of your file and layer setup? sure will do, once I reach home.

Can you post a link to a file sharing site such as DropBox with a small sample data set (say 5 records) and your template?sure will do, once I reach home.

Stephen Marsh
Community Expert
Community Expert
December 22, 2015

Would it be possible to do this in InDesign or Illustrator, or is Photoshop the only tool you could use?

I know of one option for Illustrator that may help with sizing the text:

Prepression: Illustrator – Introducing the VariableImporter Script

Adobe Illustrator Variable Data: dealing with overset text. | Vasily Hall | LinkedIn

Illustrator Variable Data Exploratory Techniques: Using Actions to Style Overset Text | Vasily Hall | LinkedIn

Perhaps JJMack could describe his script ChangeTextSize.jsx in more detail and how it could be used in this project?

No matter how you look at it, I would not throw 7000 records at InDesign, Illustrator or Photoshop’s variable data engines in one go! You may need to break these down into sets of 1000 or less.

You may also be better served by looking into robust third party commercial variable data software (that will be rather expensive).

JJMack
Community Expert
Community Expert
December 21, 2015

If you image vary in size you would I believe you would first need to create a patch process to preprocess images for the layers they will be replacing. They most likely need to be the correct aspect ratio and size for the layers. The resized files need to be save into the correct location the ones in the CSV file.

Data driver Graphics has good text Text layers can had different fonts and text size.

If your only doing image placement you may be able to use a script that will populate the templates and resize the image to fill the locations the image will be positioned to. The script also had to know the order the area will be populated  and process the image in the correct order.  A control file could be used the list the images in the order the need to be populated in.

My  Photo Collage Toolkit just uses  the file system sort order for sequencing.  I prefix the file name with a sequence number using rename file.  For templates where the images are populated in a known order.   My scripts can not replace existing template text layers.  The only text support offered is stamping the image with their file names.  However image can be any size they will be sized to fill the area the will occupy and any excess will be masked off.  Image locations can be any shape.  However image will be place in square to the canvas no rotation will be performed.

However Populated image are layers and cak be tweaked via transform rotate.

Photo Collage Toolkit

Photoshop scripting is powerful and I believe this package demonstrates this A video showing a 5 image collage PSD template  being populates with images:

The package includes four simple rules to follow when making Photo Collage Template PSD files so they will be compatible with my Photoshop scripts.

  1. Size the photo collage templates for the print size you want - width, height and print DPI resolution.
  2. Photo collage templates must have a Photoshop background layer. The contents of this layer can be anything.
  3. Photo collage templates must have alpha channels named "Image 1", "Image 2", ... "Image n".
  4. Photo collage templates layers above the background layers must provide transparent areas to let the images that will be placed below them show through.

There are twelve scripts in this package they provide the following functions:

  1. TestCollageTemplate.jsx - Used to test a Photo Collage Template while you are making it with Photoshop.
  2. CollageTemplateBuilder.jsx - Can build Templates compatible with this toolkit's scripts.
  3. LayerToAlphaChan.jsx - Used to convert a Prototype Image Layer stack into a template document.
  4. InteractivePopulateCollage.jsx - Used to interactively populate Any Photo Collage template. Offers most user control inserting pictures and text.
  5. ReplaceCollageImage.jsx - use to replace a populated collage image Smart Object layer with an other image correctly resized and positioned.
  6. ChangeTextSize.jsx - This script can be used to change Image stamps text size when the size used by the populating did not work well.
  7. PopulateCollageTemplate.jsx - Used to Automatically populate a Photo Collage template and leave the populated copy open in Photoshop.
  8. BatchOneImageCollage.jsx - Used to Automatically Batch Populate Collage templates that only have one image inserted. The Collage or Image may be stamped with text.
  9. BatchMultiImageCollage.jsx - Used to Automatically Batch Populate Any Photo Collage template with images in a source image folder. Easier to use than the interactive script. Saved collages can be tweaked.
  10. BatchPicturePackage.jsx - Used to Automatically Batch Populate Any Photo Collage template with an image in a source image folder
  11. PasteImageRoll.jsx - Paste Images into a document to be print on roll paper.
  12. PCTpreferences.jsx - Edit This File to Customize Collage Populating scripts default setting and add your own Layer styles.

Documentation and Examples

JJMack
rajeshu64974241
Participating Frequently
December 22, 2015

JJMackThanks for the tuts... its alot of stuff will go through them and will hit back... thanks again.