 Adobe Community
- Home
- Photoshop ecosystem
- Discussions
- Re: Frequency separation doesn't work/ apply image...
- Re: Frequency separation doesn't work/ apply image...

Copy link to clipboard
Copied
Hi,
I have worked on frequency separation in photoshop many times and it always worked as it should but for some reason I can't get it work anymore.
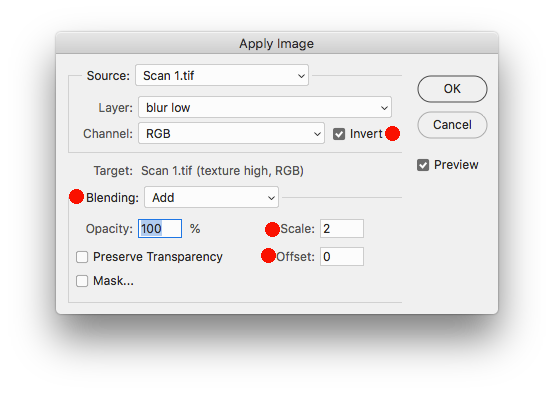
So I made "gaussian blur" and "texture" layers. The problem starts with Apply image - I do everything as it should be done (choose "gaussian blur" layer, bending "Subtract", Scale 2, offset 128) but the image turns into a black color instead of turning into gray and of course accordingly setting a blending mode to "Linear light" doesn't give the needed effect at the end as well.
Can anyone explain to me why is this happening and what is it that I have started to do in a wrong way?
I am attaching 2 pictures - the black one is what I get, and the grey one is what I was supposed to get.
I have Adobe creative for photographers and I am using Photoshop CC.
.png)
.png)


 1 Correct answer

Since your using a 16 bits/channel image in Apply Image you want to set the Blending to Add instead of Subtract, Scale 2 and Offset 0 and Invert.
The settings your using in Apply Image are for an 8 bits/channel image.
Explore related tutorials & articles
 14
Replies
14
14
Replies
14
Copy link to clipboard
Copied
Since your using a 16 bits/channel image in Apply Image you want to set the Blending to Add instead of Subtract, Scale 2 and Offset 0 and Invert.
The settings your using in Apply Image are for an 8 bits/channel image.

Copy link to clipboard
Copied
Oh, thank you so much!  I tried both things now - 8bits option and 16bits option and both of them work in a way you described. I recall now that I heard someone telling me a long time ago that it works only with 8bit photos. But the reason why I forgot about it is because for a long time it did work also with 16 bits file - that's how I did it so far with most of the pictures. And then suddenly it changed. And that seems strange actually...
I appreciate your help.

Copy link to clipboard
Copied
Let me raise the question to 32 bpc. Add and subtract are not available in Apply Image for 32 bpc.
Also why is there the difference for 8 and 16 bpc. Is this a bug or designed that way? I've seen no documentation related to Apply Image state this until I found this thread.
RONC

Copy link to clipboard
Copied
Also why is there the difference for 8 and 16 bpc. Is this a bug or designed that way? I've seen no documentation related to Apply Image state this until I found this thread.
You could use “method A” with subtract/100%/scale 2/offset 128 or you could instead use “Method B” with add/invert/scale 2/offset 0 for the apply image step.
When performed correctly, the result of the frequency separation should be visually identical to the original. So why have two methods?
For 8 bpc mode images, there is no midpoint for the calculations. For Photoshop's “16 bpc mode” (15 bpc + 1 bit) there is a true midpoint for calculations.
If one performs both method A and method B on an 8 bpc image, neither method will produce a mathematically identical image to the original, but they should both be visually identical. There will be greater mathematical error in one method over the other.
If one performs both method A and method B on a 16 bpc image, then only one method will result in a mathematically identical image to the original, a lossless conversion.
It has been argued that if the whole intent of frequency separation is to perform an edit that makes the image different to the original, then it should not matter if one method is “more precise” than the other as they are both visually identical. This is true as far as it goes for say retouching, however if you are performing the frequency separation multiple times to the same image and then recombining and then performing further rounds of frequency separation then the mathematical errors can add up and lead to visible artefacts which are not generated using a lossless conversion.
Copy link to clipboard
Copied
Stephen.
Thanks a lot for the explanation. I hadn't even worried about 8 -16 bpc midpoint difference as I and completely 32 bpc internal to code but I do have to worry if going back to 8 bpc. Will see how I can use stacking to emulate Apply Image also in 32 bpc.
Very helpful as I worry about doing things right not just viewably similar.
Edit***************
Found this after I posted: Photoshop CC 2019: Apply Image, Soft Light, and the 6-years old "50% Gray in 16-bit mode" bug (+ wor...
This says that Adobe doesn't have a handle on Apply Image. There is a midpoint error in the latest version 20.3.
Edit***************
Regards,
RONC
Copy link to clipboard
Copied
Let me raise the question to 32 bpc. Add and subtract are not available in Apply Image for 32 bpc.
Depending on what you wish to do, a complex layer stack may be able to achieve a similar result, as linear dodge (add) and subtract blend mode are available for layer blends.
Copy link to clipboard
Copied
Try my action here:
Copy link to clipboard
Copied
Hi Stephen! Thank you for sharing the file. But I am not sure what exactly should I do with it. If you could describe that it would be helpful.
Copy link to clipboard
Copied
Hi Stephen! Thank you for sharing the file. But I am not sure what exactly should I do with it. If you could describe that it would be helpful.
Hi DiiDii – The file is a .zip archive file, containing a Photoshop action to create a “frequency separation”. Photoshop actions are a series of pre-recorded steps that can help automate tasks. This particular action has both 8 bpc and 16 bpc versions:
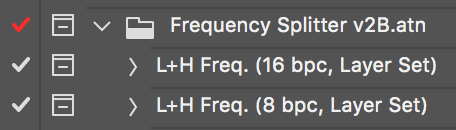
You can load it into Photoshop by double clicking the .atn file, or by using the Window menu > Actions, then using the actions panel menu to load the action.
More on actions here:
Actions and the Actions panel in Photoshop
Copy link to clipboard
Copied
I have just uploaded a new version of the action:
Dropbox - Frequency Splitter v3 Conditional.atn.zip
This version includes a conditional action step, so that you don’t have to think about matching the action to the document bit depth. Simply play the “Conditional Run” action and the appropriate action will be automatically played:

In each of the L+H Freq. actions, I have included two steps at the end to remove the layer set folder if you prefer to simply have the layers above the original image with no layer set. Simply “tick/check” the disabled playback icons to enable these two optional steps:

Apart from these minor changes, the actual frequency separation steps remain unchanged from the previous version.
Copy link to clipboard
Copied
Thank you, Stephen, for your help. I will try out your files.

Copy link to clipboard
Copied
Can someone help me too?! I literally will do everything that needs to be done prior to "Apply Image" and that link won't even highlight. So, I have duplicated the layers, made the blur and texture tabs, blurred it, then highlight the texture tab to "apply image" and the "apply Image" tab is what's the problem. I can't even press it to make it do the Frequency Separation layer.
Copy link to clipboard
Copied
Hi taylorb14514487 my help is limited to the action provided earlier in the topic thread andy any feedback or questions around it’s use or results:
Re: Frequency separation doesn't work/ apply image & subtruct
Hope this helps. This topic has come up too many times which I why I shared my personal actions to do this. Each time the topic has come up, there has been no evidence of this being a Photoshop error and it has always been user error.
Good luck!

Copy link to clipboard
Copied
mine didnt work on both methods..
how can i fix this?

 AdChoices